
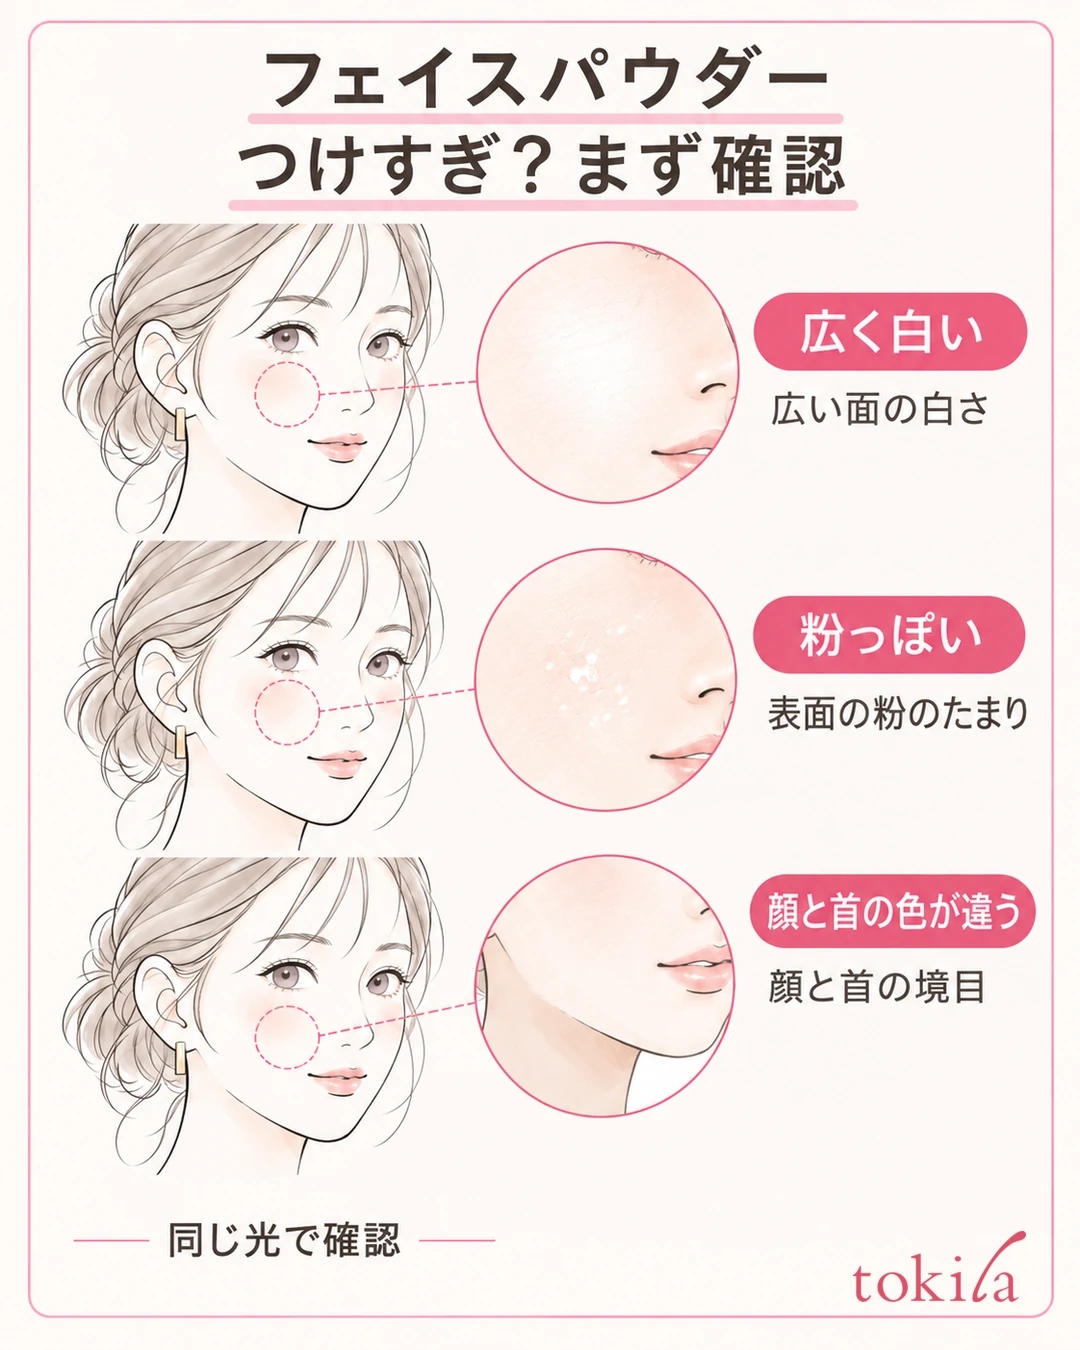
You put on face powder, and now your face looks white or the powdery look on your cheeks stands out. Before you layer on more foundation or powder, check whether there is simply too much powder or whether your base color doesn't match. Adjusting the amount of powder on your tool first, applying a thin layer once, and then adding more only where needed makes it easier to control the finish.
This article explains how to prepare so you don't over-apply finishing face powder, and how to tidy up afterward. Because it is used differently from powder foundation, follow the instructions for the product you own.
1. Tell apart whether it looks white or the surface looks powdery
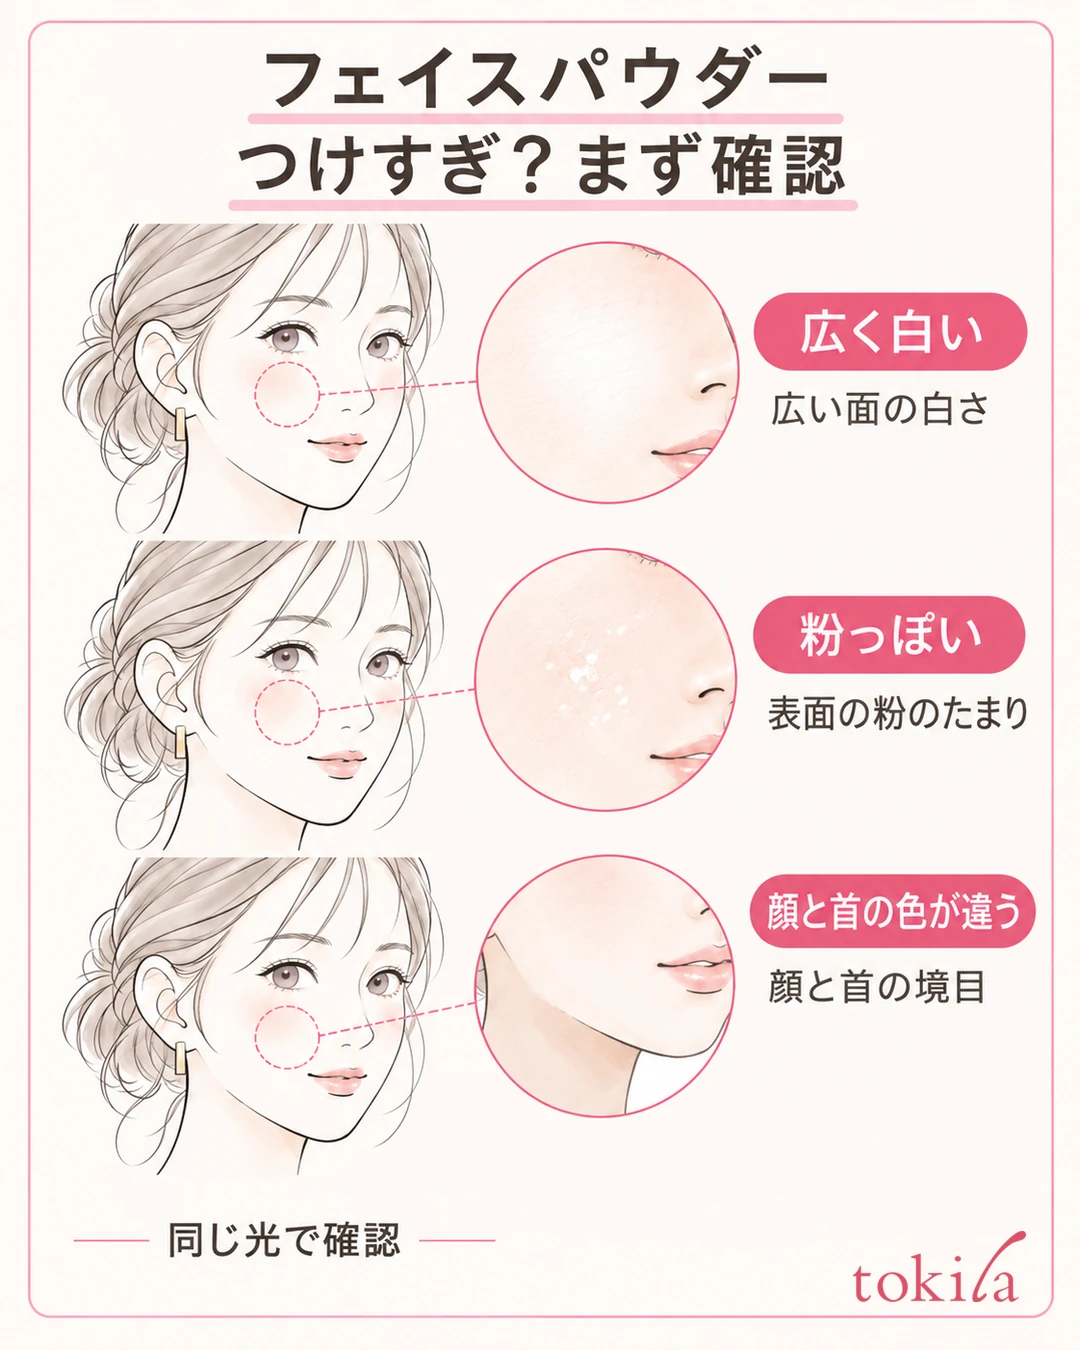
Before leaning in toward the mirror, look at your whole face from the distance at which you usually check your makeup. Then move your eyes to the spots that bother you, such as the cheeks, the sides of the nose, and around the mouth, and see which one fits best: "a wide area has turned white," "I can see grains or clumps of powder in places," or "my face and neck are different colors." This is not about fixing all of them the same way, but about narrowing down where to touch first.
If only the areas where you layered powder look white and thick, there may be excess powder on the skin. If you remember how your skin looked before applying, think back to the step where the color changed. If it already looked brighter at the primer or foundation stage, reducing only the face powder may not solve it.
If the powdery surface bothers you more than the color, look at how much powder there is, and also whether you have layered it repeatedly on areas that dry out easily. Did you finish the cheeks and nose with the same amount? Does powder collect in lines when you move your mouth? Remembering specific places like these helps you review the amount and area next time. There is no need to decide your skin type from powderiness alone.
On the other hand, if the surface is smooth but your face and neck are different colors, check the tint of the powder and the base underneath it. Don't assume that every product looks the same just because it is called "translucent" or "lucent"; check it with a thin application. If you feel the color doesn't match from the foundation stage, how to choose a foundation color may help.
When comparing the left and right sides, avoid turning only one side toward a window or tilting the mirror. The key is not to mix up differences caused by a change of light with the results of fixing the powder. After checking how it looks, choose whether to tidy up only the excess powder or whether the base needs a partial fix.
2. Adjust the amount of powder on the puff and brush before applying to skin
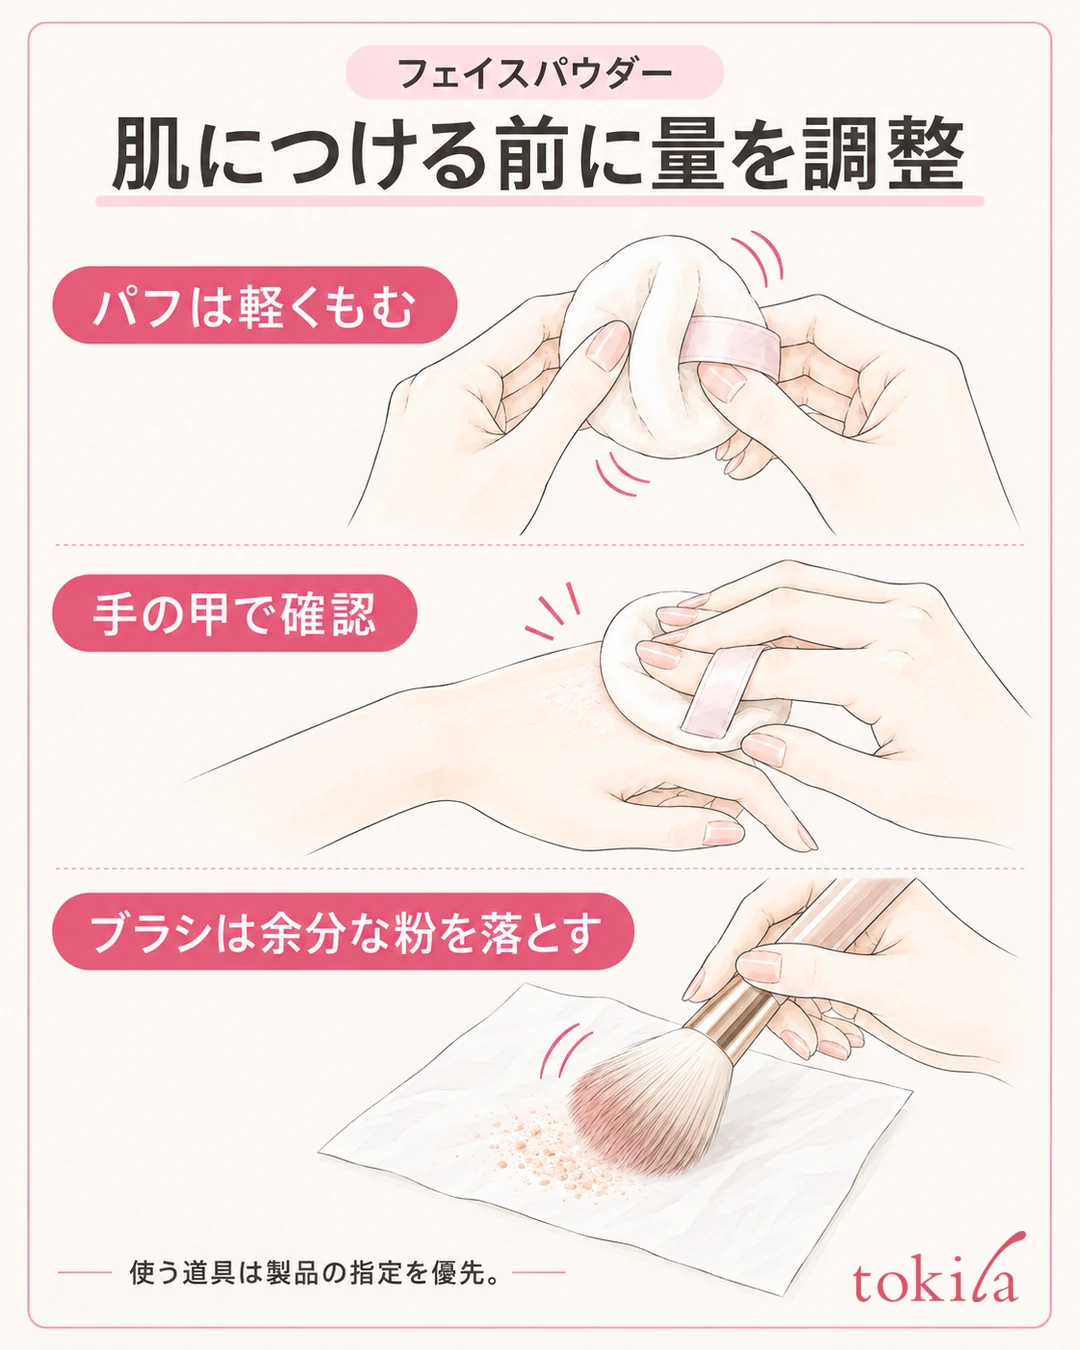
Rather than trying to thin out a large amount of powder picked up at once on your face, adjust the amount on the tool first. Start by checking the container or the product label to see whether it calls for a dedicated puff, the included sponge, or a brush. Inner lids and nets are built differently, so how you pick up the powder, such as "turning the container upside down" or "putting some on the lid," should match the product you have.
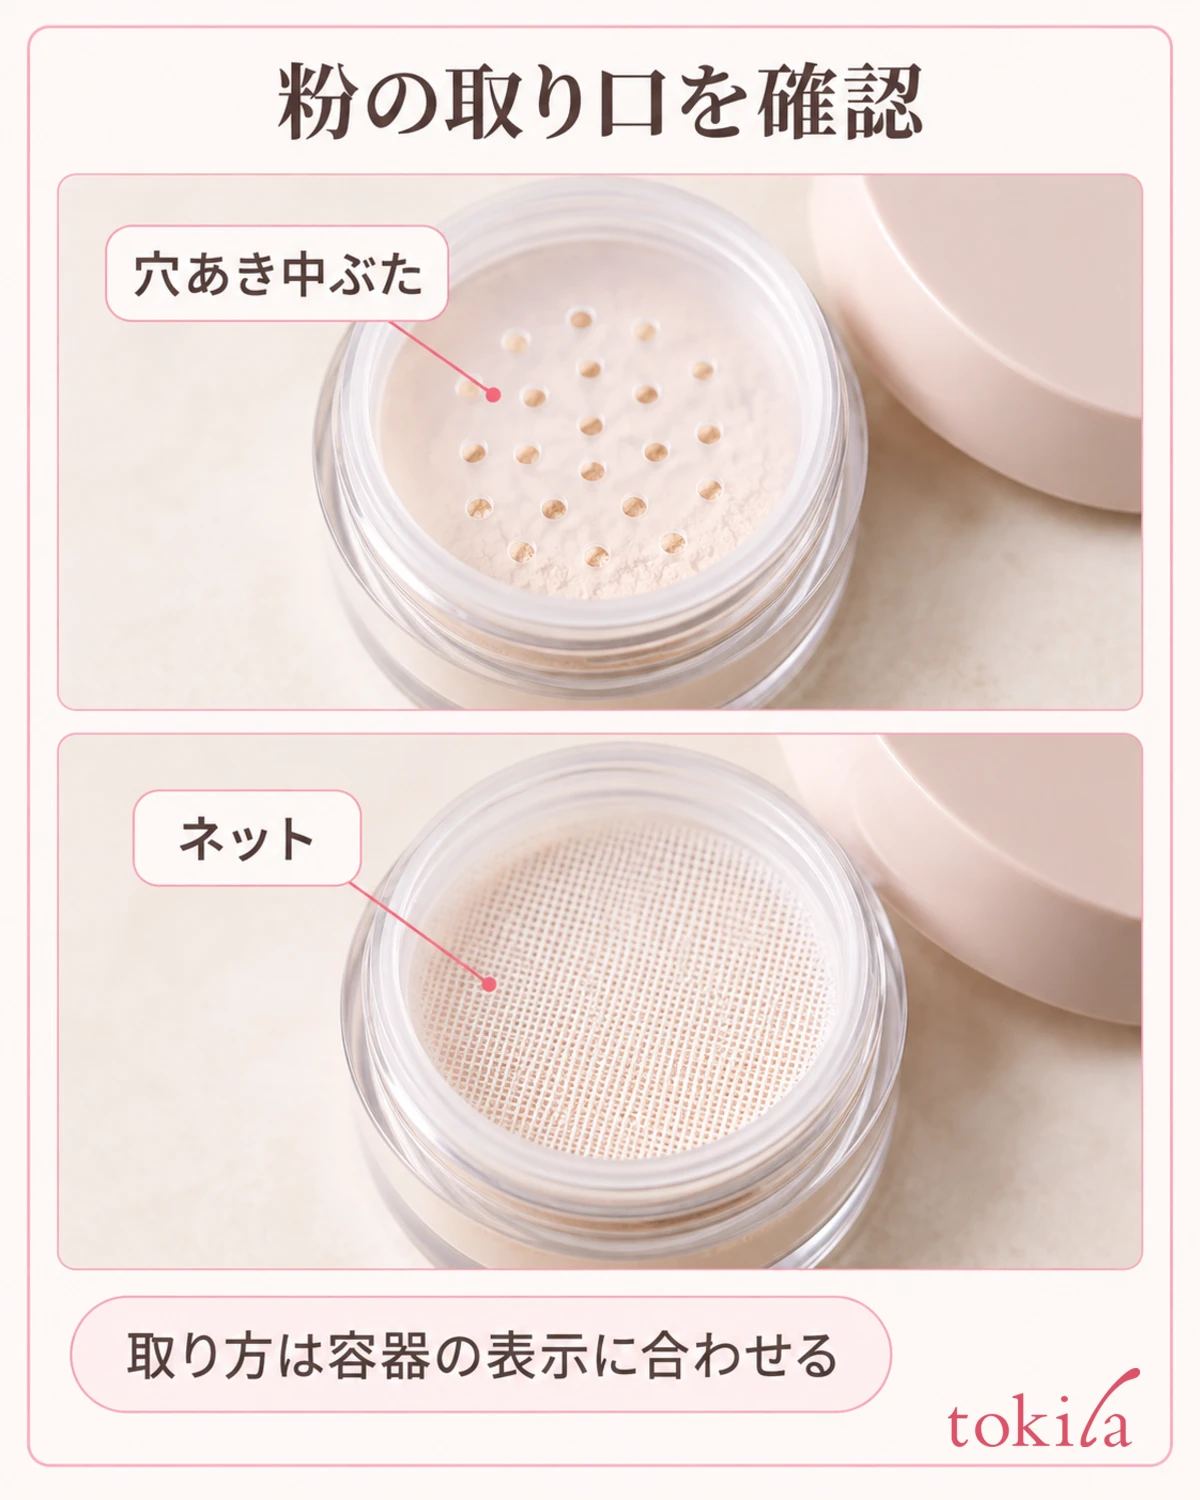
For general puff amount adjustment, after picking up the powder, fold and rub the puff lightly to work in powder that has clumped in one spot on the surface. Then press it lightly on a clean back of the hand and check that the powder doesn't transfer thickly all at once.
If thick powder remains on the surface of the puff, don't press it onto your cheeks as it is; adjust the amount according to the product's instructions. Using a clean tissue is also an option. Tapping the puff hard against the container to return the powder makes it scatter easily, so handle it gently. If you can stop here before applying to your face, you can save yourself the trouble of fixing a wide area after it turns white.
If the product can be used with a brush, work the powder into the bristles and then lightly remove the excess with a clean tissue or similar. Check that no large lumps of powder remain on the tips of the bristles, and use a lighter touch on the skin. Don't shake the handle hard or knock the brush against the rim of the container repeatedly; adjust the amount little by little.
There is no need to define a "small amount" in grams or number of dips that applies to every product, because it varies with the container opening, how the powder picks up, and the size of the tool. First try the recommended way of picking up powder, and if it tends to look white, review the amount you pick up first. Don't change how you pick up powder on your own judgment, for example by dampening a powder puff or spraying mist on a brush; if the instructions say to use it dry, follow that.
3. Apply a thin layer once, then decide where to add more by looking at your whole face

When you layer finishing powder over a liquid or cream foundation, get the base in order first and then move on to the next step. For the overall flow, including where the concealer goes, you can check The basic order of makeup. Whether to layer powder after powder foundation as well should not be decided just because it is a powder; decide based on the instructions of the products you are combining and the finish.
Once you have confirmed the area to use, apply a thin layer once. The basic idea with a puff is to touch its surface lightly to the skin and set the powder on without rubbing. However, the way to move it differs by product. Don't apply one way of moving to every powder.
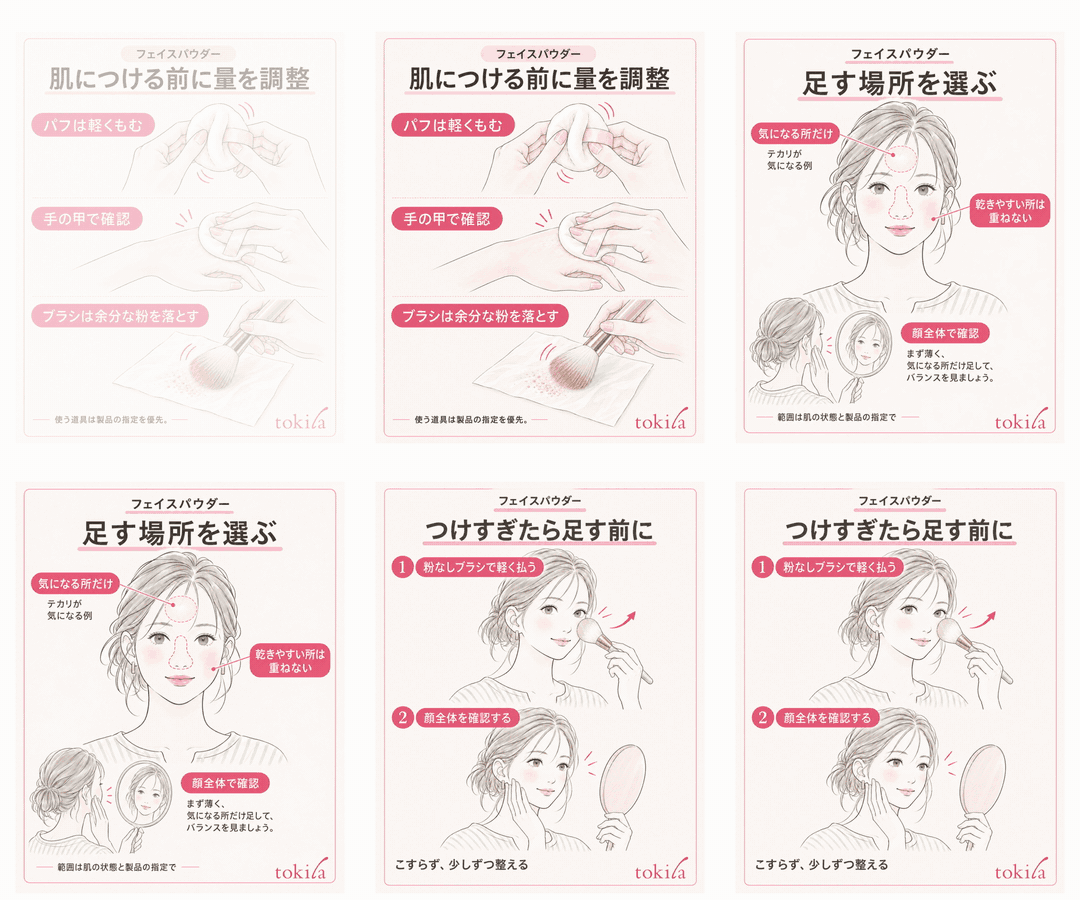
If your forehead and nose area get shiny but your cheeks dry out easily, look at the condition of each area. First finish thinly following the product, and if there are still spots that bother you, add a little only there. There is no need to repeat the same number of times on cheeks that aren't shiny as on the nose, or to apply thickly just to even out the left and right sides of the face. The area shown in the diagram is also just one way of thinking, not a place to apply that is common to everyone.
With a brush too, avoid going back and forth over the same spot. Before repeating because you are unsure whether the powder went on, step back from the mirror and check. If you want to keep some glow, another option is not to keep adding powder to the cheeks where they catch the light.
Under the eyes and around the mouth, don't pile on a lot of powder while finishing a wide area; look at these small areas and adjust. If your main concern is product collecting in lines under the eyes, don't try to hide it with powder alone, and also review the amount of concealer and how you layer it. Look at your whole face, and if no more is needed, stop finishing at that point.
4. If you applied too much powder, don't add more; tidy up only the excess
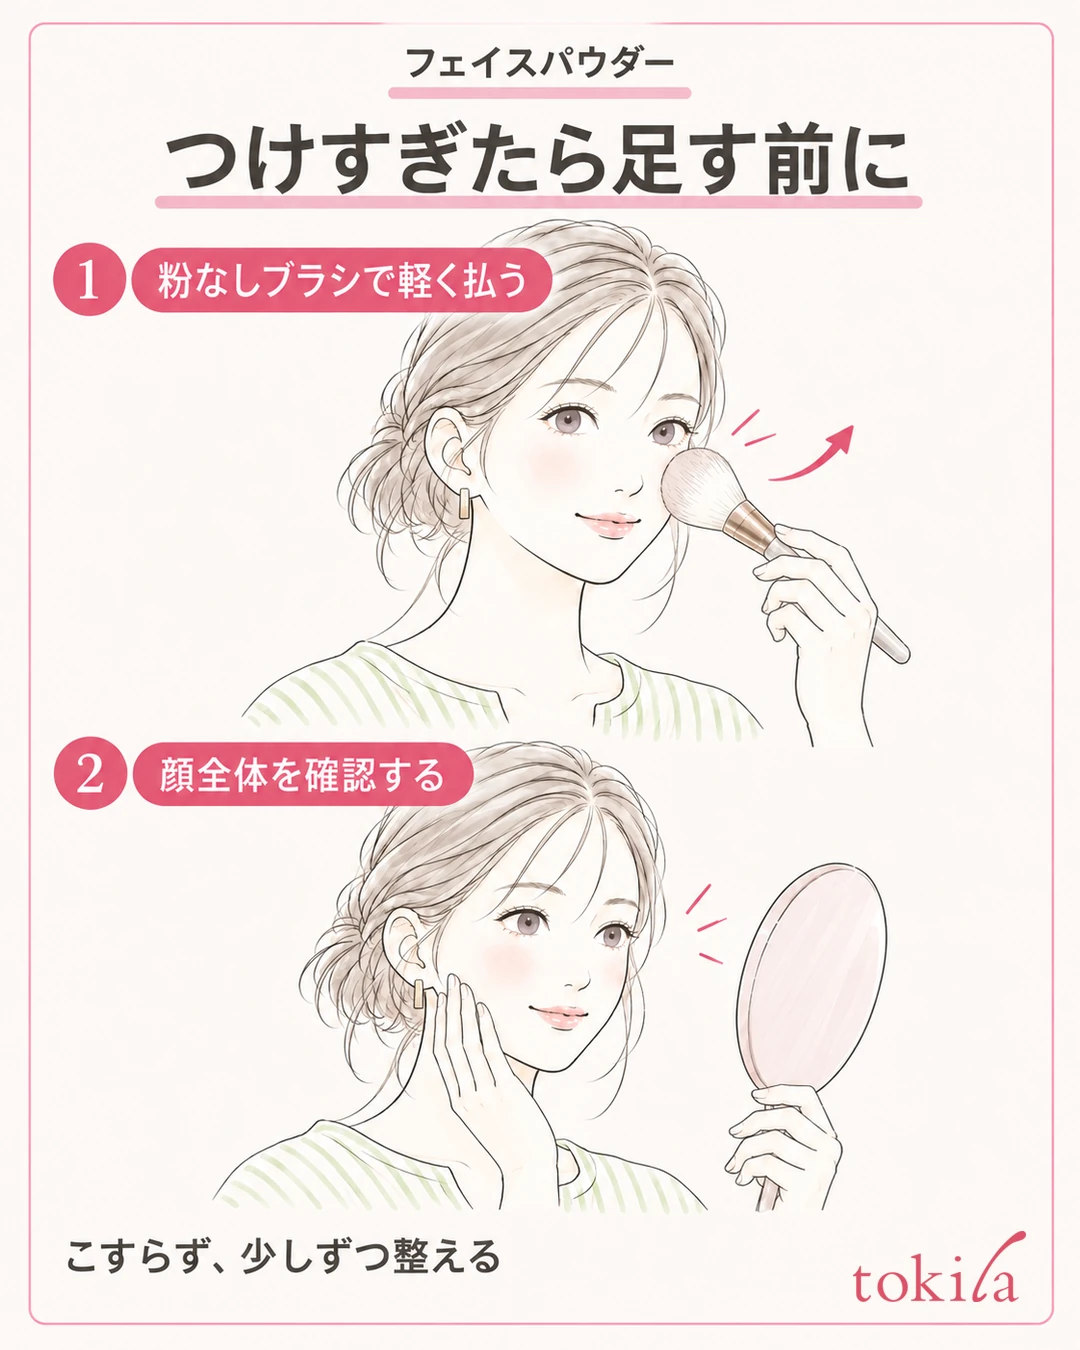
If there seems to be a lot of powder right after applying, lightly tidy up the excess before adding more color or glow. Do not load the tool you use here with fresh powder.
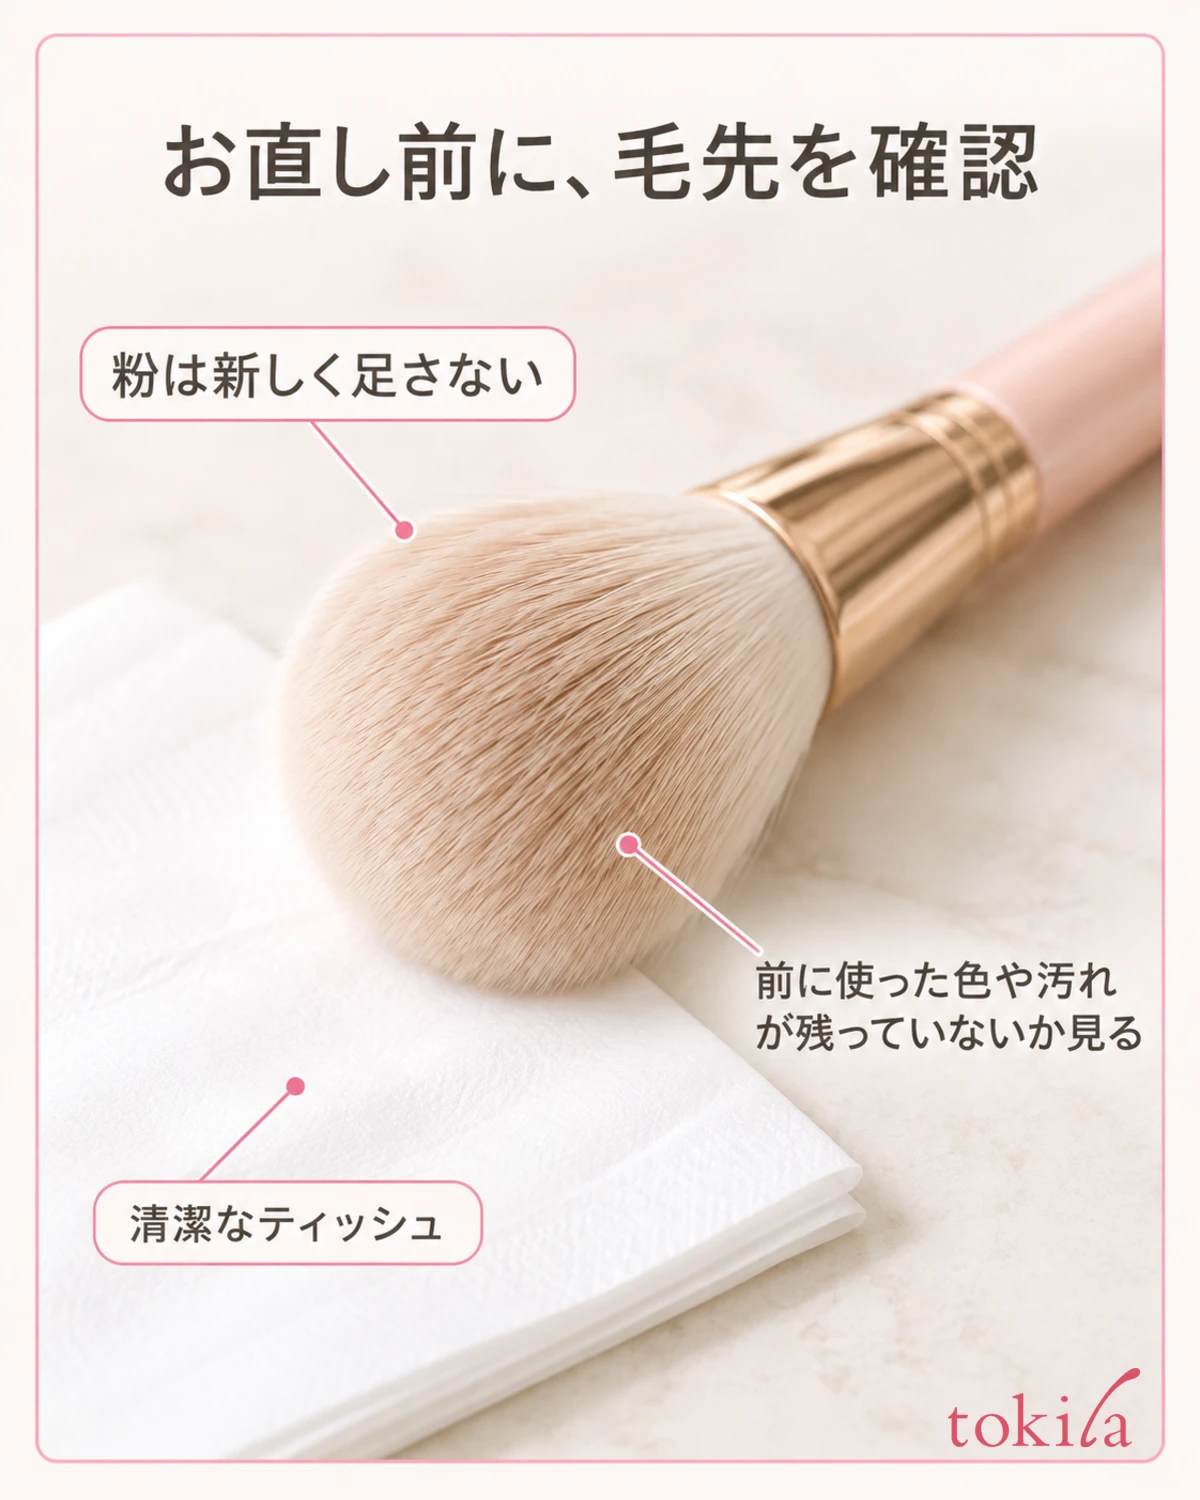
If you use a brush, choose a soft one with no dirt or previous color left on it. Lightly touch the bristle tips to the surface that bothers you and gently brush off the excess powder. After moving it once, stop, step back from the mirror, and check how the whiteness looks. Rubbing the same spot over and over as if polishing it can move the base underneath as well.
If you use a tissue, lightly press a clean side against the skin. Don't press down as if pushing into the skin or wipe sideways across the face; watch how it goes with a press-and-lift motion. If the color comes off a lot or streaks appear, don't continue, and narrow the area you touch. Checking the spots that bother you one at a time is easier to adjust than fixing the whole face at once.
If whiteness remains but you can no longer see excess powder on the surface, check the color before brushing any further. If the color of the powder or the foundation itself doesn't match, brushing alone may not blend it in. Rather than widening the edge to hide it, switch to deciding to review the product's color and the amount used next time.
For dry, powdery areas, don't cover them by adding fresh powder. For mist too, choose one only after checking whether it can be used over makeup and what distance and amount are specified. Do not add a large amount of water and move the base around, and do not rub the dry surface hard. If you need to fix the base in one area, refer to makeup touch-ups for shine, smudging, and dryness, and after tidying up the breakdown, add only to the areas that need it.
5. Next time, change one of the amount, area, or tool and review
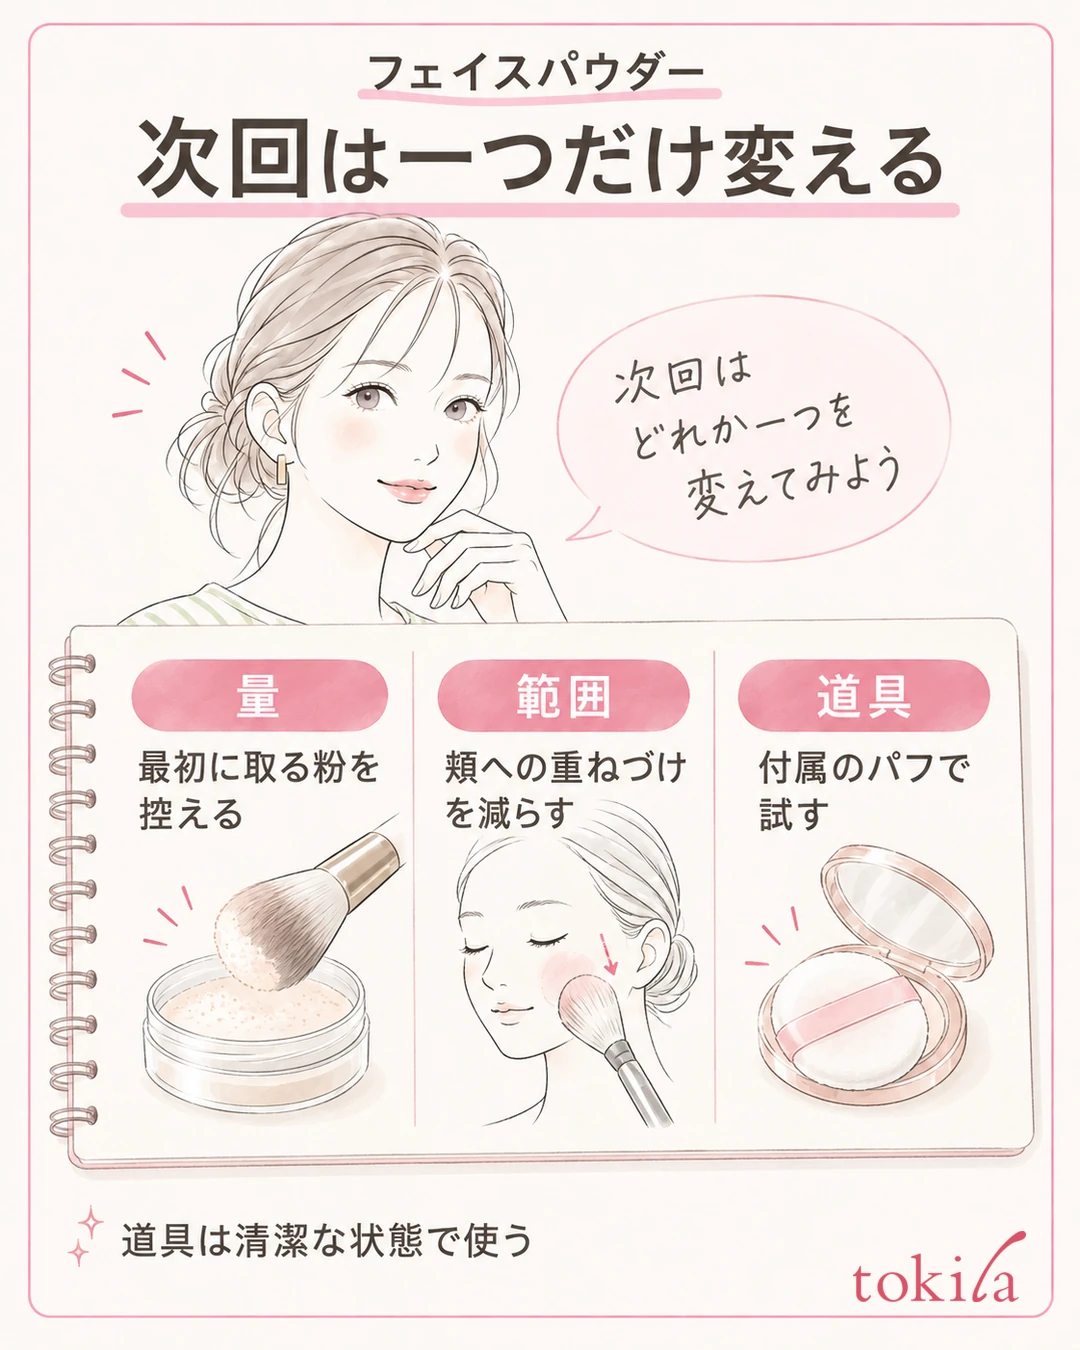
If you keep applying too much, choose one condition to change in your next makeup. Examples are picking up less powder at first, layering less on the cheeks, or trying the included puff specified for the product. If you change the amount, the tool, and the base at the same time, it becomes hard to tell which change affected the finish.
It is enough to start a note with three points: "the powder product," "the tool you used," and "where it looked powdery." If you like, also record whether it was right after applying or after going out, and under what light you checked. Writing specifics such as "in the morning, it looks white when I layer on the cheeks" or "the nose isn't a concern" makes it easier to decide next time whether to thin everything out or just change the place.
Also check the condition of your tools. If old powder or base has hardened on the surface of the puff, it may be hard to apply evenly even with the same way of picking up powder. Check whether how well it holds powder and how it feels on the skin have changed, care for washable tools in the way the manufacturer specifies, and dry them thoroughly before use. For detailed washing instructions, see caring for brushes and sponges.
Don't assume that washing always restores the original condition; if the pile or surface of a powder puff is worn, look into a compatible replacement. Don't reuse an accessory from a different product just because it looks similar; check its intended use as well.
If you keep layering finishing powder to hide spots and the like, it is also important to reconsider the role you expect from the powder. Separate the places that need partial coverage from the places where you just want a smooth finish. If you adjust the amount and area with the products you have and the color or texture still doesn't suit you, choose again by referring to the official description of the finish or by asking at a store. Before buying more, put into words where, when, and how it bothers you, and your consultation will be more specific.



