
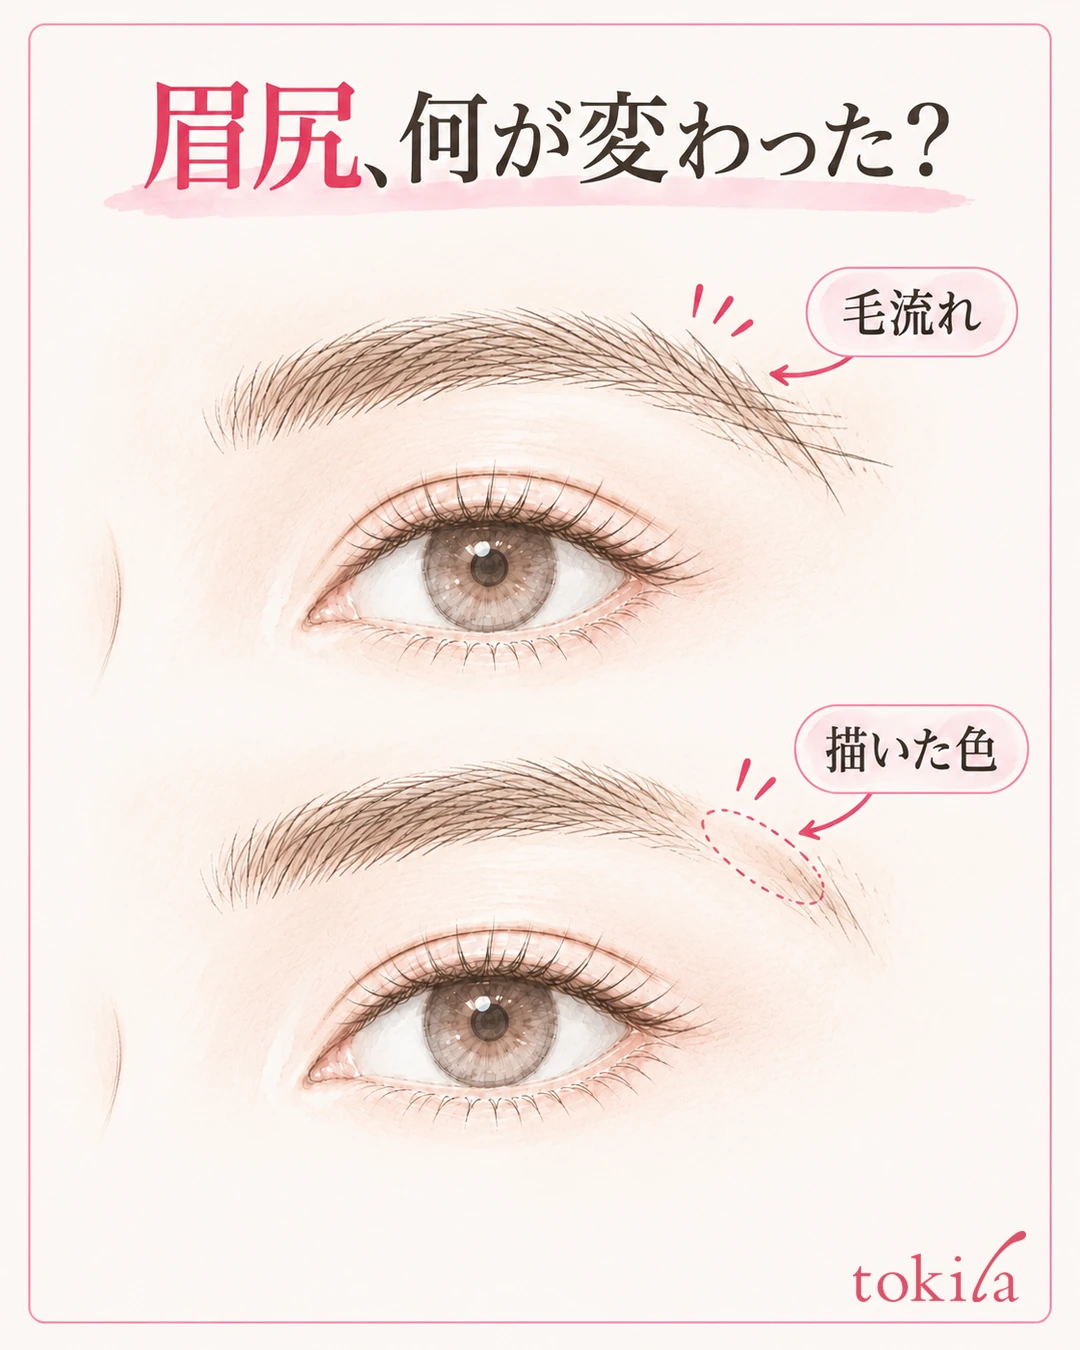
You drew your brows fine in the morning, but in a mirror when you are out, only the tails have faded. Before you draw over the spot that disappeared, check whether the hairs are lying flat and hidden, whether the color you drew has faded, or whether color has spread around it. Rather than making the whole brow darker, preparing the base and filling in only the short stretch that is lacking makes it easier to keep the shape.
This article covers the situation in which brow-tail makeup fades as the hours pass. It is separate from judging morning left-right differences in shape or the causes of brows that are sparse to begin with, and it introduces preparation before drawing, how to choose a brow product, and partial touch-ups when you are out.
1. Tell apart faded color and a change in hair direction at the brow tail
Move your hair aside and, in a mirror where both brows are visible together, return to a natural expression. First look from the middle of the brow to the outer end and find which stretch differs from the morning. If you look closely at only one side, you may add too much length to the end. Also separate the places where there is hair from the places where you drew on skin to fill in the shape.
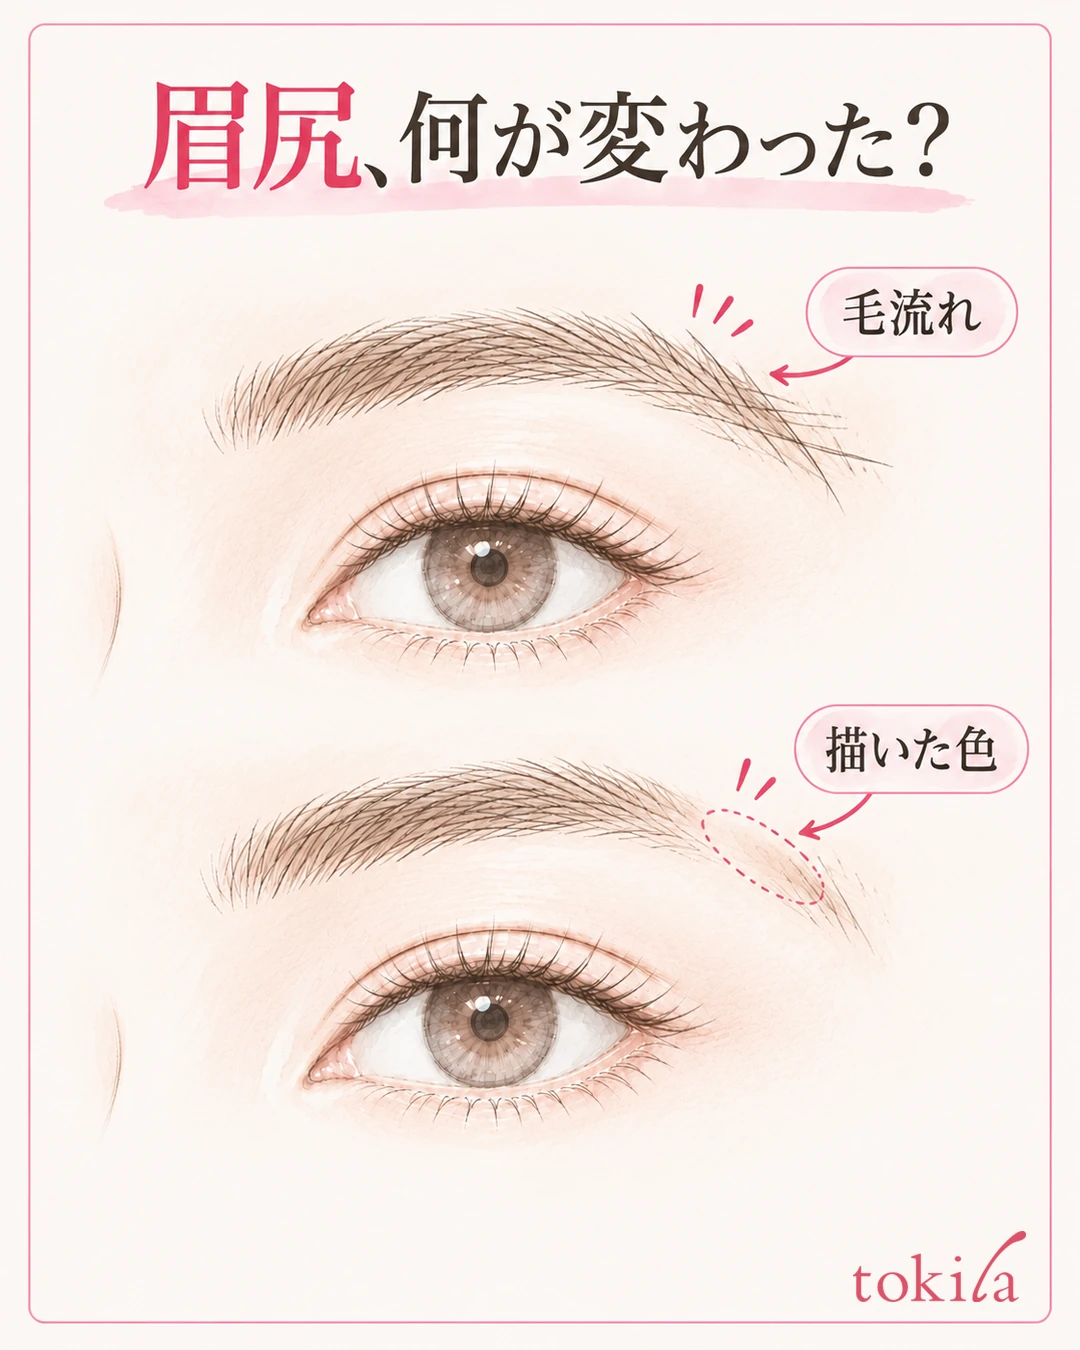
If the brow-tail hairs are simply lying flat, you can choose to tidy the hair direction before adding more color. On the other hand, in places where a line drawn on the skin has faded, brushing the hair will not bring the color itself back. If brown has spread around it, before drawing a new end over that color, tell apart the line you want to keep from the part you want to tidy.
After lightly tidying the surface of the hair with a clean brush, take the tool away and look again. Do not force down brow mascara that has hardened; follow the product's instructions. Even a change in the direction of the brow-tail hairs, or in the bangs falling over your eyes, changes the impression. Do not make it a routine to add pencil every time the brows look faint.
If you cannot remember the shape from the morning, you do not need to create a new, longer brow on the spot. From the flow of the middle that remains, check the lacking range in small steps. Rather than lining up the ends on one horizontal line, use the flow of the hair on each side and how natural it looks on the whole face as your guide.
Also look back at when it faded. Pick one situation you can think of, such as after wiping sweat, after your bangs touched it, or after you touched your brows. Do not decide the cause from appearance alone; use it as a clue for changing how you touch your brows or your base next time. There is no need to test durability by rubbing the brows.
If the left-right difference in shape bothers you from the morning, go to the steps for telling apart brow height, length and darkness. If you drew the inner part too much, how to fix the boundary and darkness of the brow head will help. Today, limit your range to only the brow tail that has disappeared.
2. Before drawing, check the skin at the brow tail and any excess oil
The brow tail often has little hair and a lot of area where you draw on skin. If a lot of oil from skincare or base remains there, the drawn line may slip or the color may not set well. The idea is not to skip moisturizing, but to do the necessary care and then check the surface of the place where you will draw.

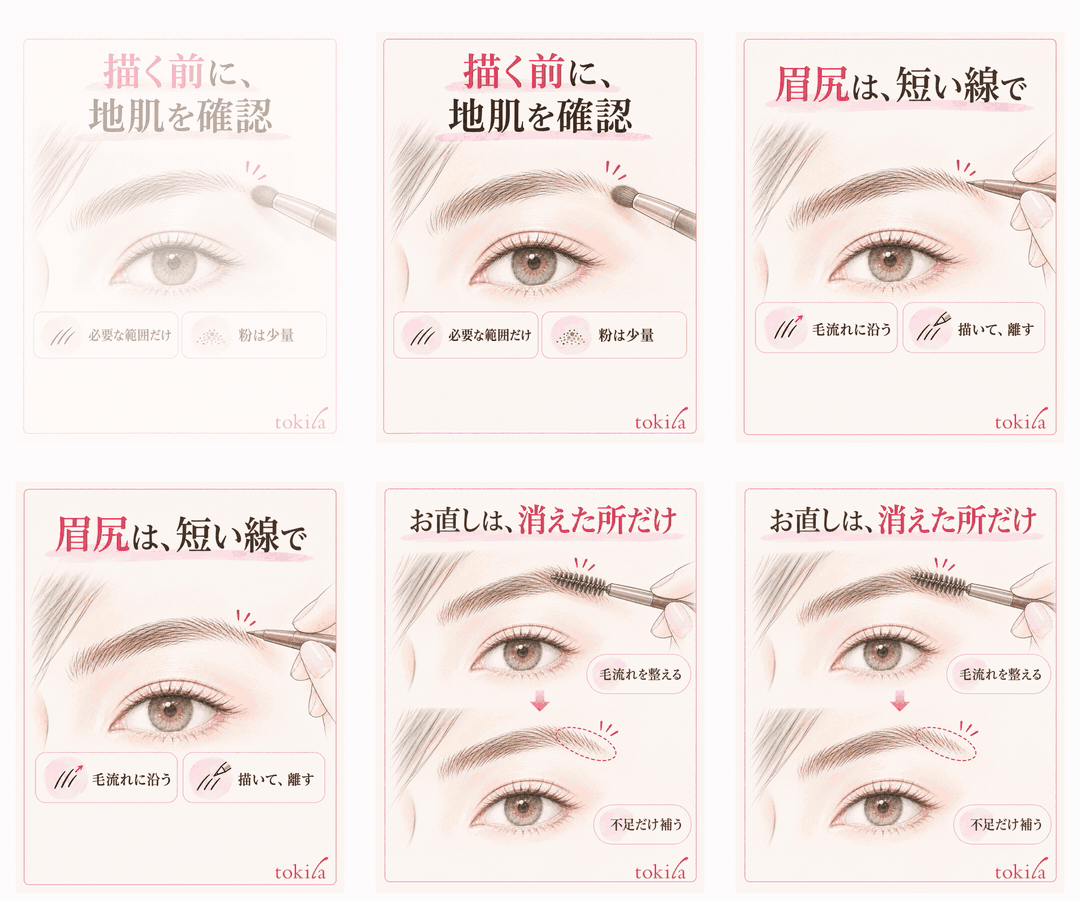
Here, you judge whether powder is needed by the condition of your own skin surface. The steps do not call for adding a thick layer, in the hope that it will last longer, onto skin that is already dry and powdery.
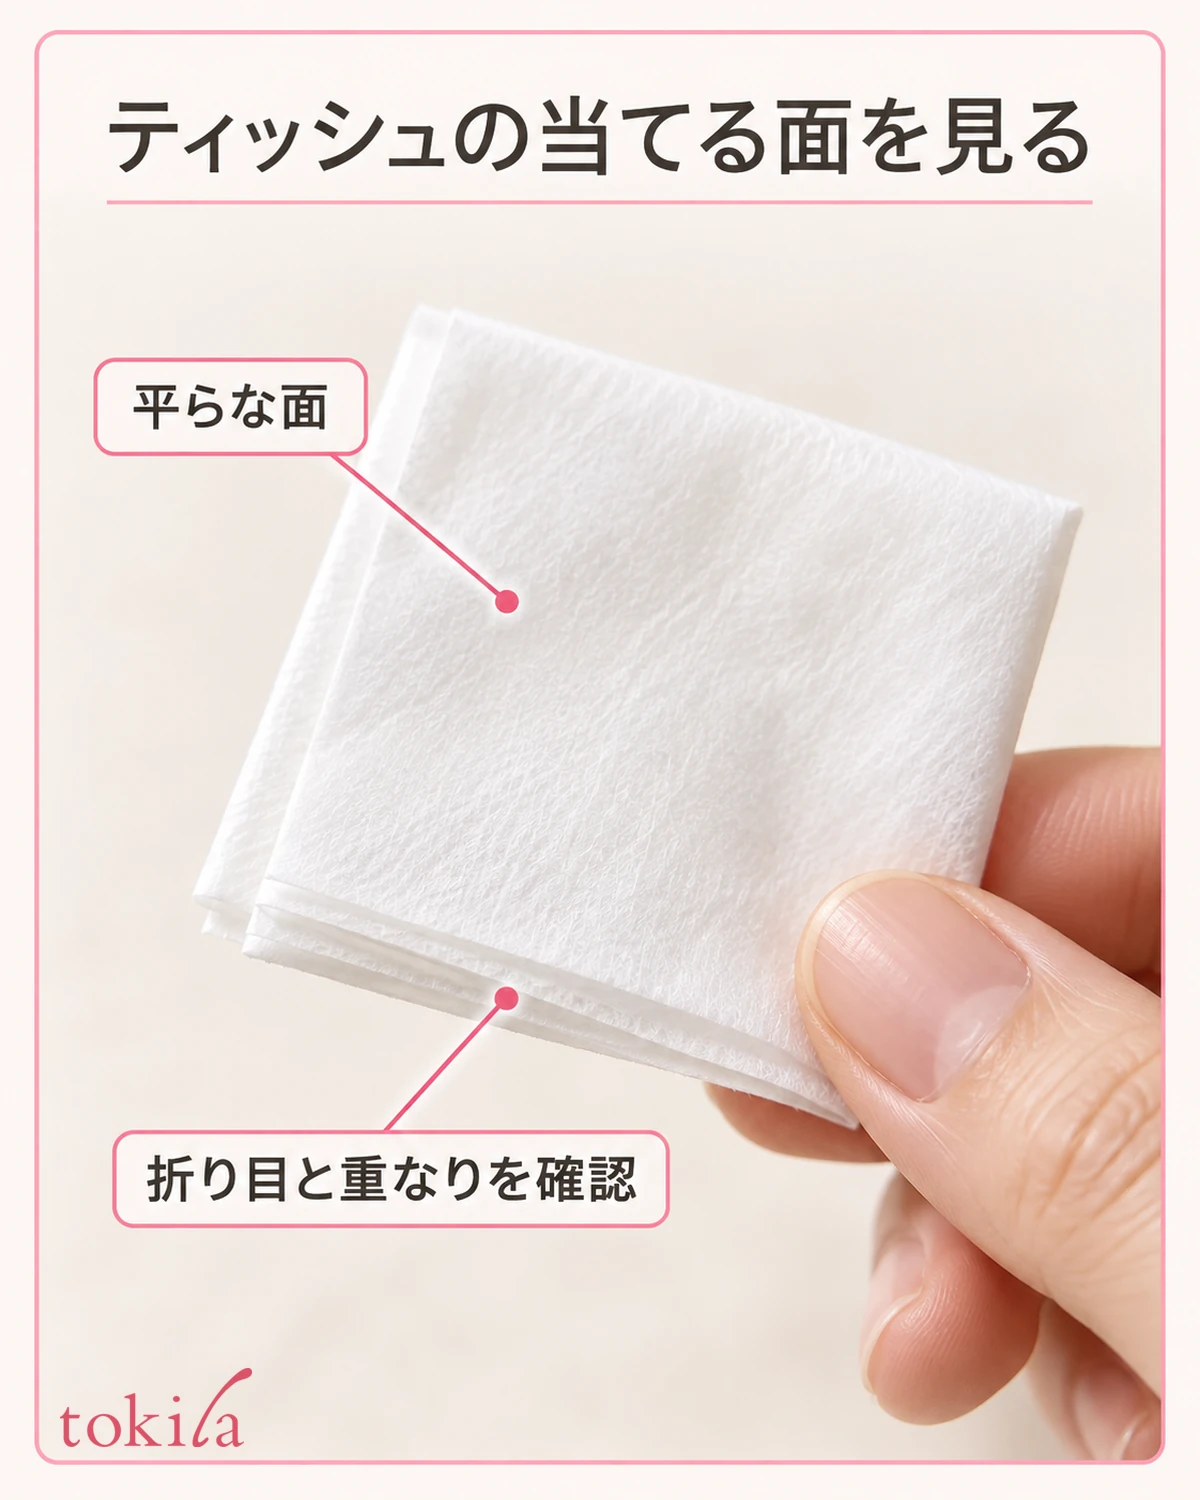
If oiliness bothers you, lightly press a clean tissue or similar against the spot and lift it away. Keep it to a small adjustment before drawing, so you do not wipe long sideways and remove the brow-tail color or the base. If you worked so strongly that you wiped off sunscreen, do not forget to add the UV protection you need.
If you use powder, take a small amount on a small brush, remove the excess, and blend it thinly onto the skin where it is needed. If white powder stands out or clumps remain on the hair, reduce the amount. Covering only the top of the brow hairs thickly is different from preparing the skin you draw on. Do not point the tool at your eyes, and work in a mirror where you can see both hair and skin.
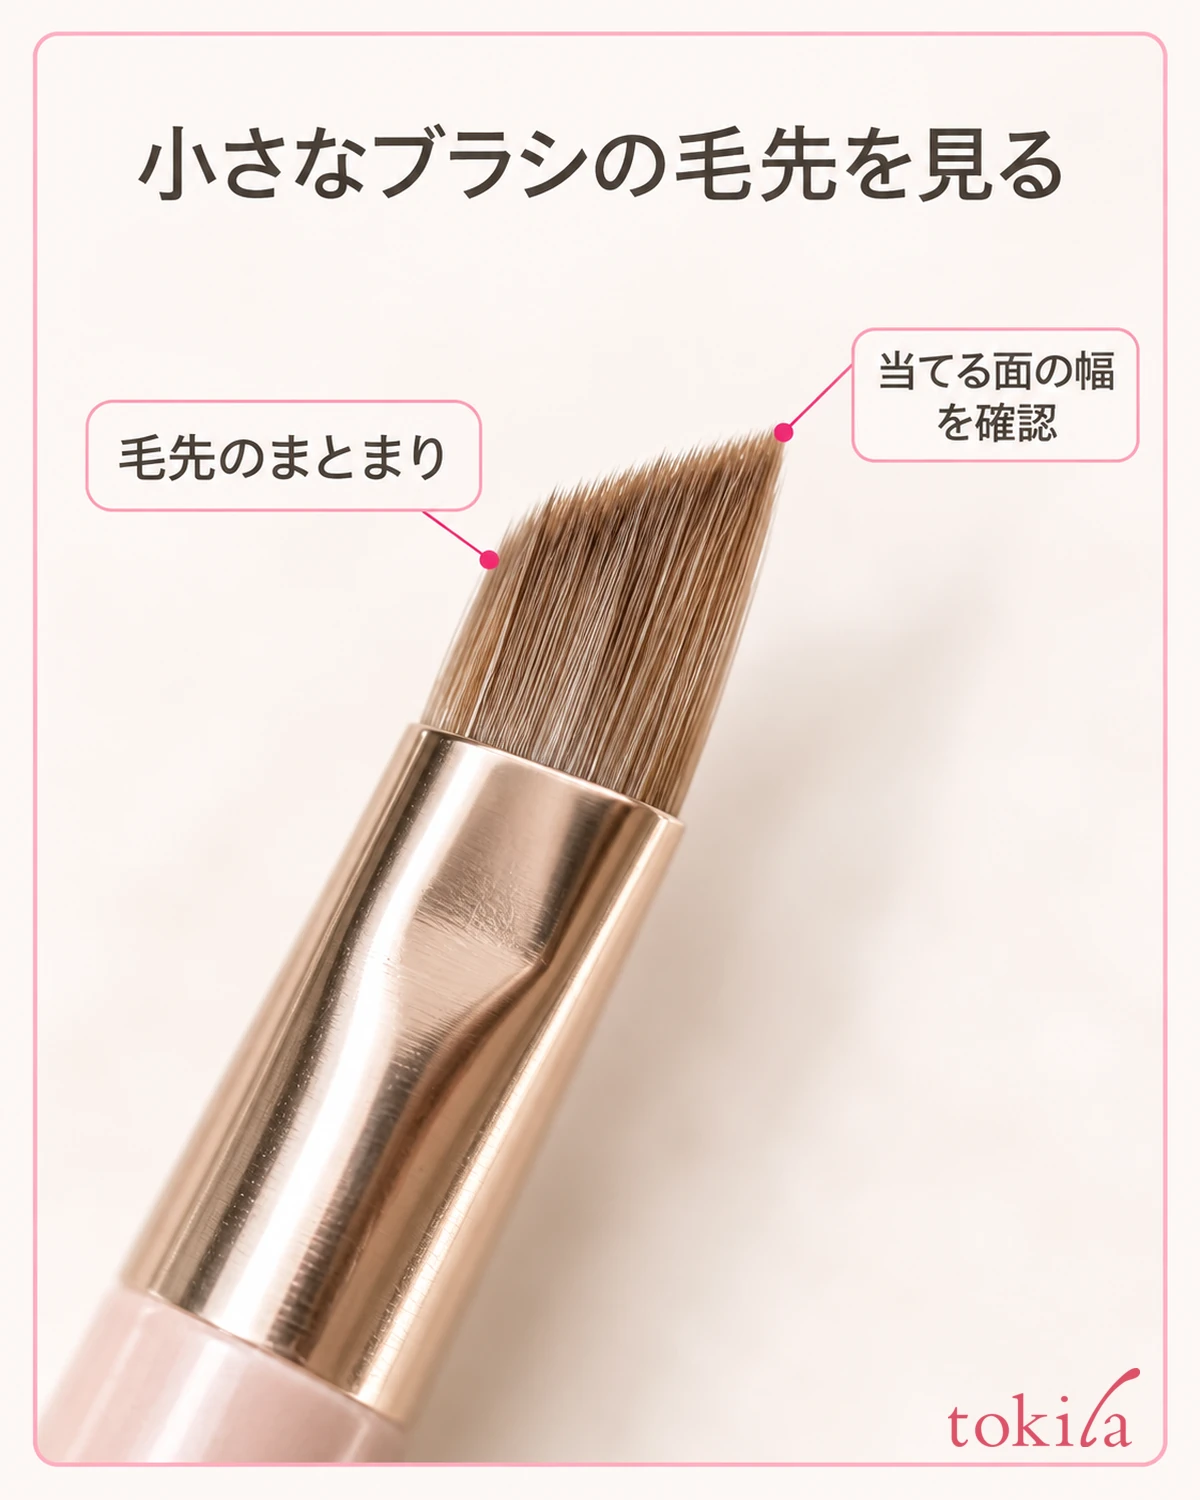
Once you are ready, check in a short spot at the brow tail whether a lightly drawn line takes. If it slips, check the surface and the tip before switching to heavy pressure. The cause of color not showing is not always the skin; the condition of the lead or tip and the product's first-use steps also play a part, so reread the instructions.
The order in which you layer base on the brows and the amount of powder you need change with the product and your skin condition. Rather than adding powder the same number of times every day, look at how easy it is to draw today. Using a state in which the hair direction is visible, the skin does not look white and thick, and a light line can be placed as your guide, keep preparation from changing the shape of the end.
3. Fill in the brow tail with short lines, and follow the product's order and drying time
Just because it fades easily, you do not need to draw the brow tail thick and long in the morning. Place short lines that follow the real flow, a little at a time, where hairs are lacking. Rather than filling in a wide triangle, decide the range you need while checking how the end of the line connects to the remaining hairs.
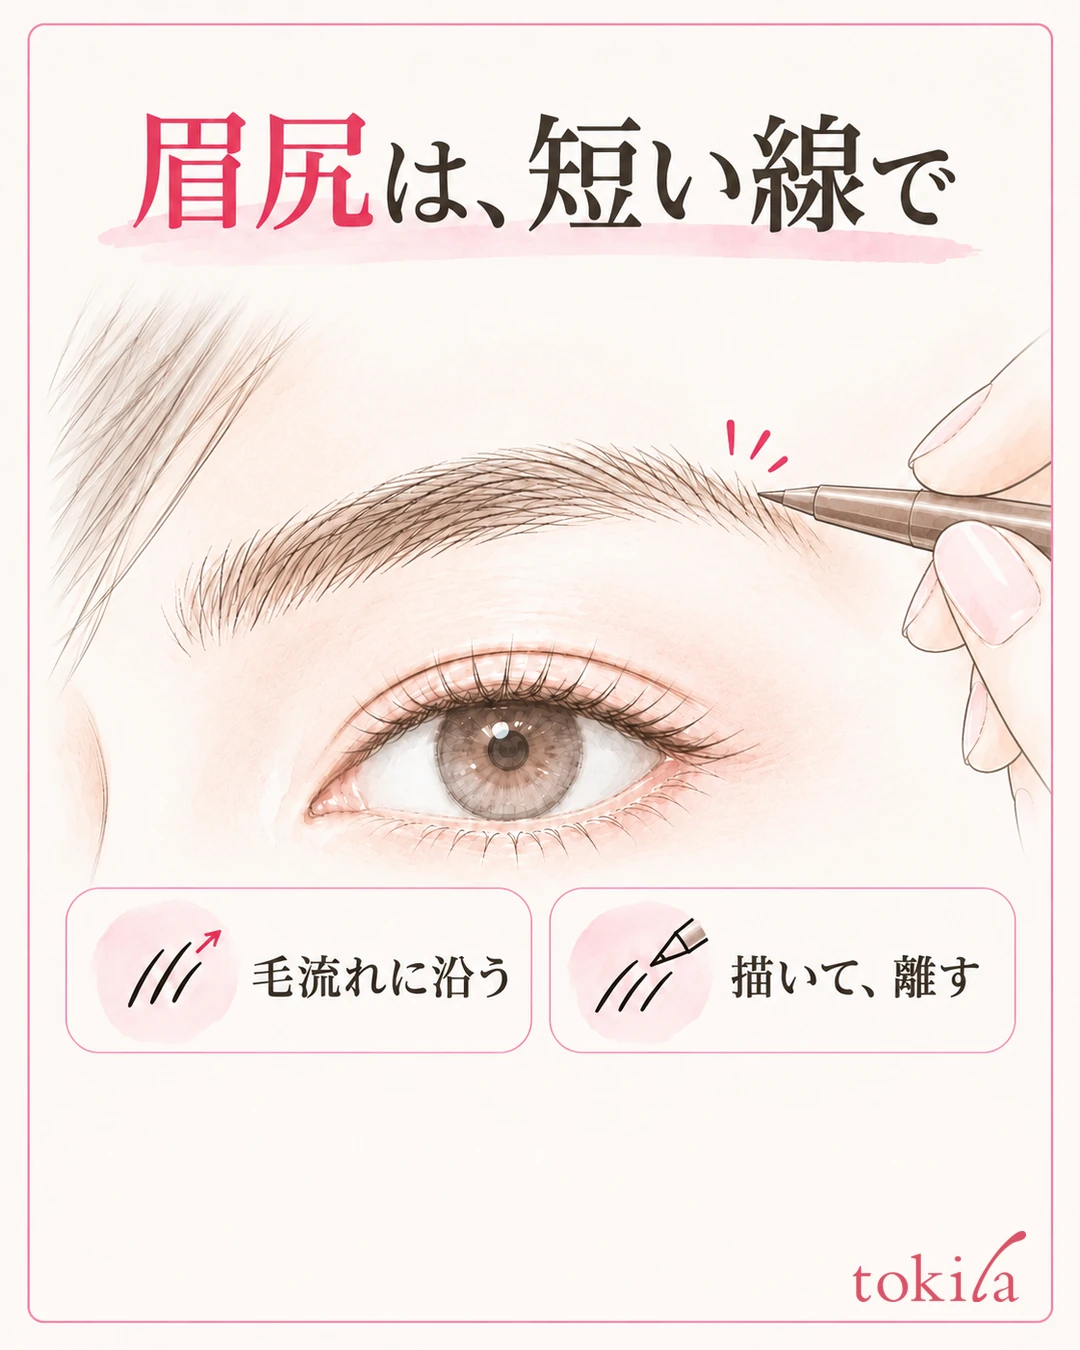
On days when you are conscious of sweat, sebum or rubbing, you can use the characteristics a product states as a clue for choosing. However, do not assume that "it's a liquid, so it will never disappear"; check how easy it is to draw and how it comes off as well.
If you combine pencil, liquid and powder, give priority to the order for the products you have. Do not simply extend that order into a common rule for other products.
Lightly touch the tip to the skin, draw a short line in the direction of the hair flow, and then lift it away. The point is not to go back and forth over the same end many times, deepening the color and then blending it. If no color comes out, do not press harder on the brow; check the product's instructions on how far to extend the lead or how to handle the liquid.
For liquids and similar products, also check how you touch them until they dry. If you trace over the freshly drawn line again and again with a finger or brush, color may move to places you do not want. Do not apply a fixed number of seconds to every product; follow the handling described in the instructions. While waiting, avoid touching the brow to test whether it has dried.
You do not need to add the same darkness uniformly to the middle and the end of the brow. Look at the color of your own brows and today's finish, and choose a color in which the short lines do not stand out. Once it connects naturally to the middle that remains, check the whole face. Treat filling in only the faint spots and changing the color of the whole brow as separate steps.
4. When out, tidy the remaining color and then add only the stretch that disappeared
When you are out, do not redraw the whole brow from the start; decide which parts to keep. Check in the mirror the stretch of the brow tail that disappeared, and if there is sweat or oiliness, lightly press a clean tissue or similar and lift it away. If you keep wiping the drawn brow sideways, even the middle you want to keep will fade, so limit yourself to the places that need it.
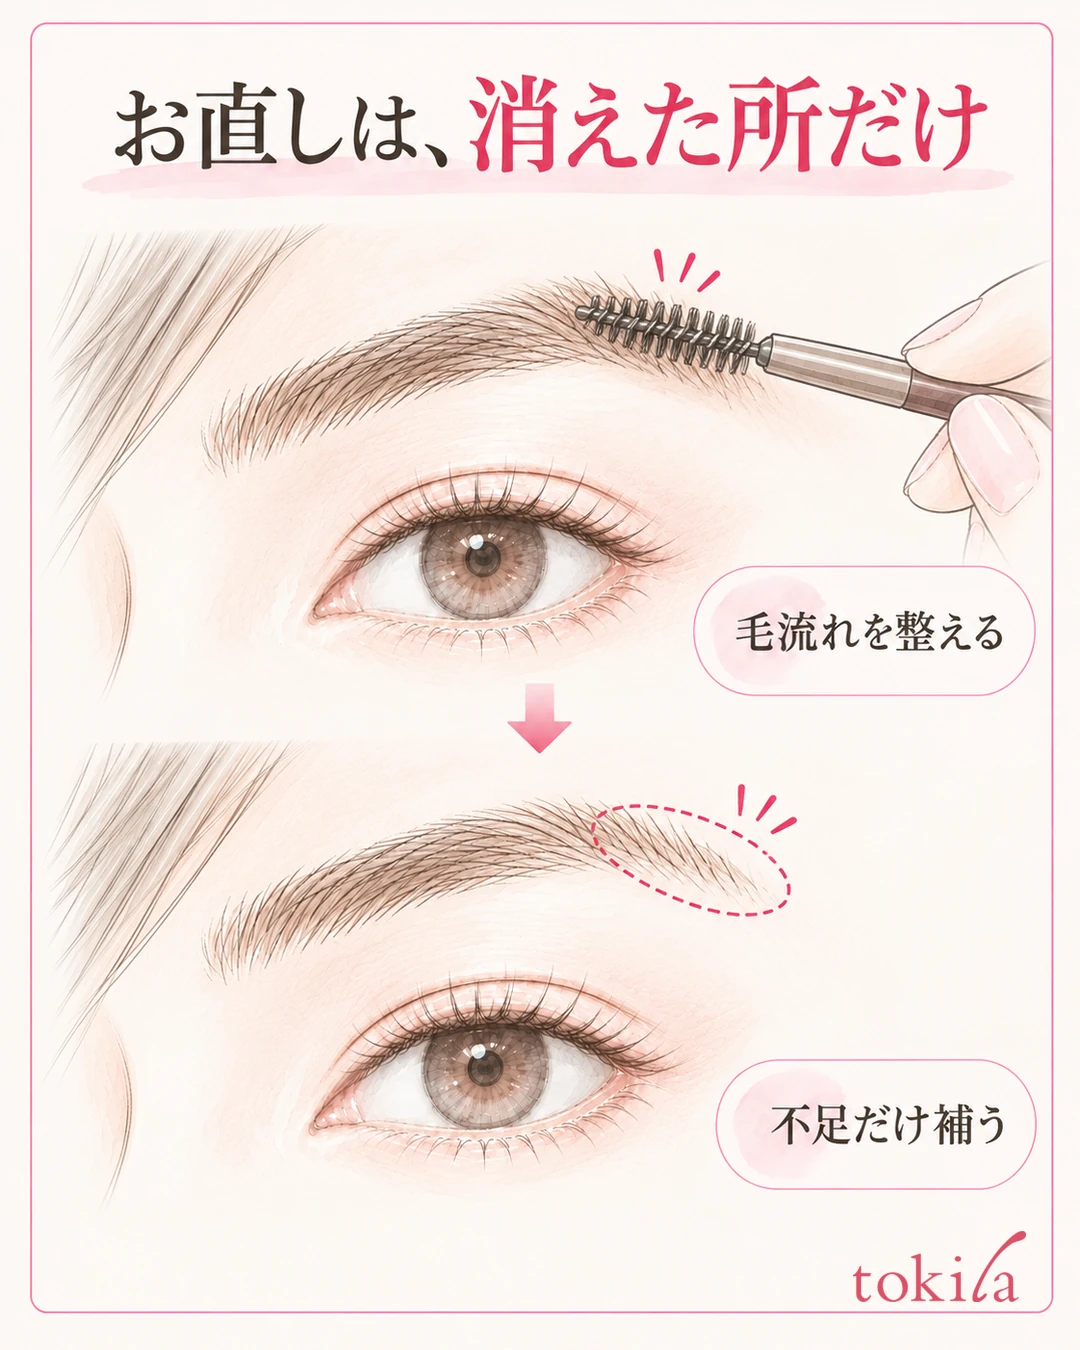
Next, if the hair can be tidied without strain, use a clean brush. This is not a step in which you brush hard and remove all the color. Do not keep working on places with hardened liquid or pain.
Once the base is prepared and the flow of the remaining hairs is visible, add to only the short stretches that lack color. If the middle has enough color, do not trace it; fill in a small amount starting from where it joins the brow tail. Place one short line, lift the tool away, and recheck the end so that you do not make the brow longer than it was in the morning.
If color has spread around it, or a dark clump remains even after blending, just adding to the faint spots may not fix the shape. Check how to remove the brow product you used and, if needed, redo a narrow area. After using a remover as well, follow the wiping or rinsing that the product specifies.
In places where the base or sunscreen came off when you redid the area, add the necessary care and UV protection, and tidy the surface before you resume. Do not rely only on hurrying to layer over wet skin or on hiding a dark color by covering it with thick foundation. On days when you are short on time, limit yourself to a small area you can handle.
For touch-up tools, pick what you need, such as the product you use, a small mirror and a clean brush. You do not need to layer on every kind just because you carry them. If you see changes such as the brow becoming darker, becoming longer, or color spreading onto the skin, going back to look at the whole face rather than adding more will lead to your next decision.
5. Stop at the whole face, and next time change just one thing: how you touch or the base
Once you have tidied it partially, bring the mirror back to a distance at which both brows and your eyes fit together. If you keep looking enlarged at only the brow tail, you may keep adding lines that are already sufficient on the whole face. Look at the join up close and at the length and darkness from a distance, and stop at the point where it blends into today's makeup.
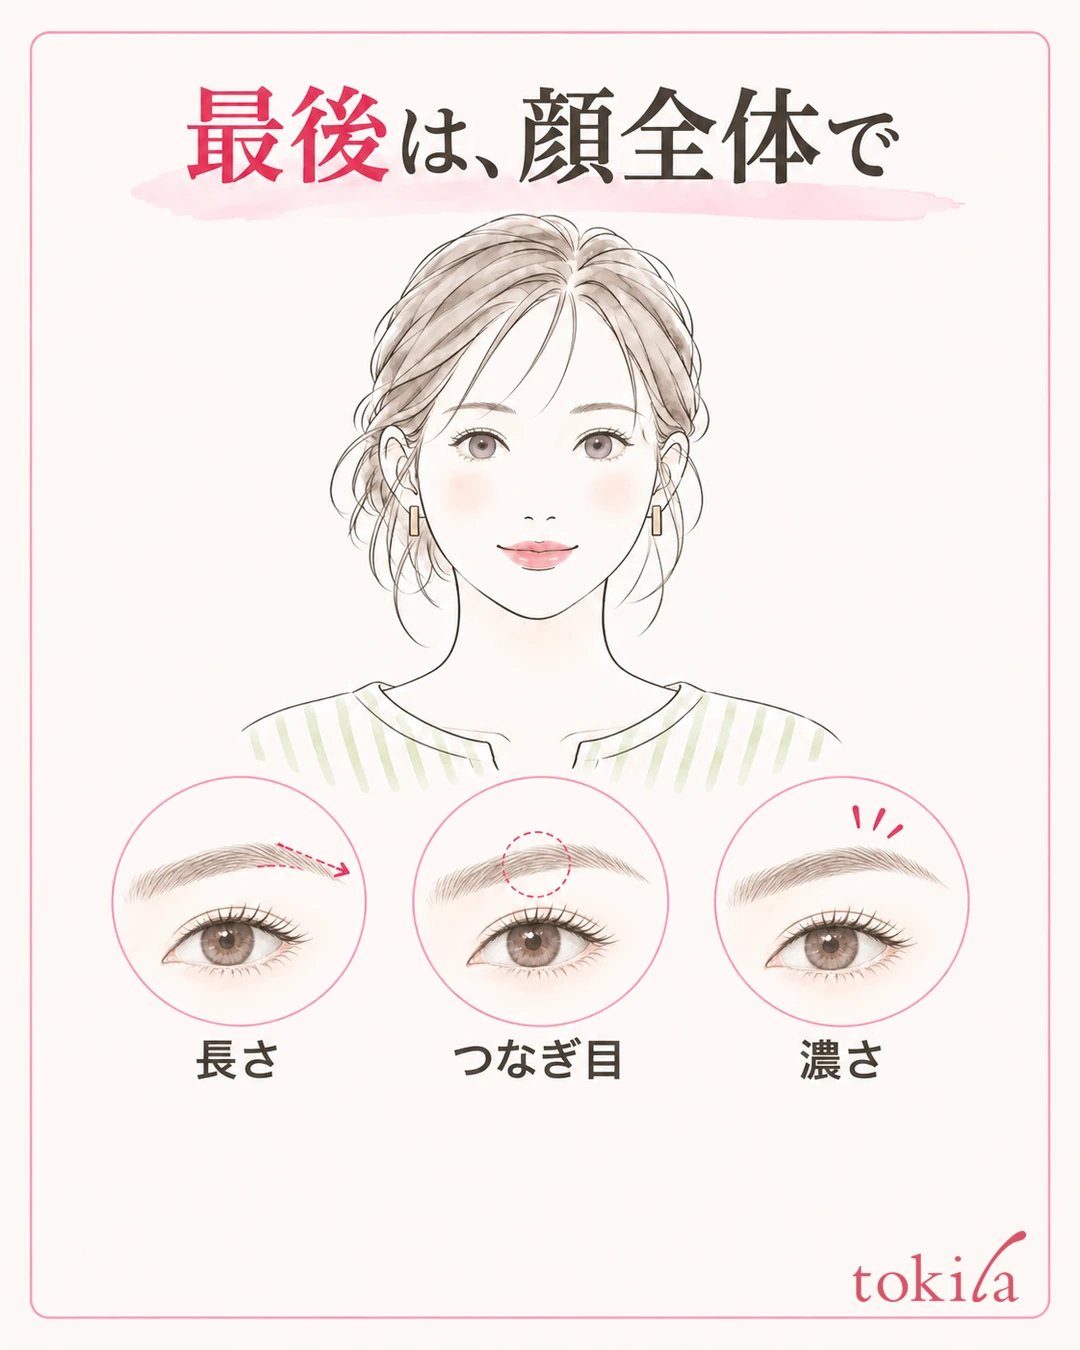
On a day when one side has faded, you do not need to trace the other side the same number of times. Keep the brow head and middle that remain, and check that only the adjusted end does not suddenly become darker. It is important not to keep adding color to both sides in order to make even the natural left-right difference perfectly identical.
When you put your bangs back, also look at where they touch the brows. When you wipe sweat with a handkerchief, look back at whether you are rubbing sideways over the brows. Even while relying on a product's durability, you can choose to rethink how often you touch your brows unconsciously and how you wipe. Do not conclude that it is all just a matter of oil.
If the same stretch keeps disappearing, leave yourself one condition to change next time. Choose something tied to today's observation, such as "thinly tidy the skin before drawing," "move the bangs that touch the brows out of the way," or "look at the hair direction with a brush before touching up." If you change the color, the base and the tools all at once, it becomes hard to look back and tell which one made things easier to handle.
If you keep a record, briefly note the time, the stretch that disappeared and the action you took to fix it. If you use photos, match the lighting, the direction of your face and whether the image is mirrored. Do not decide which product is better from photos taken under different conditions; treat the record as a way to remember where to look next. Do not extend your own observations into a test that would give the same results for other people.
When your brow tails fade, first tell apart color and hair direction. Prepare the skin before drawing only as much as needed, and fill in with short lines that suit the product. Even when you are out, keep the color that remains and stop at the whole face. Treating this order as one set lets you rethink touch-ups that make the whole brow darker and longer every time it fades.
Written by the tokila editorial team. We organized the judgments and adjustment steps you can review with the tools you already have.



