
You rolled up your sleeves, but by the time you finish washing your hands, the cuffs have slipped back down. The more you fold, the thicker the sleeve gets around your arm, and now it is hard to bend. In that case, before adding more folds, try to tell whether the folds are coming undone or the whole bunched-up sleeve is sliding down.
Here we introduce how to rethink rolling up sleeves, focusing on shirts with a buttoned cuff that can be folded back without strain. A cuff is the band-like end of the sleeve that surrounds the wrist. How a sleeve sits depends on the fabric and the width of the sleeve, so instead of applying the same width and height to every piece of clothing, adjust while checking that you can move comfortably.
1. See whether the folds are coming undone or the whole sleeve is sliding down
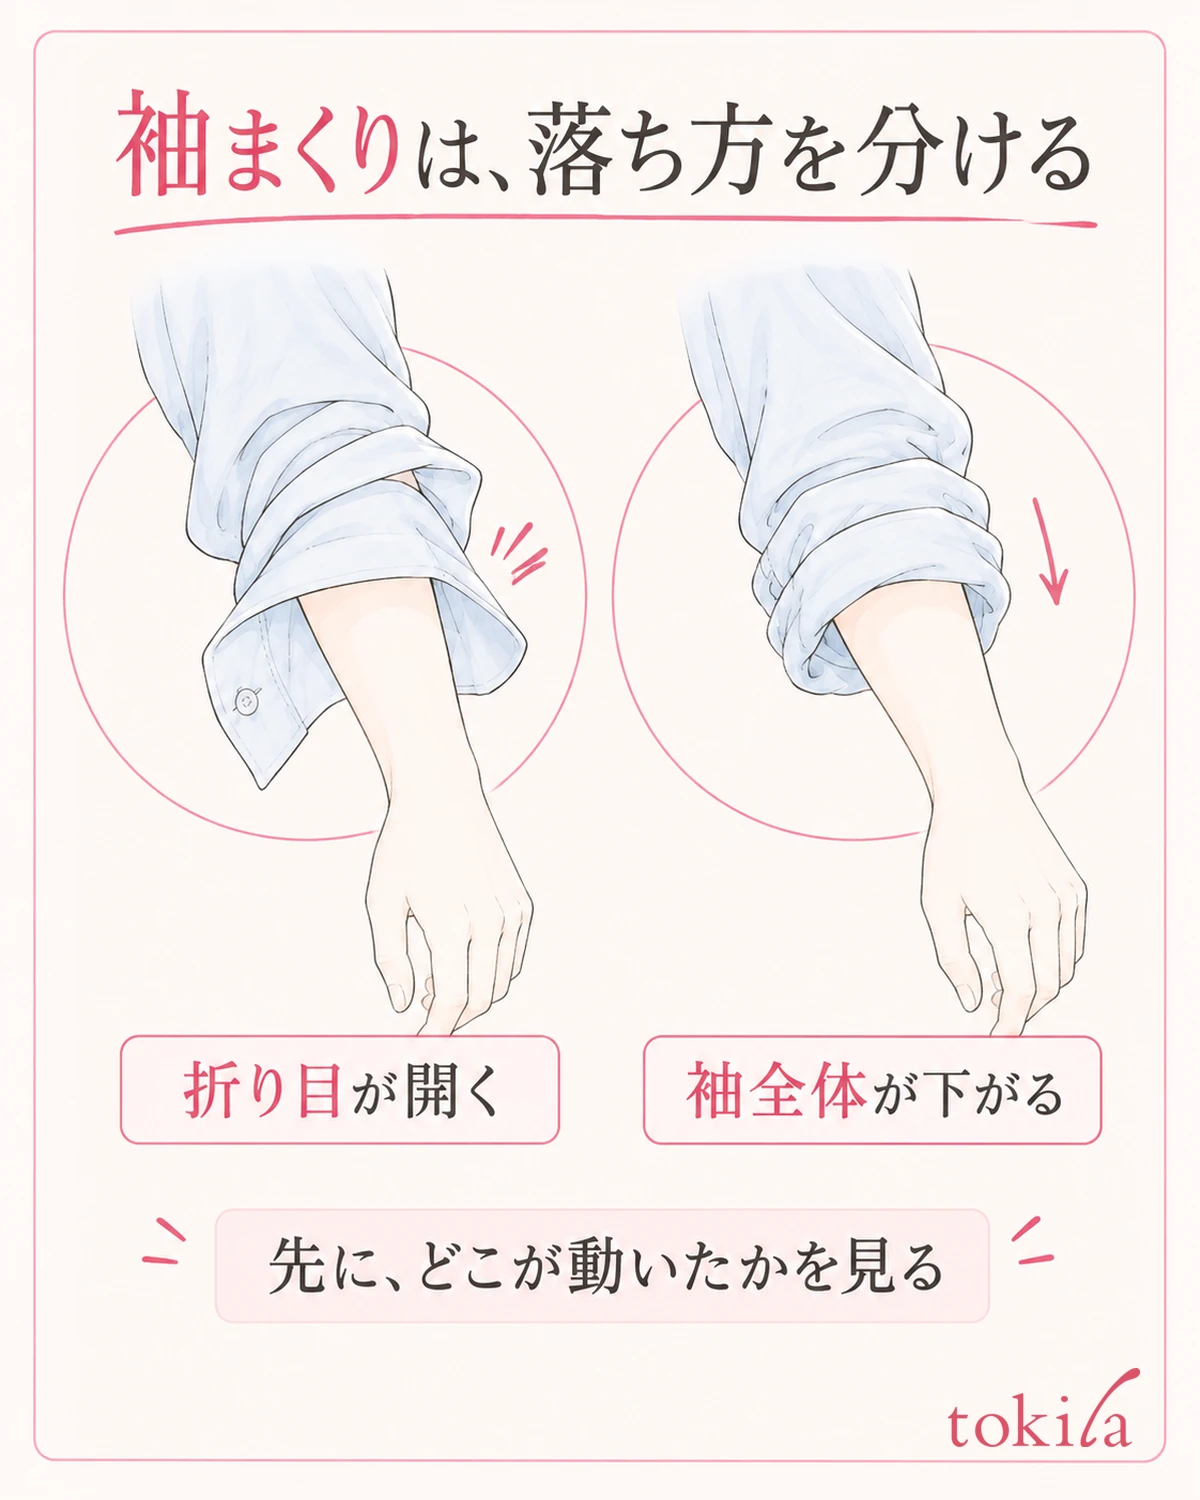
First, without pushing the fallen sleeve straight back up, look at what has changed. If only the outermost fold has opened and the cuff has returned to the wrist, check how the folds overlap. If the whole sleeve slides down while keeping its ring shape, the order of the day is to review the room between the sleeve and your arm and the position where it is staying put.
If it falls on one side only, compare the width of the folds on the left and right and the seam on the underside of the sleeve. Even if the part visible from the front is folded neatly, the fabric may be bunched in one place on the back of the arm. Look all the way around the sleeve and check for twists, slanted folds, and any corner of the cuff left hanging down.
Next, decide how you want to use the garment. The height you need differs depending on whether you want your wrists free only while washing your hands, or want to wear it as a short sleeve while you are out. Do not make raising it to a high position the goal; with your arm lowered, check for a position where the sleeve stays out of the water and does not get in the way of what you are doing.
The steps that follow cannot be applied as they are to knits without a foldable cuff, sleeves with elastic, or lined jackets. For clothes with a tab or fastening button on the sleeve, look at that structure first. If folding would require stretching the fabric or pulling hard on a seam, not rolling up the sleeves is also an option.
Rather than pushing up a wet sleeve just to tidy its shape, change clothes first if necessary and check afterward. If your skin chafes or you feel any tightness while wearing it, lower the sleeve before comparing how well it stays put. Look at the appearance and how easily you can move together.
2. Undo the button and check the shape of the cuff and the width that folds
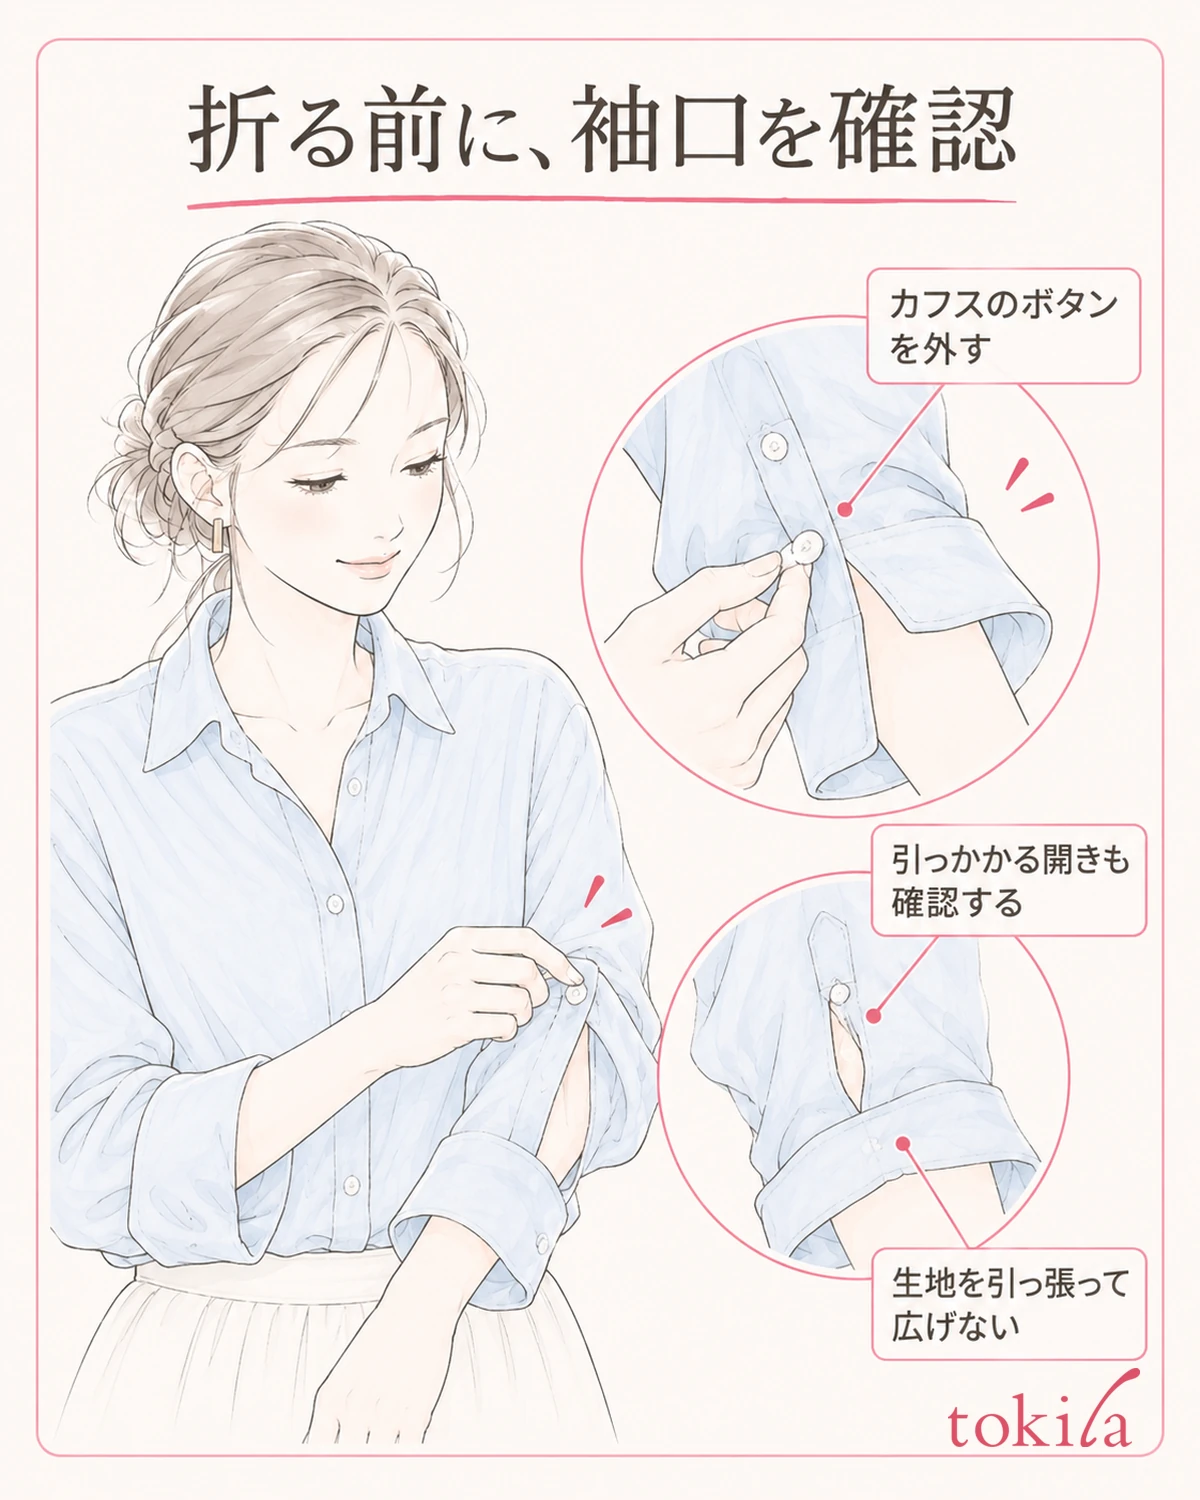
Undo the button on the shirt cuff and return the sleeve to the wrist. Undo any parts that have already set into a round shape and bring the fabric closer to flat before you begin. If you push the sleeve up to the thick part of your arm with the button still fastened, the strain falls only on the part with the opening, so it is important not to force it through.
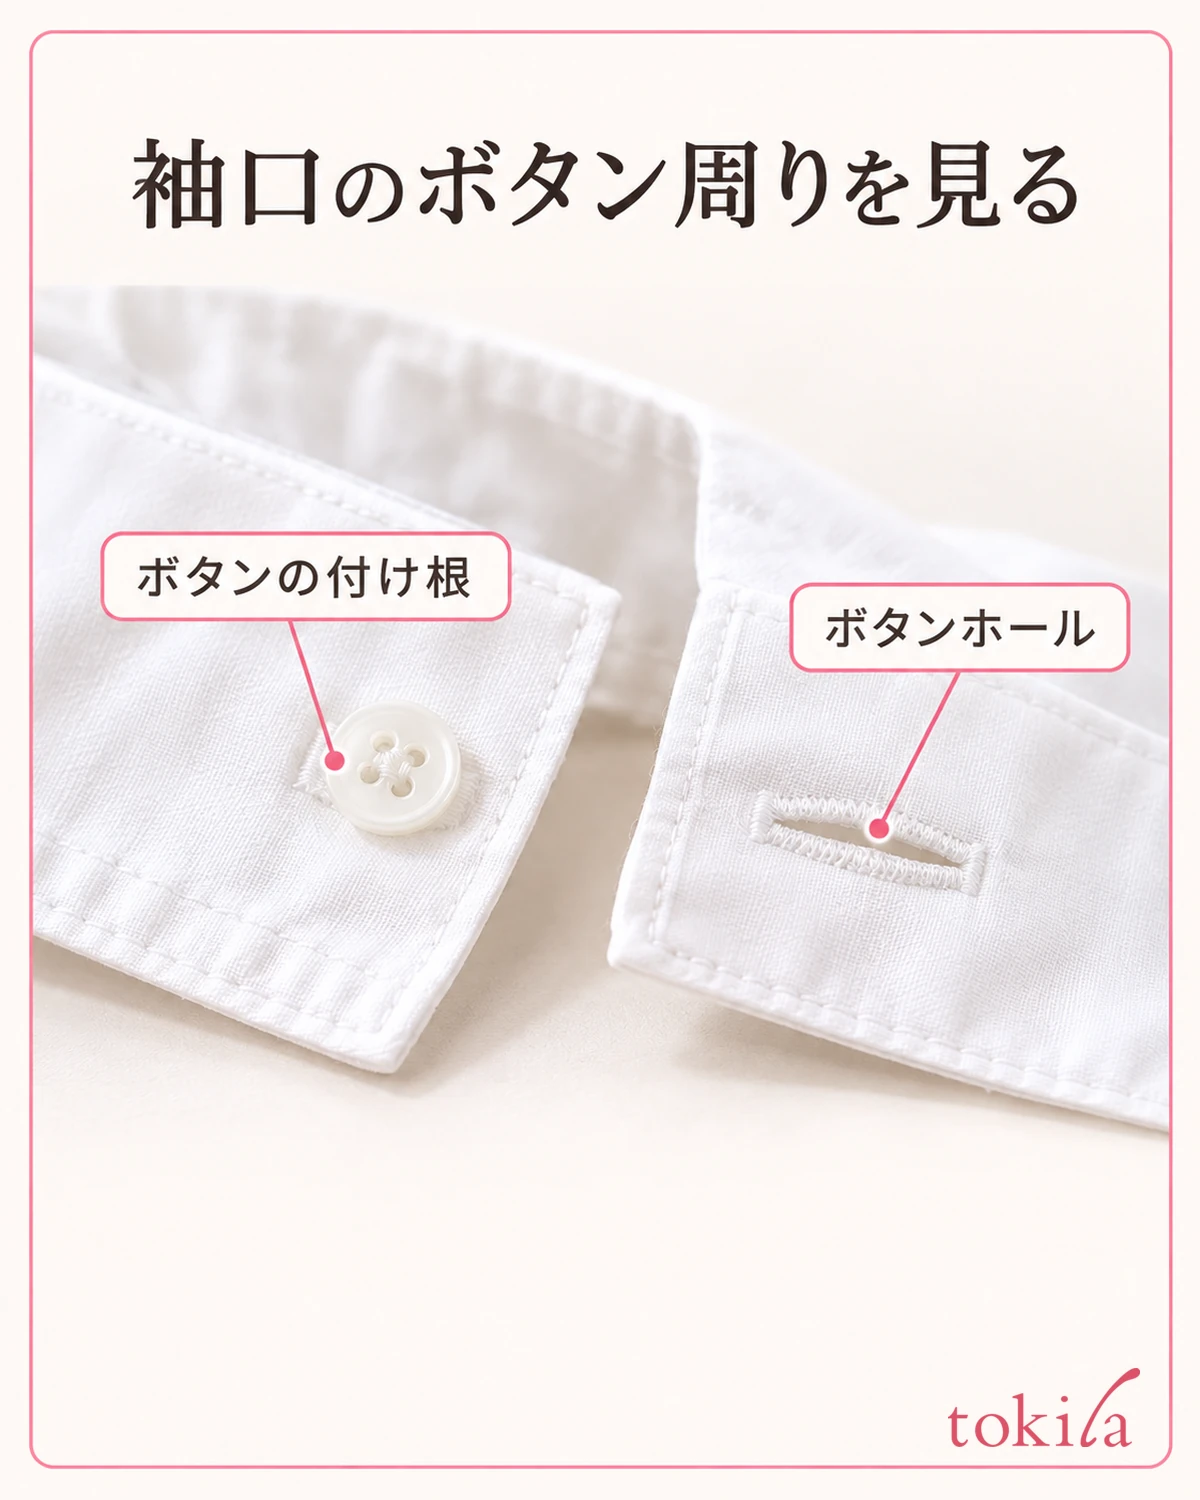
If there is also a small button on the opening nearer the elbow than the cuff, check that it does not catch when you put your arm through. Undo only as many as you need; undoing all the buttons does not necessarily make the sleeve hold together. Adjust to a state where it can be folded back without pulling the fabric, to suit the width and opening of the sleeve.
Lightly hold the cuff from both sides and try folding it outward once along its width. At this stage, do not try to gain height; just even out the width all the way around the wrist. If it is wide at the front and narrow at the back, it is easier to track the position by going back and folding again than by pulling at it while it stays overlapped.
If the sleeve has a tab for fastening it, check from the structure of the garment whether it goes through from inside the fabric or is fastened on the outside. Do not assume a decorative button is for fastening, and do not pull a tab that does not reach to stretch it. If it does not settle in the specified way, return it to its original state without applying force.
If the cuff is stiff, the sleeve is narrow or the fabric is thick, check whether the folded ring moves up your arm without strain. Do not force open a ring that will not pass when pushed, or let it dig into your skin. Do not fold as many times as with a soft shirt; decide to stop at a lower position or to lower the sleeve.
Even with a thin, smooth fabric, do not decide the cause of slipping from the material name alone. The same material label can mean different thicknesses and tailoring. Looking at your own garment with a single fold actually made, including the seams and decoration at the cuff, gives you a clue for choosing how to layer the next fold.
3. Fold the sleeve evenly all the way around and fix twists in the layers
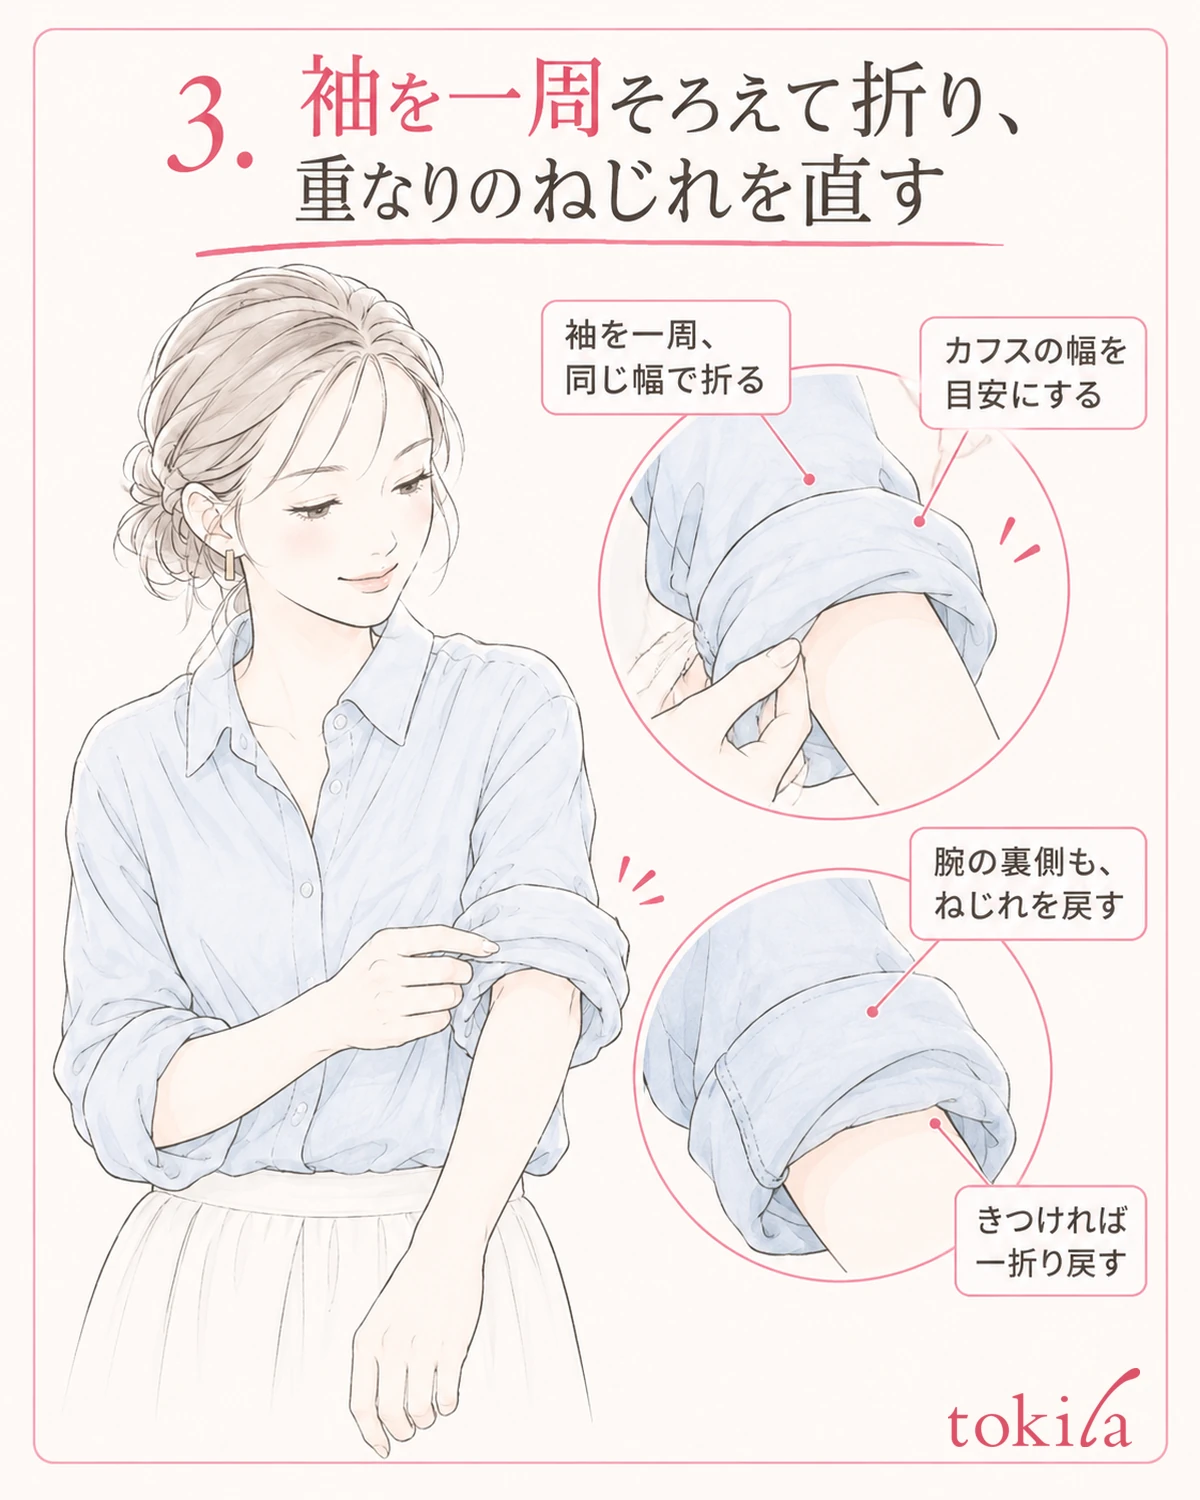
The easiest form to try first is to fold back in the same direction, using the width of the cuff as a guide. Once you have the first fold in order, turn that whole fold outward as if scooping it up. Instead of pinching and pushing in only the fabric at the front, check that the layers overlap at the same width all the way around to the back of the arm.
With each fold, check the position of the seam on the underside of the sleeve. If the seam has moved at an angle, the whole sleeve may be twisted. Rather than turning the fabric hard around your arm to fix it, undo one fold, set the seam back in its original position, and fold again. Also check that the part with the button has not become one big lump.
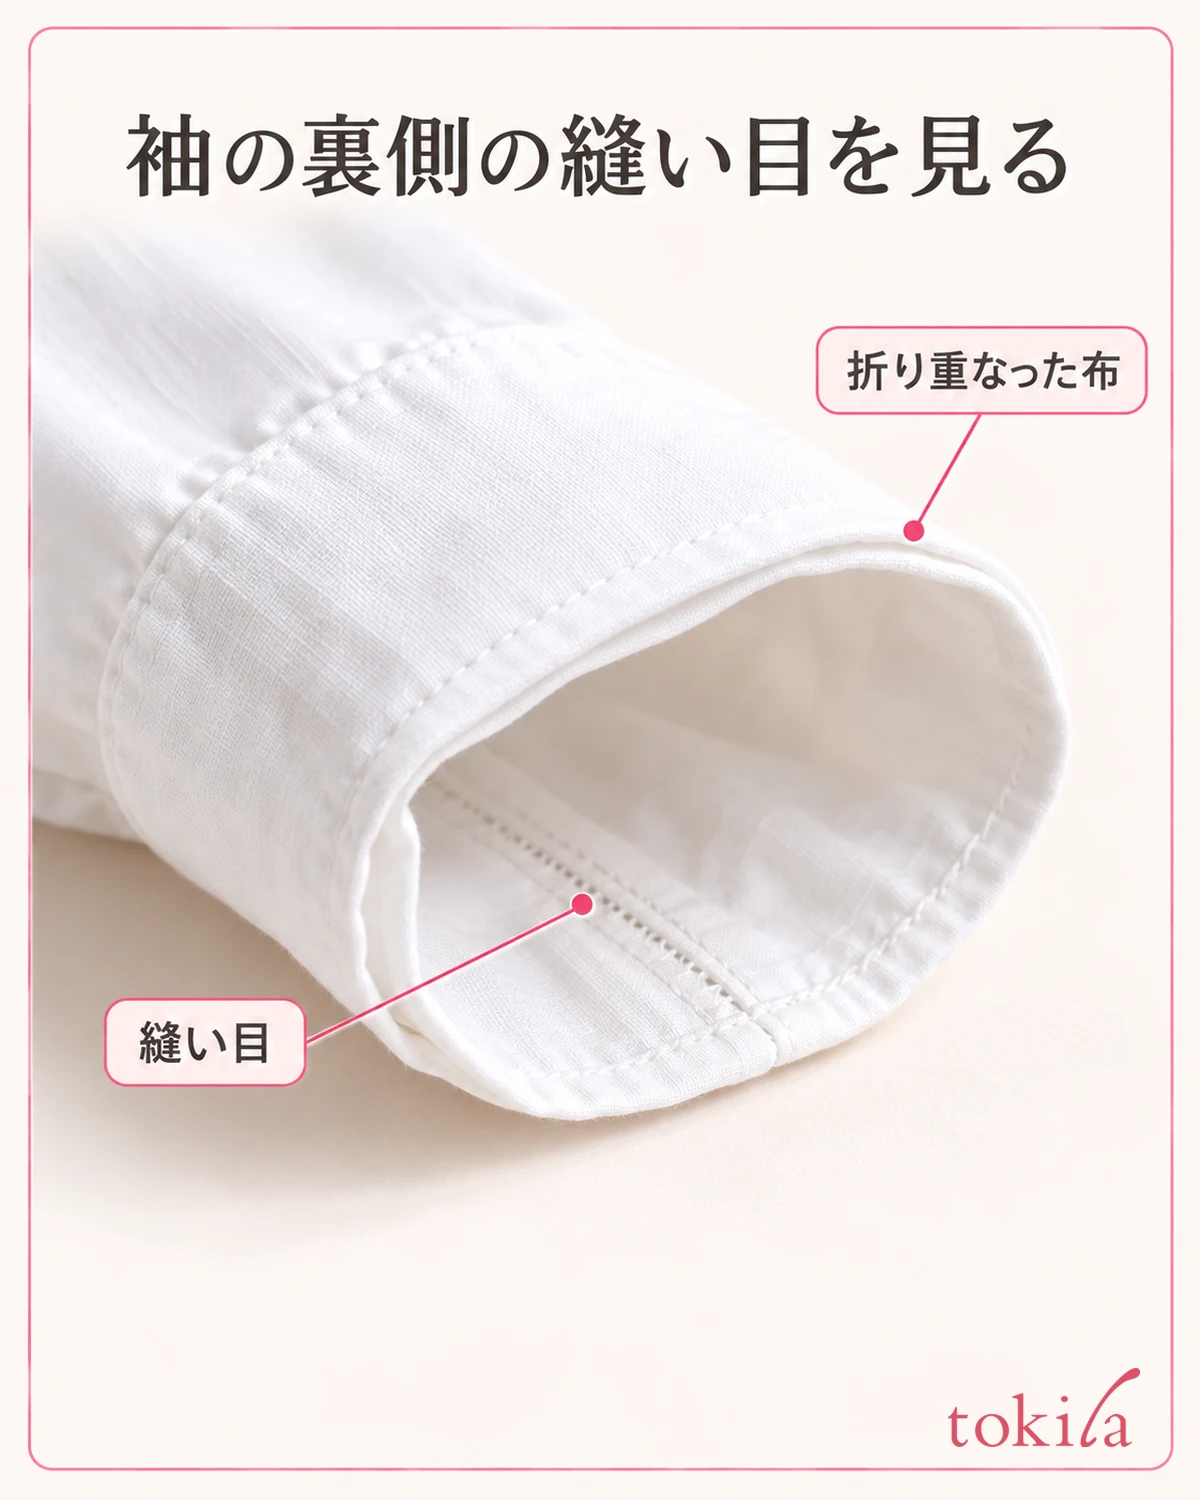
If the edge of the cuff gets caught inside the fold, do not pull only the corner sticking out; loosen the layers and tuck it back in. The key is to first make a form where the layers overlap evenly, rather than focus on how high you roll the sleeve. If the sleeves feel different in thickness on the left and right, there is no need to tighten one to match the other's height.
When checking the width all the way around, gently rotate your arm. Rather than trying to fix everything with one hand and pulling the sleeve hard, turning the side you want to adjust toward where you can see it makes the overlap of the fabric easier to follow. There is no need to force your fingertips into the inside of the ring to widen the space.
Here, slowly bend your elbow and check that the fabric does not pull tight. If the ring gets thicker with each fold and presses against the bent part of your arm, do not add any more folds. Take off one fold to lower the position, for example to a form that only exposes the wrist, and return to a height this garment can manage.
If you only push it up from above when it slips, the first twist may remain. Even when you are out, it is easier to adjust by lowering your arm, looking at how it is folded, and undoing the one fold you need to. Take the trouble to even out the sleeve all the way around, and do not fix a tight ring so that it digs into your arm.
4. If the folds open up, also try layering fabric over the cuff
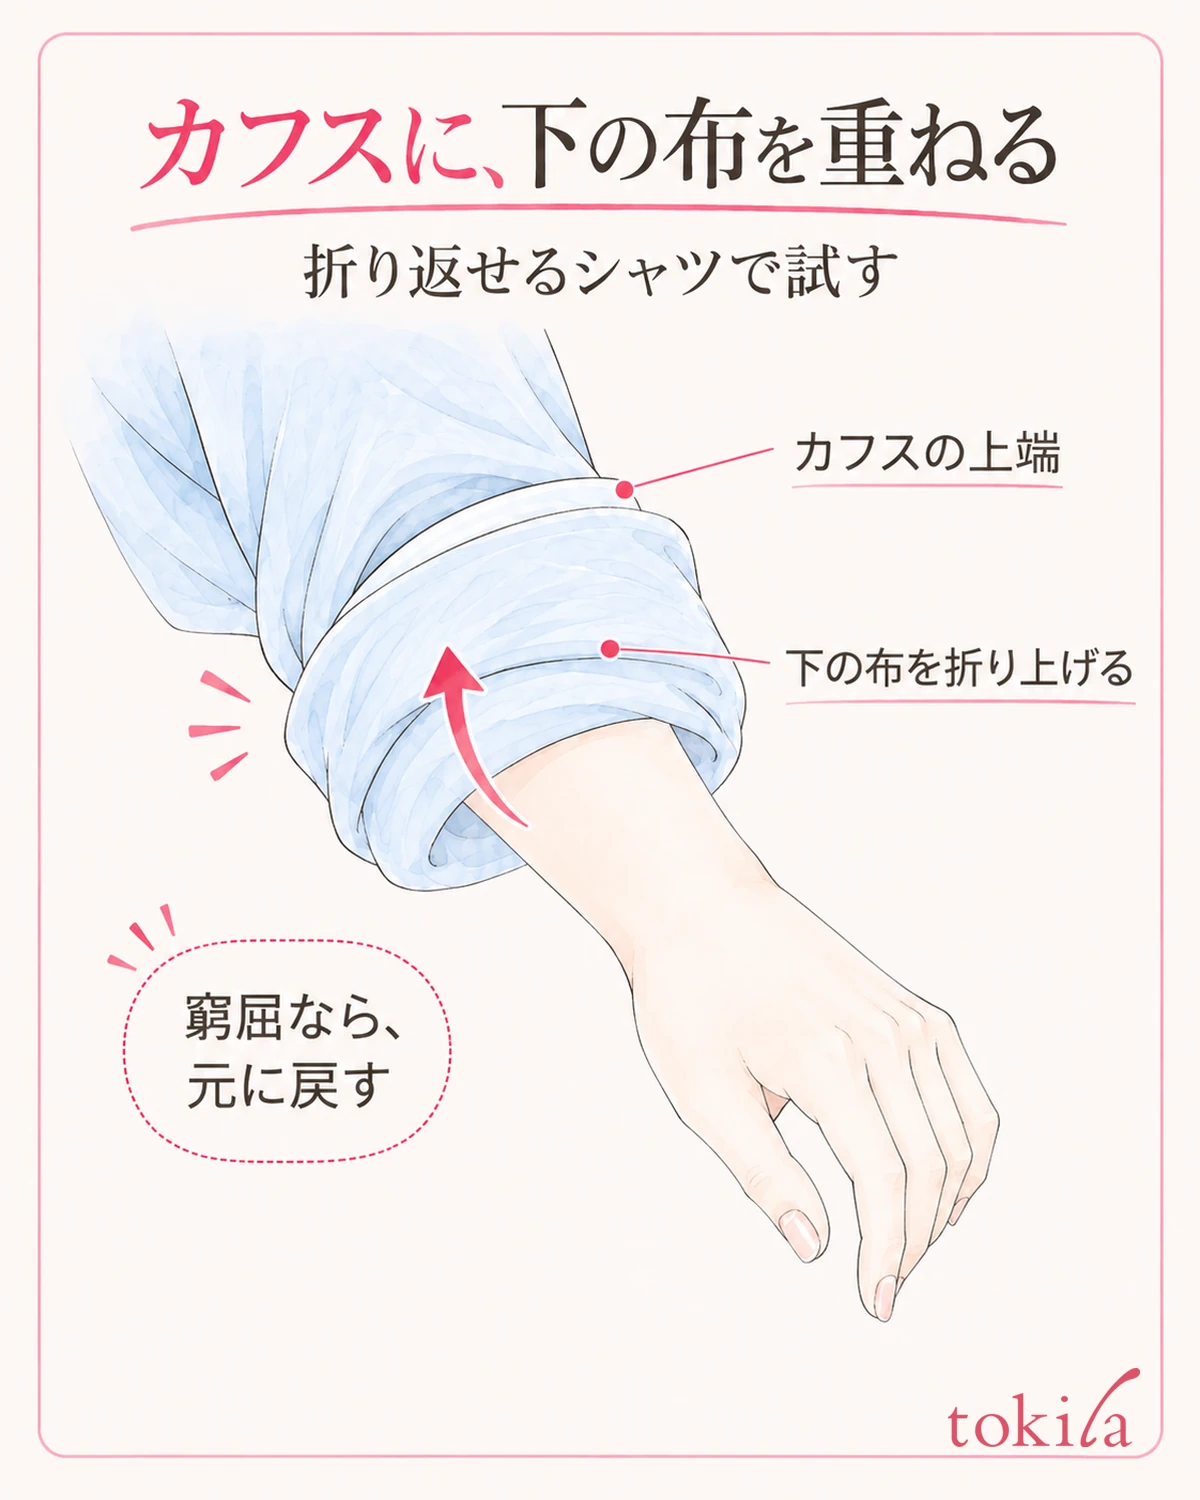
For a shirt whose edge opens even when folded evenly, there is also a method of making the first fold wider and layering the fabric beneath it over the cuff. This is one form to try on a shirt that folds back softly and has some room in the sleeve width. It is not a method that guarantees it will never fall, and it is not meant to be forced on thick or narrow sleeves.
Return the sleeve with the button undone, and turn it outward once, wider than the width of the cuff. As a rough guide, there is a form that takes about two cuff-widths, but this is not a fixed measurement. With your own shirt, look for a position where bending your elbow does not feel cramped and enough fabric remains on the wrist side for the next fold up.
Next, lift the lower edge of the fold formed on the wrist side and layer it under the cuff. Letting the top edge of the cuff show slightly makes it easier to check how far the layers overlap. It is not about folding the cuff itself narrow; it is the action of folding the sleeve fabric beneath it up and outward.
After you have tidied the front, check that the same layering is in place on the back of your arm. If the fabric is left over on one side only, do not hide it by pulling the edge hard; undo the lower fold once and adjust the width. If the corner of the cuff or the button presses against your skin, or the ring becomes too thick, stop this form and go back to the even-fold method.
If the whole sleeve slides down every time you move, changing only how the folds are layered may not be enough. If the garment has a fastener built in, use it in the specified way; if not, consider changing into a short-sleeved garment. Do not try to make up for poor staying power by tightly wrapping your arm with rubber bands or stationery.
5. Move your arm to check, and adjust one thing at a time to match how it falls
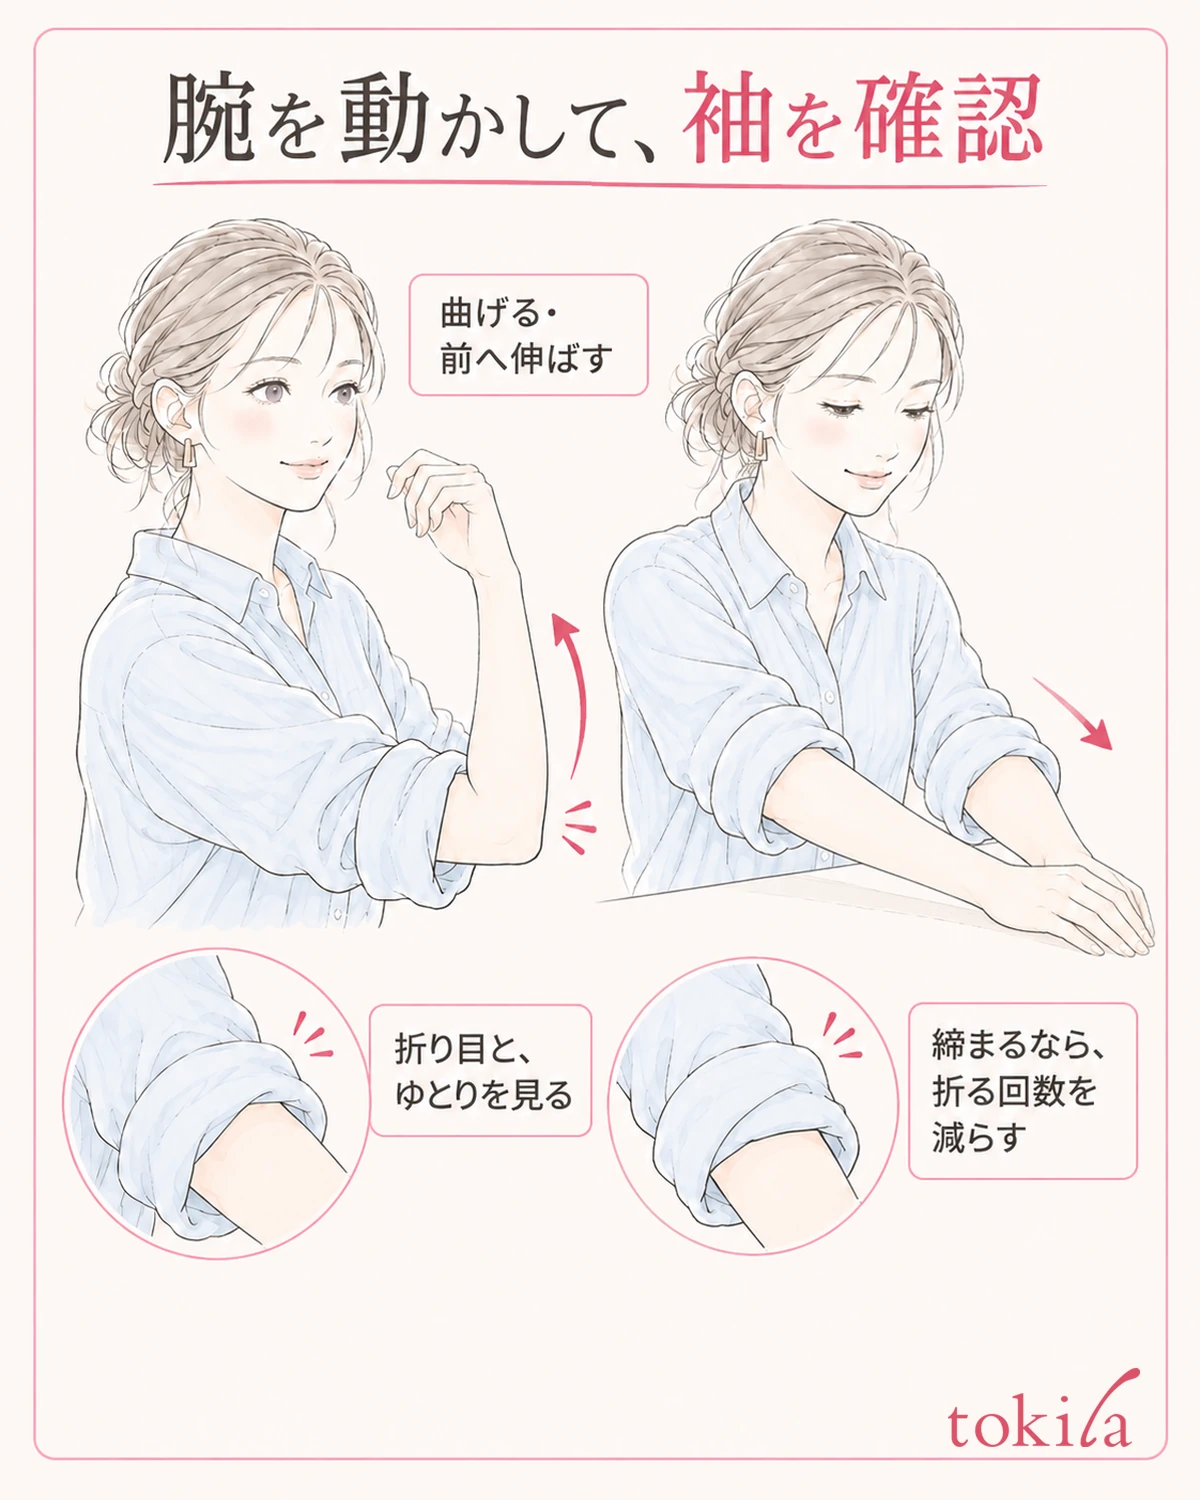
Once the shape looks right in front of the mirror, bend and stretch your arm, reach forward, and make movements close to your usual tasks. See whether the fold opens when you rest your hand on a desk, and whether the whole sleeve slides down when you hold a bag. Check separately that the left and right match while still, and that it stays manageable when you move.
If only the outer fold opens, undo one fold and review whether the layers overlapped all the way around to the back of the arm. If it slides down while keeping its ring shape, do not push it up high by force; check the position where it is fastened and the room in that sleeve. If it is hard to bend your elbow, first try reducing the number of folds.
If you change the fold width, height and number of folds all at once, it becomes hard to tell what you fixed. Try this order: first undo the twist on the back and move; next, if necessary, change the fold width. That makes it easier to find a form that works well for your own shirt. If you keep photos, looking at the back of the sleeve as well as the front helps when you look back.
If only one sleeve falls when you are out, do not force the other one up to the same height; check how each is folded. The way you use each arm and the thickness of the layered fabric can also differ. Adjust starting from the visible fold width, within a range where both sides move easily.
When you wear a jacket over them, also check that the thickness of the folds does not catch inside. If it feels cramped, lower the sleeves before putting it on. If the fabrics pull on each other when you pair it with a stole or similar, also refer to the steps for reviewing a stole that slips off, and adjust by separating which one is moving.
When lowering the sleeve, do not pull it down from above all at once; open the folds in order, starting from the outer one. Check that there is no pulling around the seams and buttons, and care for fold wrinkles according to the garment's care label. Rolled sleeves do not necessarily become more stable the more you fold. Please review, in order, the structure of the cuff, the way the fabric overlaps, and the room to move.



