
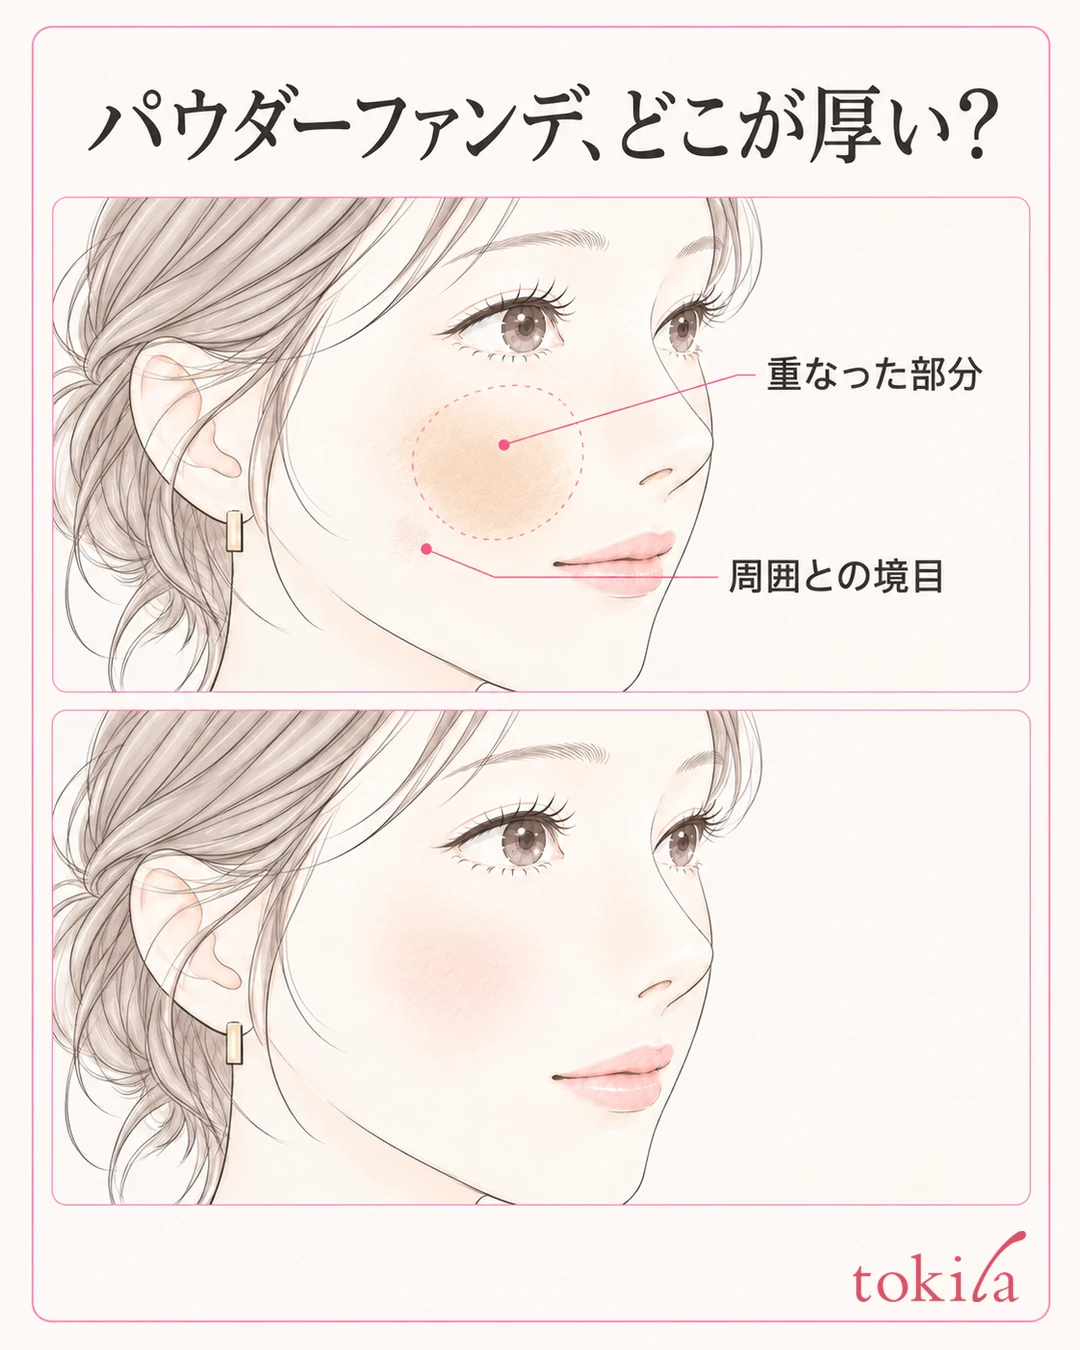
The more layers of pressed powder foundation you apply, the thicker your cheeks look. You want a thinner finish, but rubbing again and again with the sponge lifts the color away. When that happens, before adding fresh powder, check where it is thick and how much you picked up in the first place.
This article reviews that heavy look right after application from three angles: the amount you pick up, where you place it, and the finish. It mainly covers using solid pressed powder foundation with a sponge. Follow the instructions for the product and tools you use first, then check a small area with a small amount before adjusting.
1. Tell thick spots apart from a color that doesn't match
First, stop adding powder, hold the mirror a little farther away, and look at your cheeks and jawline. Separate whether only one part of the cheek has an opaque buildup of color, whether your whole face looks lighter than your neck, or whether some areas look powdery. You do not need to pin down causes such as dryness or oil just from how it looks.
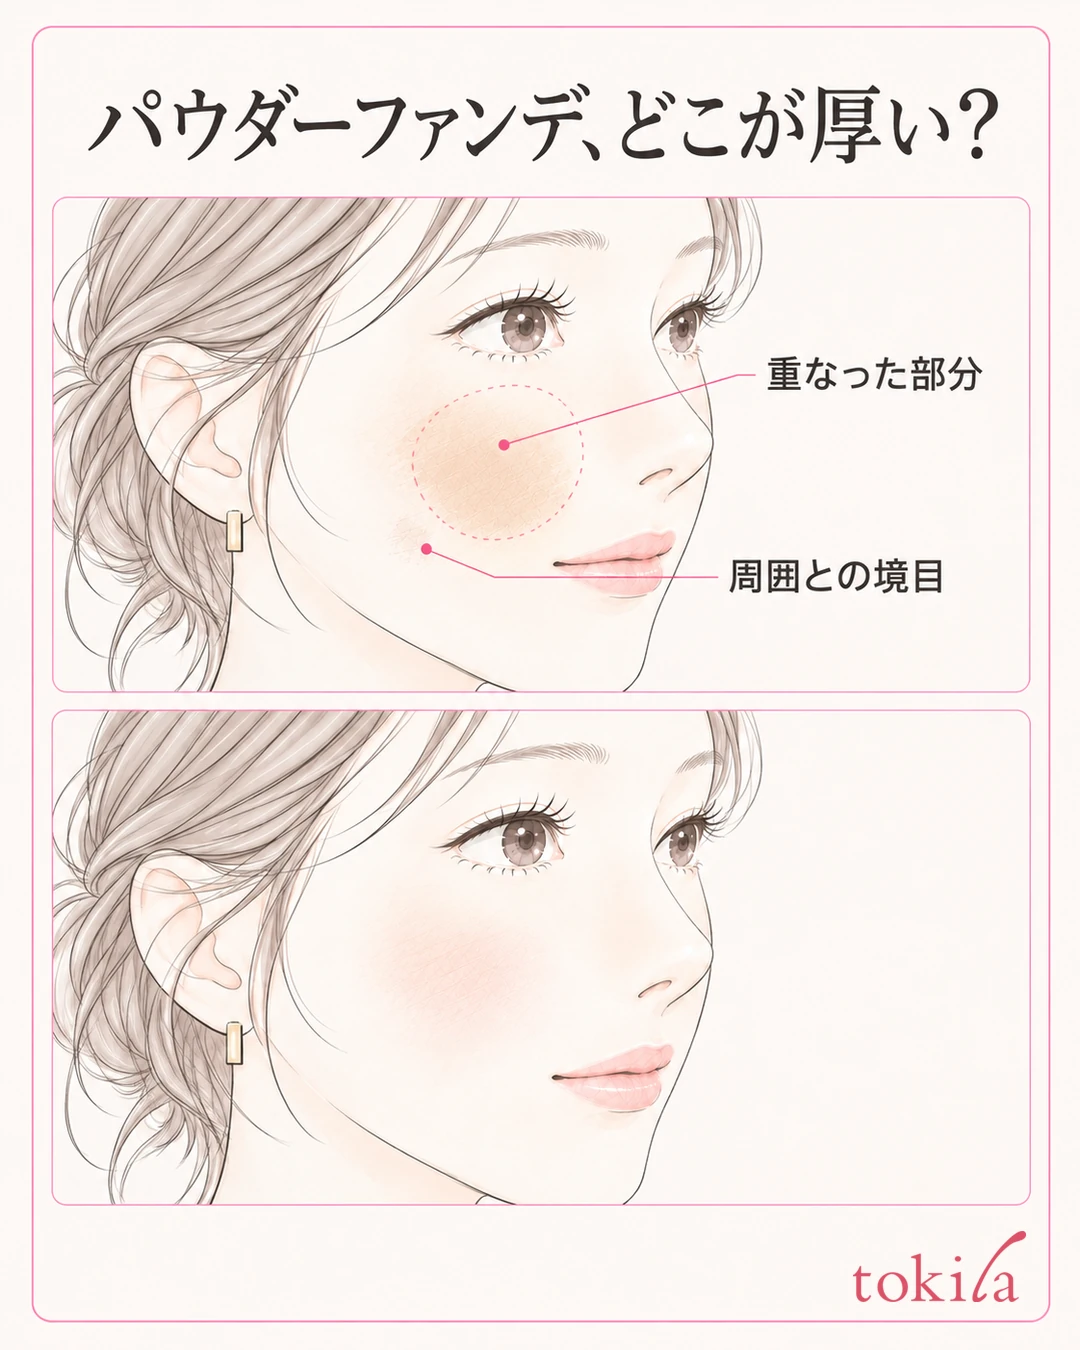
If only the layered area turns into a flat patch of color with a visible border around it, that is a clue to review the amount and the area you apply to. On the other hand, if the color of your whole face looks off even after a thin application, simply using less powder may not solve it. See also how to check your foundation color.
Adding more foundation to a powdery-looking spot can make the original layer thicker. Try not to treat "color I want to hide is still showing" and "the thickness of the makeup bothers me" as the same problem. Looking at the surface in a close mirror and at how your face connects to your neck in a distant mirror makes it easier to choose what to fix.
This article covers how to pick up and apply the pressed powder foundation itself. If it is the finishing powder you used after the base that bothers you, see adjusting when you have applied too much face powder. Also think of streaks from applying liquid foundation with a brush, and creasing that appears as time passes, as separate issues.
Before adjusting, recall today's order of steps. Did you layer before the primer had settled? Did you pick up powder again and apply it to the same cheek over and over? Did you add the same amount all the way to the outer edge at the end? Choose what to review from your actual process. You do not need to judge a product's quality or your skin type from the thickness of the powder alone.
Look at both cheeks under the same light and check that only one side isn't in shadow. If you add powder each time you change where the window or light is, it becomes hard to tell how it looks from how much is actually there. After matching the light, decide on one spot to fix this time before picking up your tools.
2. Check the product's instructions and the condition of the sponge
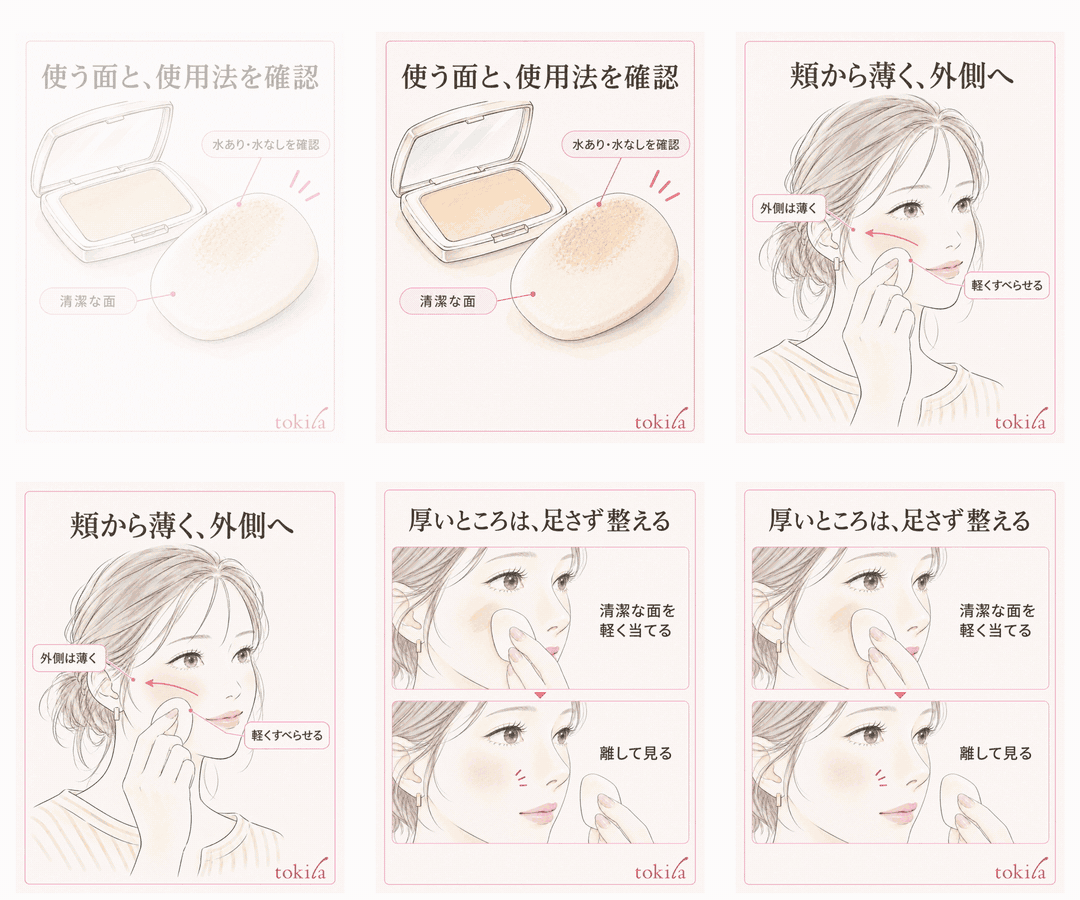
In the compact and the instructions that come with the product, check which sponge to use, whether to use it dry or whether it may be dampened, and how much to pick up. Don't assume that a powder can be used wet just because of its form, and don't dampen a dry-use product on your own judgment. The steps change between wet and dry use, so the figure in this article shows an example with a dry sponge.
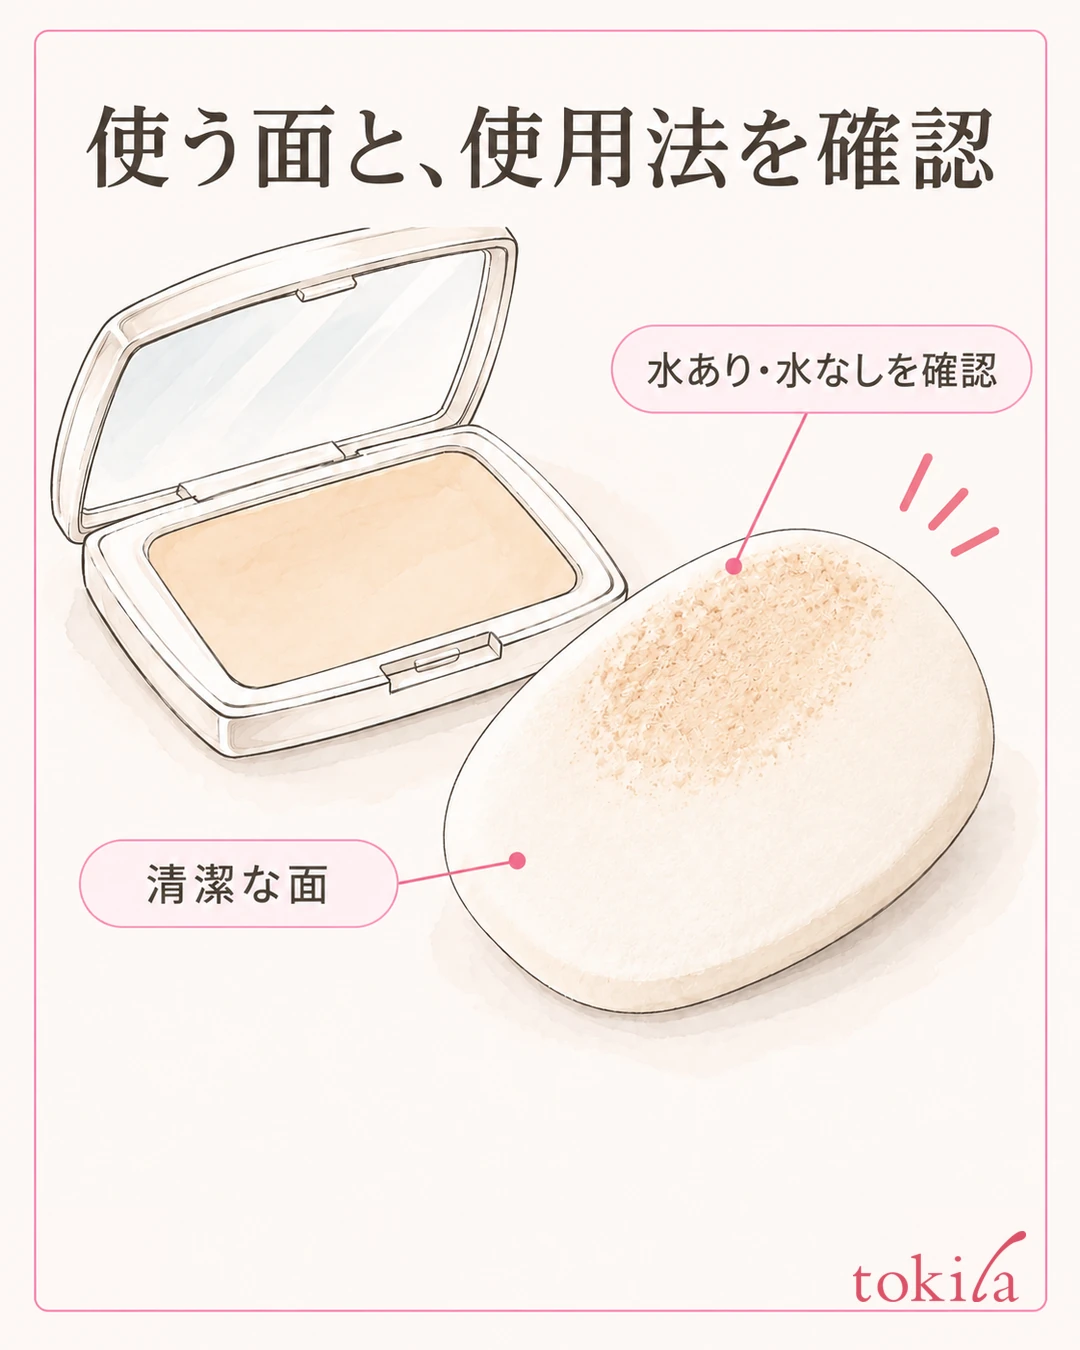
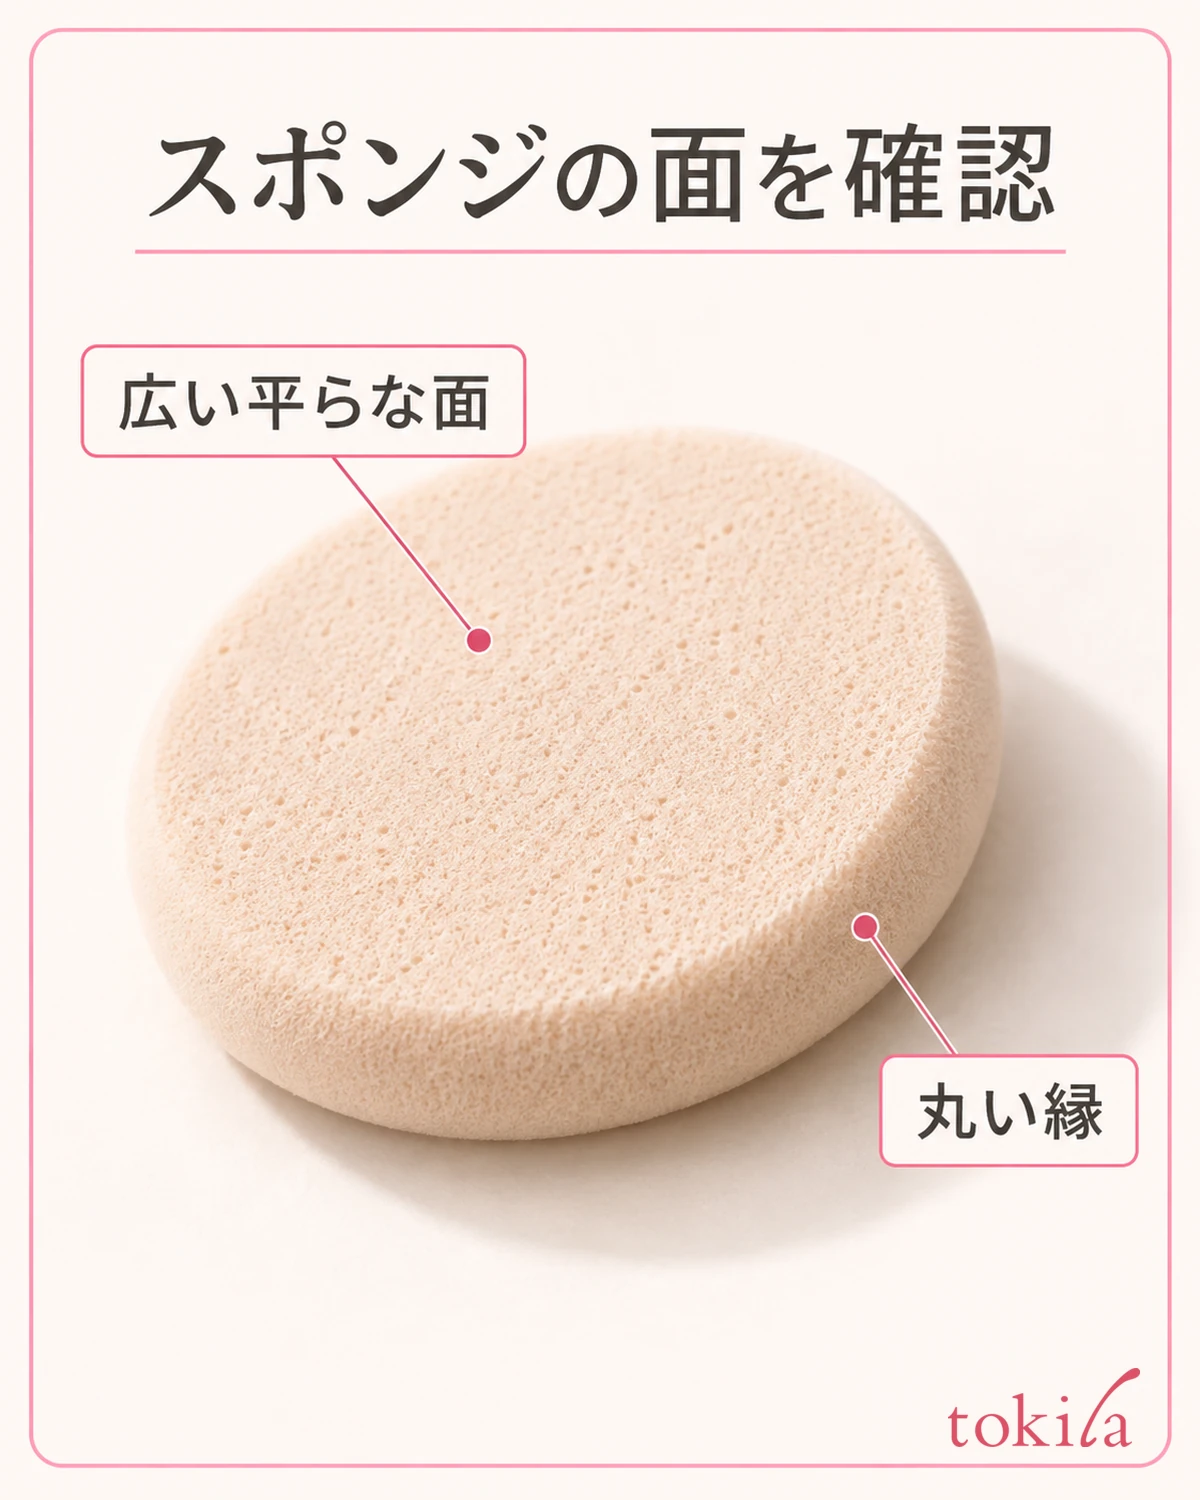
Open up the sponge and look for hardened powder or oil and for surface damage. Rather than layering new powder over a dirty surface, get the designated clean face of the sponge into a usable state. Let washed tools dry thoroughly following the manufacturer's drying instructions before use. Cleanliness and the amount you apply are separate things to check.
Next, check that your skincare and primer have settled as the product's instructions describe. You do not need to set the same waiting time for every product. If a lot of product remains on the surface and still shifts around, go back to the earlier step before sealing it with powder, and check how much you used and the conditions for layering.
When reading how much to pick up on the sponge, separate the "area" in the instructions from the "thickness of powder." Even if the instructions say to pick up on half of the face, that does not mean pressing it back and forth over that area to pile the powder up like a mound. After checking the product's guideline, look at the state after one pick-up and at how it goes onto the first cheek.
When holding the tool, support the face you use and don't press hard with just a fingertip on one small corner. If you feel you can't get color unless you add more force, don't keep rubbing the same spot; check the surface of the powder and the sponge. Tool care is covered in how to wash and dry brushes and sponges.
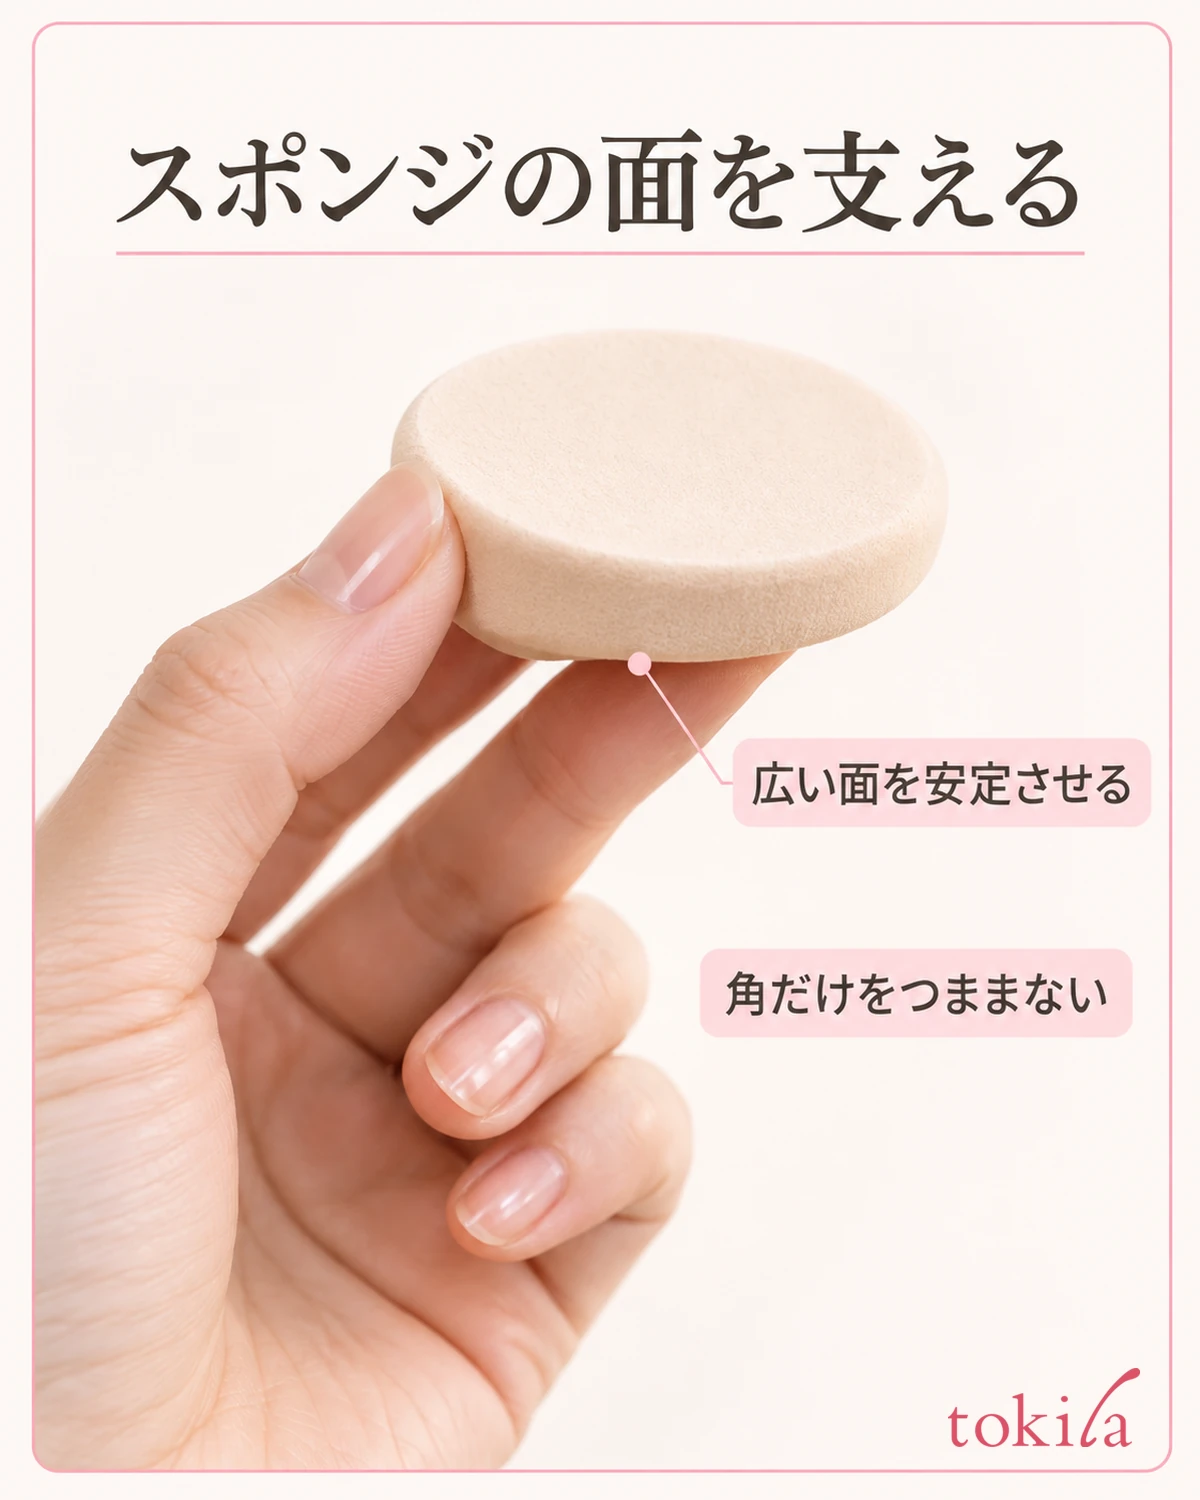
If your sponge is small and the instructions about area are hard to apply as written, look at the guidance on the accessories or recommended tools for that product. Don't treat half of a different sponge as the same amount; judge by the color that first goes on a small part. You do not need to spread leftover powder over areas that don't need it just to use it up.
3. Spread thinly from the cheek and don't keep adding powder outward
Pick up the powder as instructed and first check the finish on one cheek. Don't assume that pressing harder makes it thinner; work with light movements that don't pull the skin.
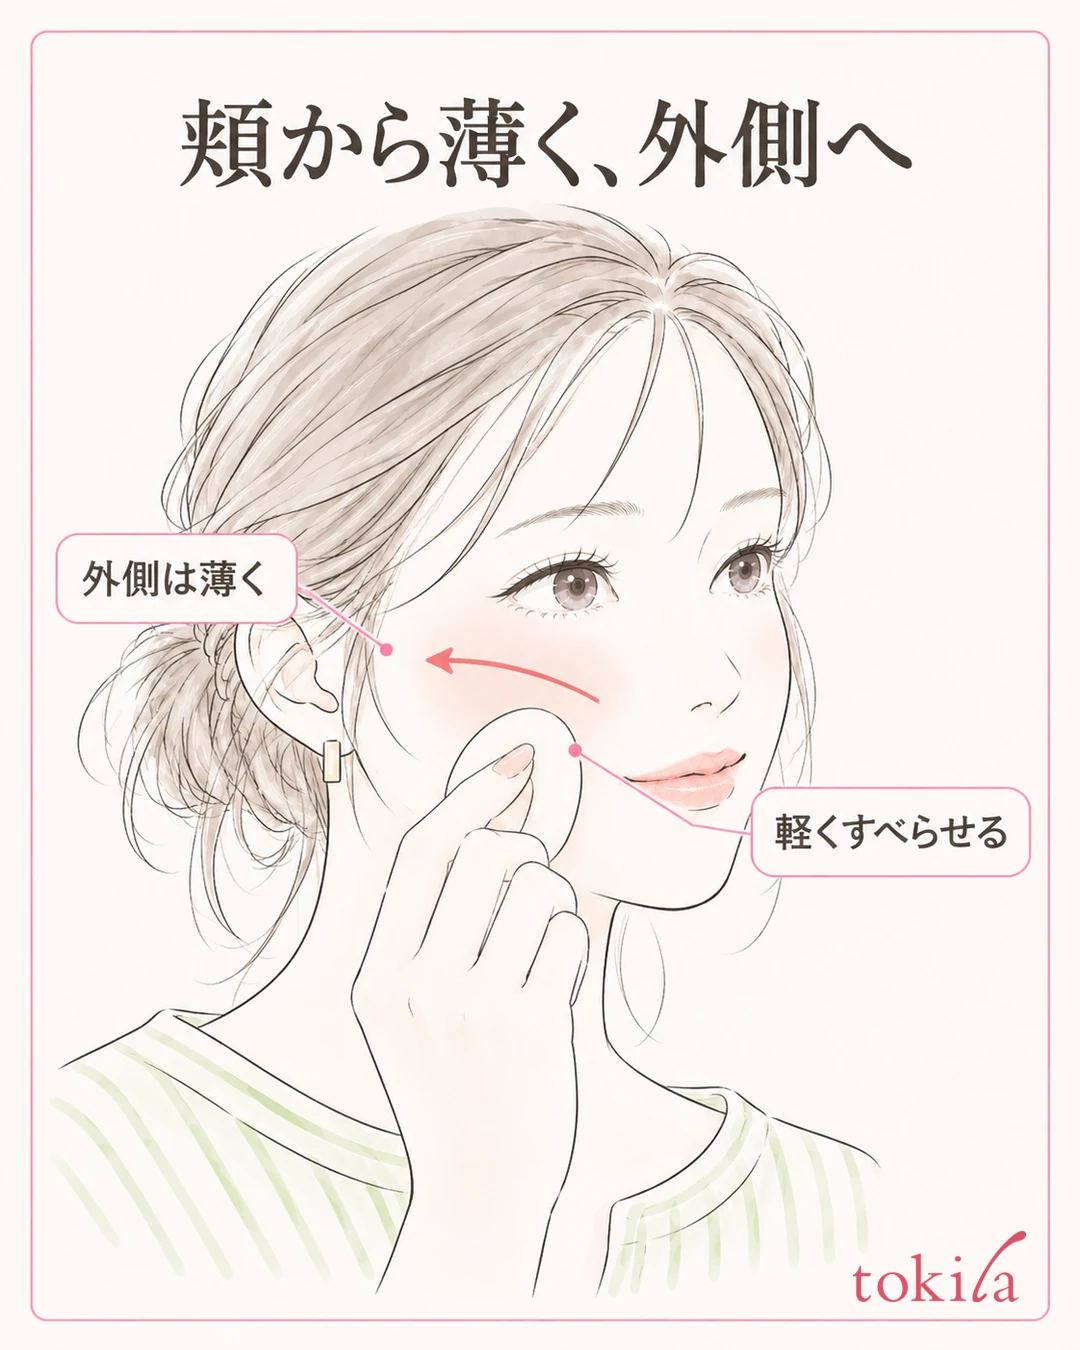
Color tends to build up where you place the powder first, so don't suddenly put a lot on the jawline. Apply it to the part of the cheek you want to finish, then spread outward as the product's instructions describe. You do not need to fix the number of movements or the pattern for every product.
Once you have finished one cheek, move the mirror away before picking up powder again. See whether any spot lacks color and whether the current amount is already enough. Don't aim only to make the whole face equally opaque; check that it blends naturally. Do the same for the other cheek, creating a rhythm of picking up, spreading thinly, and looking from a distance.
Around the nose, mouth, and eyes, avoid picking up the same amount as for the cheeks each time. If the instructions say to finish with the powder remaining on the sponge, use that method; if a different amount is given, follow it. Don't keep layering on areas that move a lot, and for narrow areas, handle them while checking the usable face or corner of the tool. Do not press anything into your eyes or mucous membranes.
At the hairline and jawline, blend the edge of the applied area thinly. Even if the border bothers you, you do not need to add new powder to the outer edge and make your whole face evenly thick. Rather than trying to erase small unevenness in color by applying more over the whole face, choose between touching up that spot or stopping with the current finish.
Even if some areas you want to cover remain, take a step to look at your whole face once you have finished it thinly. If you add more, put a small amount on a narrow area and don't spread the color too far outward. If you use concealer, check the order of layering with the foundation, and don't turn it into a routine of piling everything thickly over the powder.
4. Smooth out thick spots before adding new powder
If only one part gets thick right after application, first put the compact down. Check for a clean part of the sponge without powder on it and start adjusting from the small area that looks thick. The aim is not to rub your whole face and remove all the powder, but to see whether you can blend it into the thinly finished surroundings.
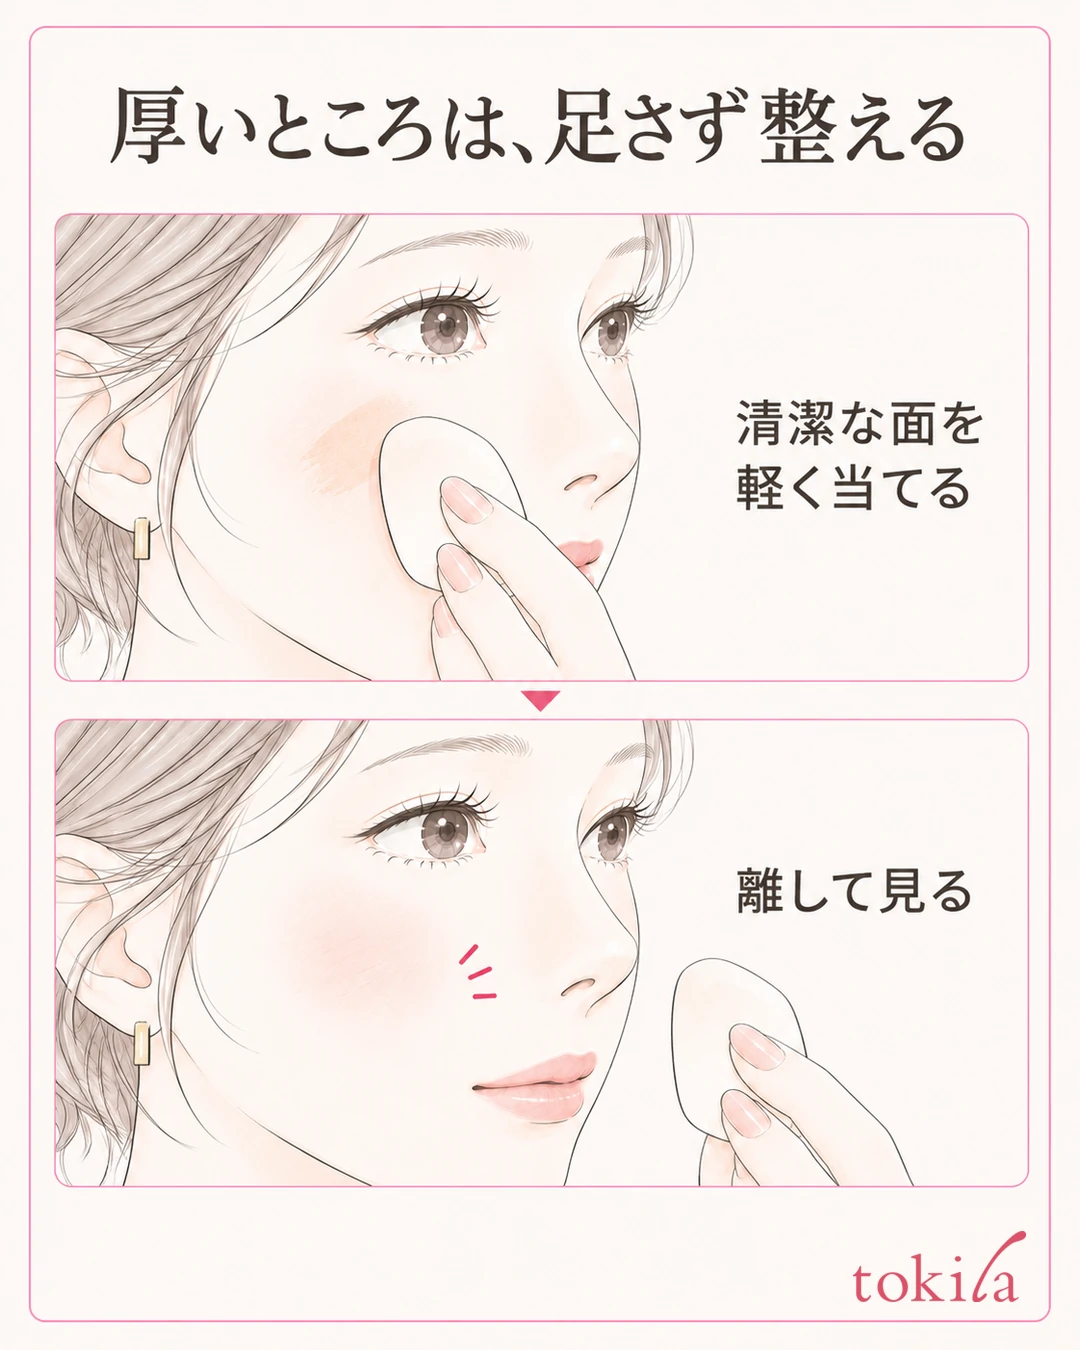
However, if the product you use specifies a sliding method, follow that guidance first. Don't confuse the action of applying anew with the action of smoothing out excess thickness.
In the example in the figure, a clean face is touched lightly to the cheek and lifted away to see how it has gone on. Don't dig the sponge into your skin or move back and forth over the same spot many times. If it looks natural after one adjustment, stop there. Even if you feel the color has lifted, compare it with the surroundings in a distant mirror before immediately putting the original amount back.
If adjusting moves the primer too, the holes where color has lifted get bigger, or the more you rub the rougher the surface looks, don't keep smoothing. If you need to remove part of it, tidy that area following the instructions of the makeup remover you use, and consider rebuilding thinly from moisturizer or primer. If you lack time or tools, stop before covering the thick layer further.
Consider that sunscreen and similar products in the redone area may also come off, and check the steps you need. To reduce thick powder, don't rely on the idea that piling a lot of emulsion or mist over it will always fix it. If sweat, oil, or creasing after being out is the main issue, see also the order for touching up makeup.
After adjusting one part, check once more that you have switched to a clean face. If you smooth another cheek with a face that has picked up the color you removed, you will lose track of where you put the color back. If the places to fix keep increasing, rather than continuing partial fixes, divide the process and take time to review the whole.
5. Check your whole face and change one thing, in amount or area, next time
Finally, don't judge only in the close mirror; step back to a distance where you can see your whole face and neck. Look at whether it blends naturally from the inside of the cheek outward, whether a thick band of color remains on the jawline, and whether the areas around the nose and mouth have become thick. Return to a natural expression and also check for buildup in the parts that move.

If the color looks off after a thin finish, it is time to review your color choice or the combination with your primer rather than rubbing until the powder is gone. Some skin color remaining in places and the base being thick are separate judgments. On days when you want to keep your preferred coverage, think of a small touch-up where needed rather than adding over the whole face.
Next time, change one of these: the amount you pick up first, where you place it, or the number of times you add to the outer edge. Briefly noting actual actions such as "after finishing my cheeks, I added powder to the outside again" helps you sort out at which step it got thick. Even without measuring numbers, you can use it as a memo to look back on your own process.
If you still get the same result after reviewing the amount, check in order the sponge's dirt or damage, how well the primer has settled, and how the product is used. Don't decide by category alone, such as "thinner is always better" or "high-coverage products always get thick." If it is hard to get close to the finish you want with the products you have, consult the official explanations or ask at a store.
The heavy look of pressed powder foundation comes down to thinking separately about the amount you pick up, where you place it first, and how you finish the outer edge. Step back and look once before adding new powder, then adjust the existing thickness in a small area. Each time you fix one part, don't redo the whole face; choose a balance between the coverage you need and a light finish.
To avoid repeating the cycle of adding and fixing at every check, you may set up pauses to step back and look once each at the cheeks, the small areas, and the outer edge. What matters more than keeping to a count is being able to judge whether the next bit of powder is truly needed. Have a marker for when to stop once the finish looks good.
Written by the tokila editorial team. We have organized judgments and adjustment steps you can review with the tools you already have.



