
When you try to remove finished nail tips from a practice stand, the tip alone may flex, or the whole handle may pull out of the base. When that happens, before pulling harder, take another look at which connection you are actually trying to release. The fixing material on the back of the tip and the part that holds the handle to the base are separate places.
This article explains what to check before removing practice or display tips from a stand used to make nail art on a desk. It does not cover removing tips worn on your natural nails or handling uncured gel. The basic rule is to follow the instructions for the fixing material and tools, and to stop bending the piece if it will not come off.
1. Separate the tip-to-handle connection from the handle-to-base connection
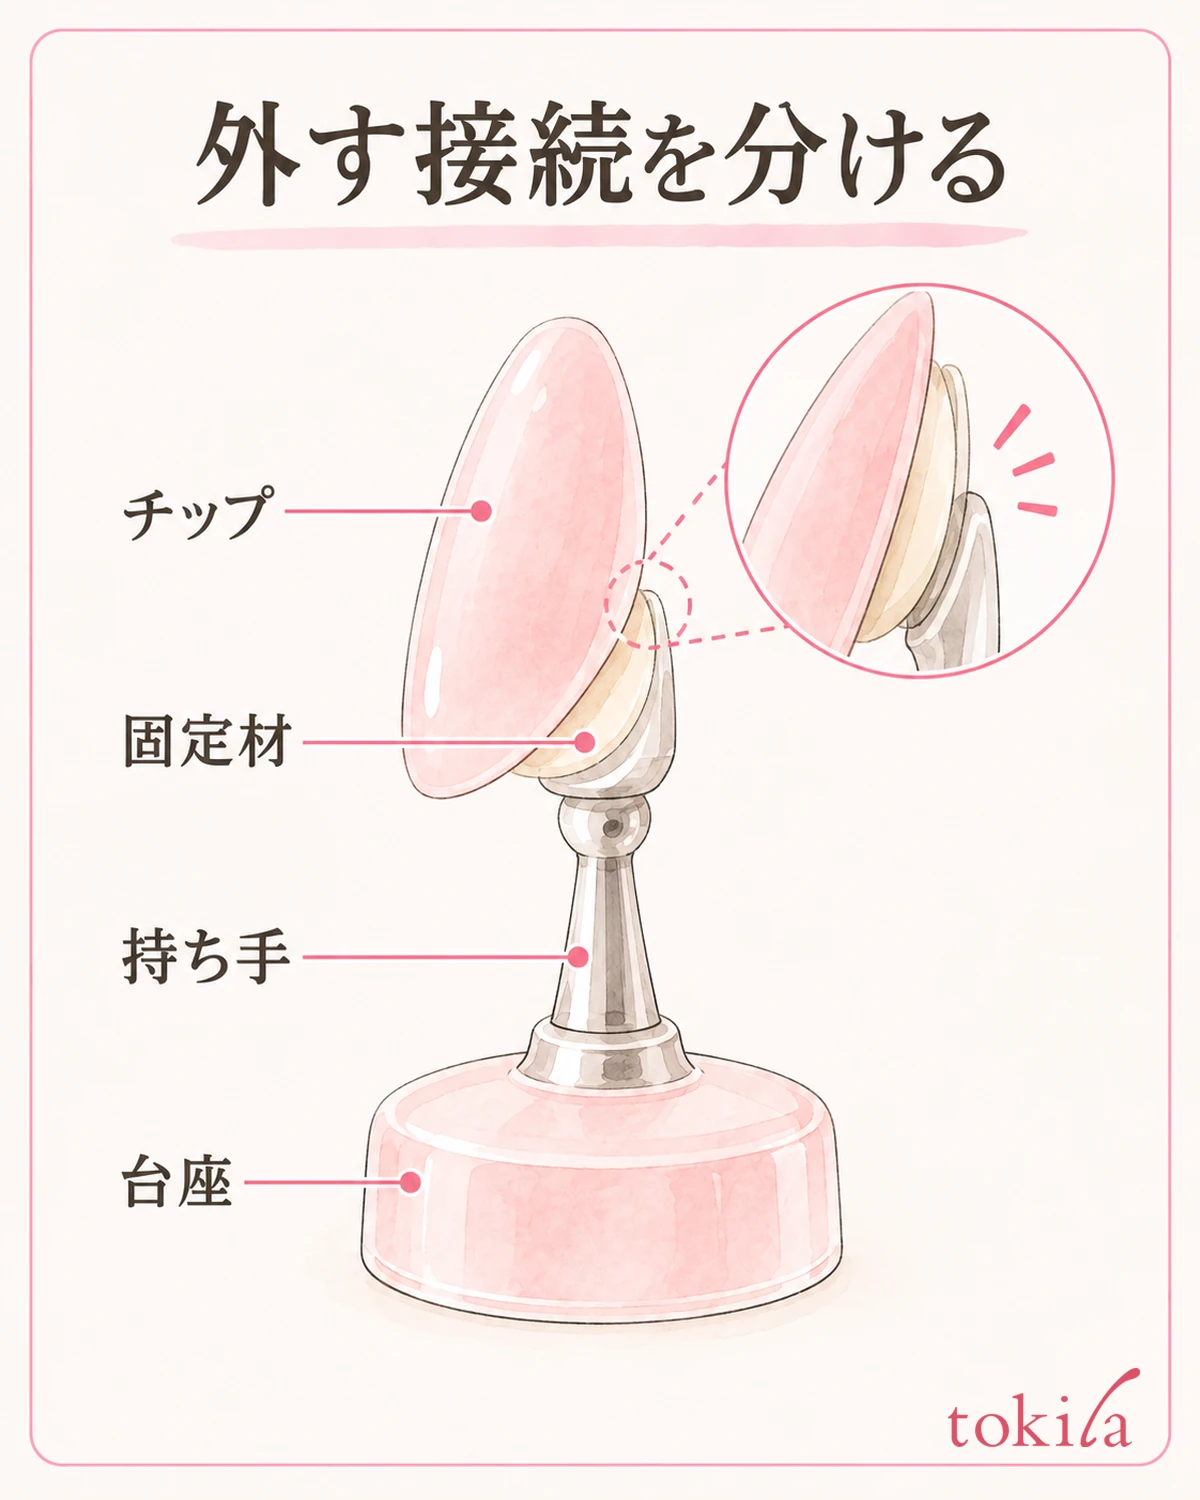
First, place the tool on a desk and look at its structure from the side. Check whether the finished tip is at the top, the fixing material is on its back, and the handle and then the base are underneath. On some products, the handle and base are one piece. Do not decide where it comes apart based only on the number or color of the parts; compare it with the illustration that came with your tool.
Even with a type whose handle can be pulled out of the base, that movement alone does not release the tip. Whether to remove the handle first or leave it on the base while you work depends on how the product is meant to be used. Do not hold the base down and pull hard on the tip to separate both connections at once.
Also work out whether the tip is not moving or the handle is wobbly. If the handle moves too and your hand feels unsteady, check how the tool is positioned before applying force to the tip. Clear some space so that you can see the connection without touching neighboring pieces or brushes, and then resume.
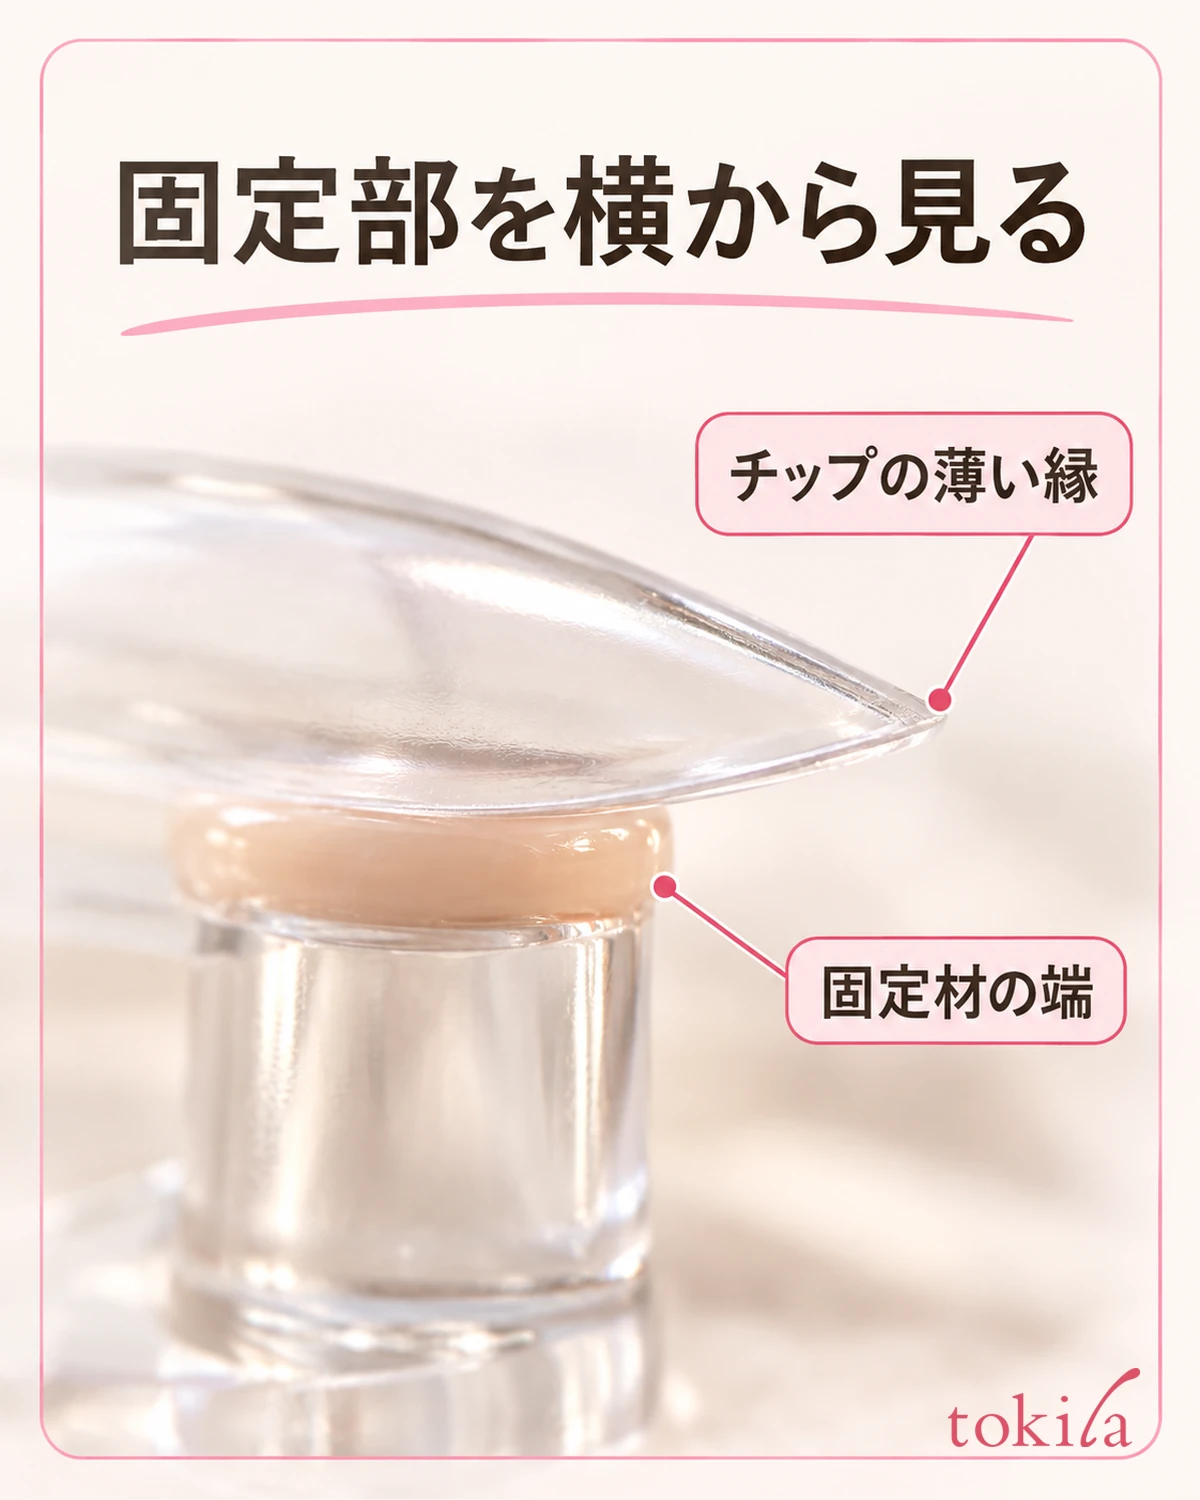
With a clear tip, the surface shine and the fixing material on the back can appear to overlap. Change the angle a little and look separately at the tip's edge, the end of the fixing material and the top of the handle. Another point is not to assume the color of your design has changed when it is only the color of the fixing material showing through.
What you are checking here is a practice tool used before attaching tips to your natural nails. If a tip will not come off while worn on your finger, consider it separately, in what to check before removing applied nail tips. Do not apply the way you remove tips from a practice stand to the space between your nail and the tip.
Once you understand the structure, decide on one connection to release next. Putting the target into words, for example "the handle supports and I work at the boundary between the tip and the fixing material," makes it less likely that you end up pulling only on a decoration or a long tip end.
2. Check the type of fixing material and the removal instructions
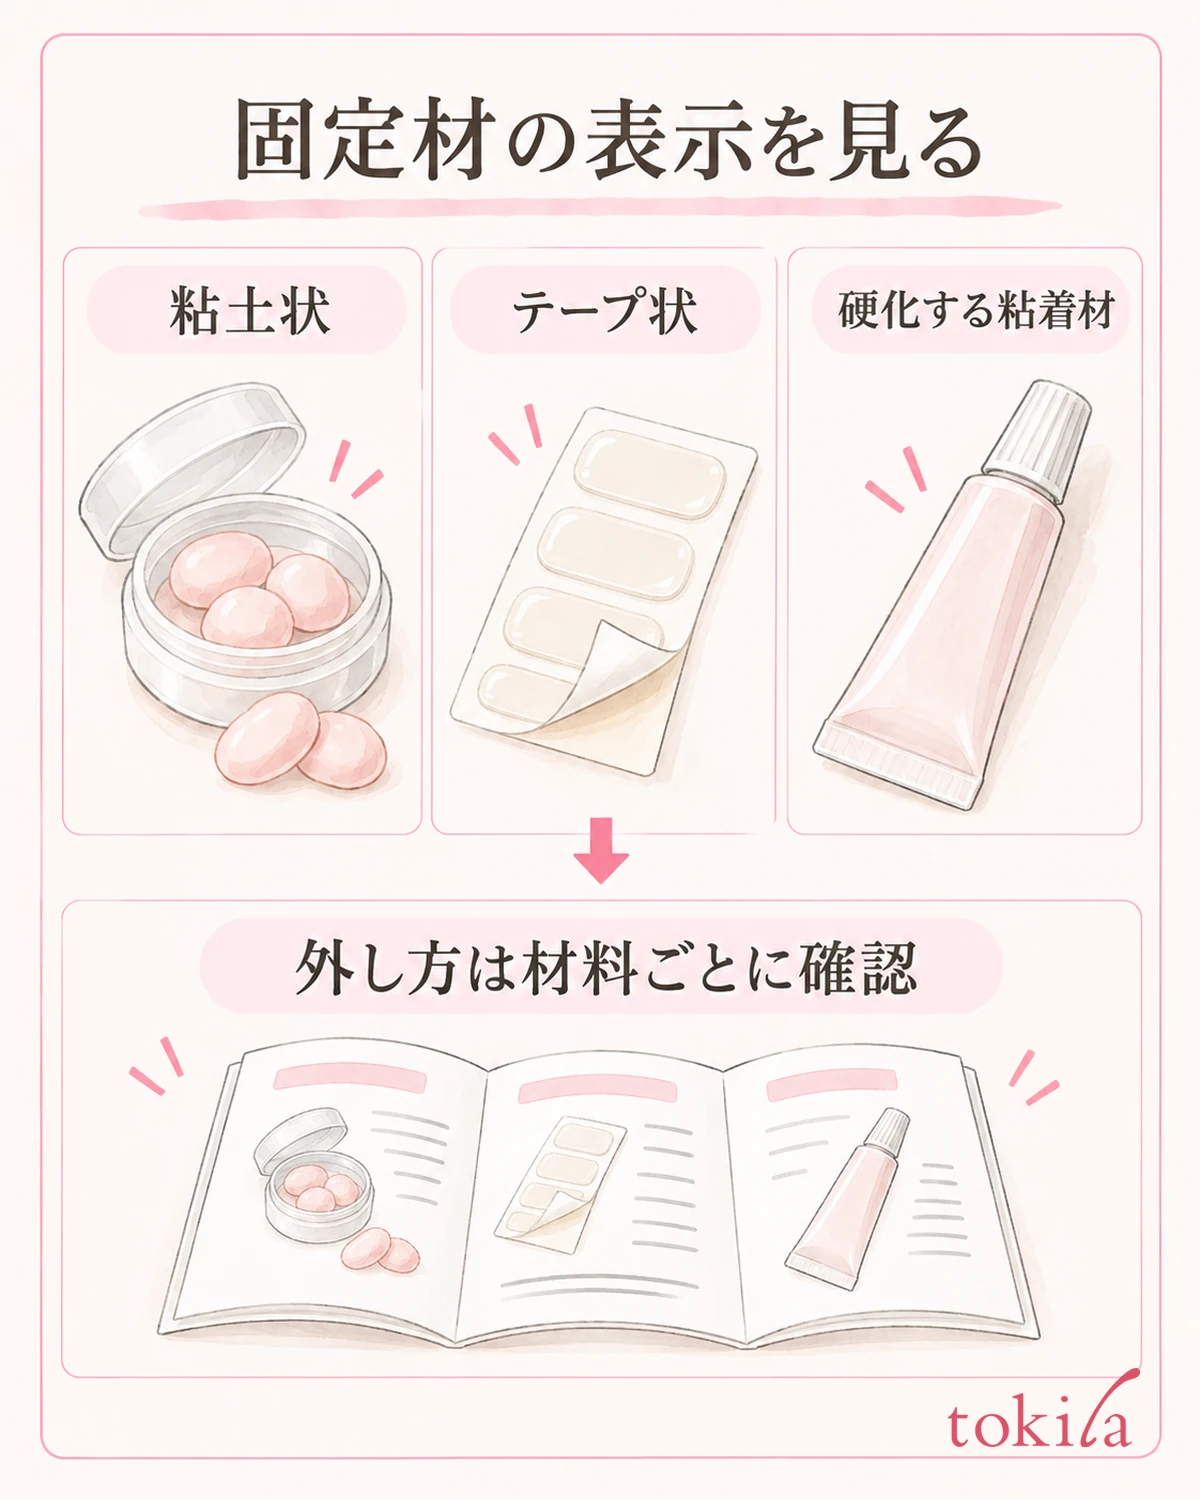
Check what was applied to the back of the tip. Preparation and handling after removal differ among putty-like fixing materials, sheet-type double-sided tape and tacky gels that are cured with a light. Do not decide based on looks alone, assuming that something clear must be the same thing or that something soft must be the same putty.
Take out the bag or container used during the work, and read whether it is approved for use on practice stands and whether it has instructions for removal and cleaning. It is important not to treat an adhesive meant for natural nails and a material for temporarily fixing pieces to a work stand as having the same purpose. Do not layer anything over a material whose purpose you do not know to reinforce it.
Some materials are applied after being set once, while others do not require curing. Here we do not set common exposure times or light types. If the fixing material has changed but you keep following the steps for the previous material, you will not know in what state it is fine to remove, so match the material you used with its instructions.
Do not try alcohol, nail polish remover, water and heat one after another just because it will not come off. Even if something can be used on the fixing material, it may not be usable on the tip's material, the surface finish or the stand's paint. Before wetting the connection with a liquid that is not specified, check whether it can be used on both tools.
If time has passed since you made the piece and you do not know the material, you do not need to force it off on the spot. You can also decide to set the whole stand in a stable place until you can compare it against the bag or your purchase record. Adding new adhesive and then trying to remove it does not count as checking the fixing material.
From next time, noting the name of the fixing material in your work notes and storing the bag together with the stand makes checking easier. However, do not mix different materials into one container; keep each one's packaging and labels. The notes are not for skipping the instructions but for avoiding mix-ups about which material you used.
3. Check the finish and decide where to support first
Before removing the tip, check whether the finishing step for the cosmetic you applied is complete. Drying of polish and curing of gel with the specified light are different things. You cannot decide it is safe to touch just because the surface looks glossy or does not seem to move.
If a required step is unfinished, do not go on to pinch the tip; go back to the finishing method for the product you used. Do not press it with your fingers repeatedly to test it, and do not get uncured material on bare hands. Avoid mixing the handling of the fixing material and the check of the surface finish into one step.
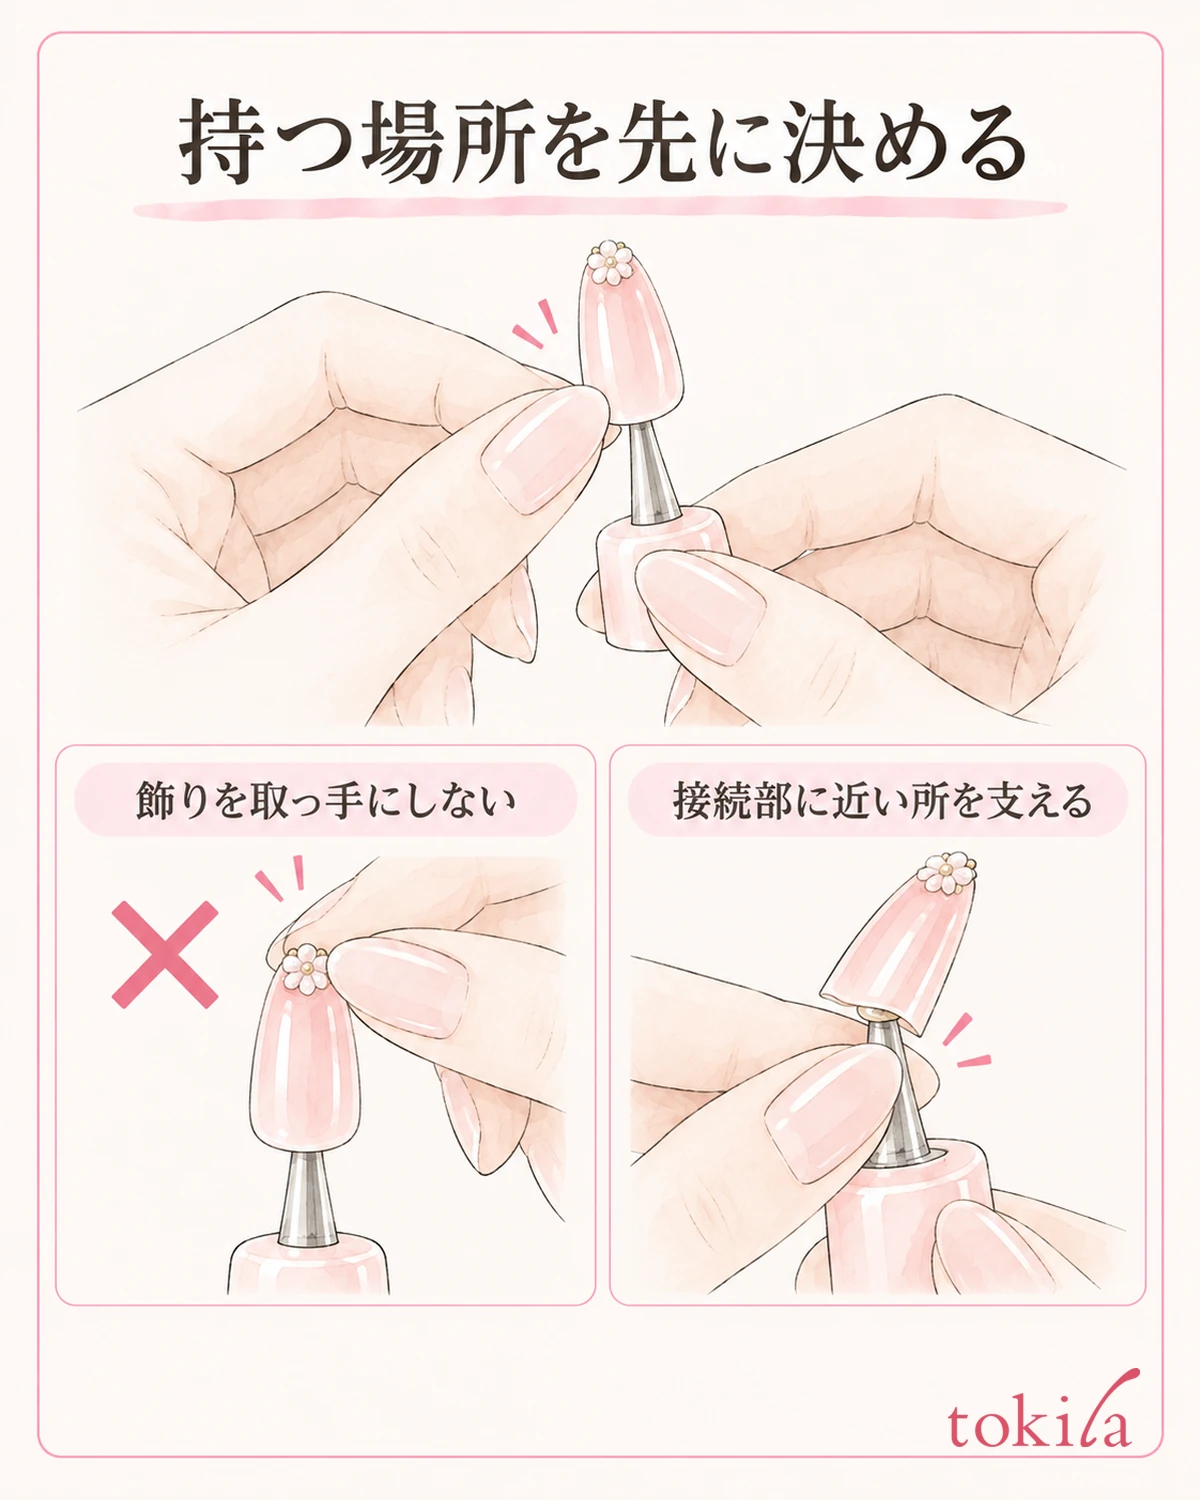
If you are ready to begin removal, look at where on the piece you can hold. Pinching a large decoration, a long thin tip end or a thinly shaved edge puts strain on the piece before the fixing part moves. Choose an area you can hold that is close to the connection, and make sure the handle side can also be supported as instructed.
Once you have decided where your hand goes, turn the tool at an angle where your fingers do not hide the connection. Rather than lifting the piece into the air and repeatedly changing your grip, keeping it close to the desk and preparing a clean tray to receive the removed tip makes it easier to know where to put it.
Do not pull while using the neighboring tip as a support, and do not insert a metal blade behind the piece. Even if the existing gap is narrow, do not force it wider unless prying with a tool is specified. When you want to see the structure, adjust the direction and the lighting first.
If a piece has a large part and nowhere to hold it, do not use the part itself as a handle. Leave it on the stand until you can confirm how to remove it, and choose checks you can do with the work paused, such as taking photos to ask about the combination of piece and fixing material.
4. Release it slowly as instructed, and stop if it bends
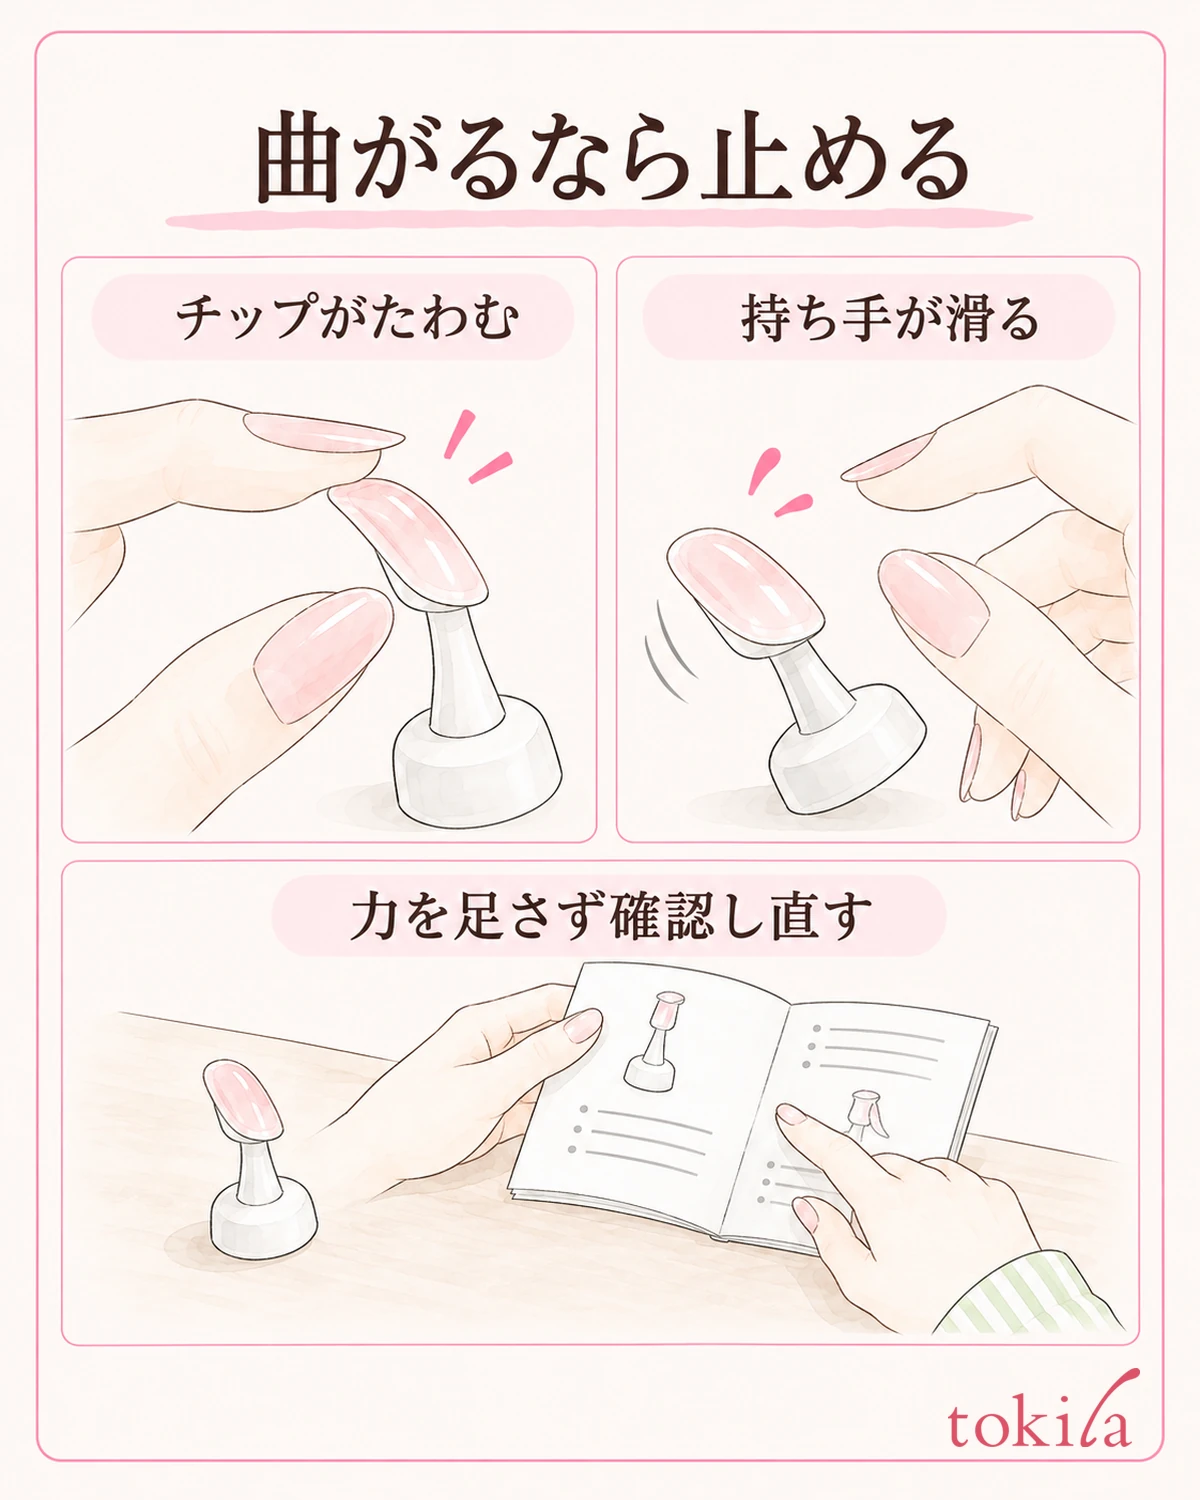
Once you have confirmed how to remove it, move it a little at a time as the instructions for that material and tool describe. Not every stand allows the same direction, such as pulling up, sliding sideways or turning. Do not decide the direction with finger strength alone; first check how the connection is meant to come apart.
After moving it once, look to see whether the tip has started to lift or only the handle has moved. So that the recoil does not hit a neighboring piece, do not bring your face too close, and keep both the tool and the place where you will set the tip in view. It is important not to pull with a sweeping motion and not to keep moving it without being able to see.
If you notice any change, such as the tip turning white as it bends, the edge flexing, a decoration shifting or the handle slipping, stop that operation. Do not think "it moved a little, so one more push will do it"; go back to where you are supporting and the instructions for the fixing material. Do not assume that a deformed piece is partway through coming off.
If it does not come off, do not simply add more force in the same direction; check again the material you used and the connection involved. Do not switch to removing something stuck with your own solvents or heat. If the material is unknown, or it will not come off even when you follow the instructions, store the tool in a stable condition and consult the seller.
Place the removed tip on the tray without pressing its decorated surface down. Before moving on to the next tip right away, look at what remains on the back and check whether the fixing material is on the tip side or the stand side. Scraping off remaining material with a fingernail is not something you do automatically as a continuation of removal.
Even if a method worked for one piece, you do not need to apply the same force to thin tips or pieces with three-dimensional parts. Look at the area that can be held and the fixing surface of each, confirm the steps, and then handle it. Also be careful that the more you hurry, the easier it is to mix up the connection you are releasing and the part you are supporting.
5. Check the back and the fixing part, and leave notes for the next piece
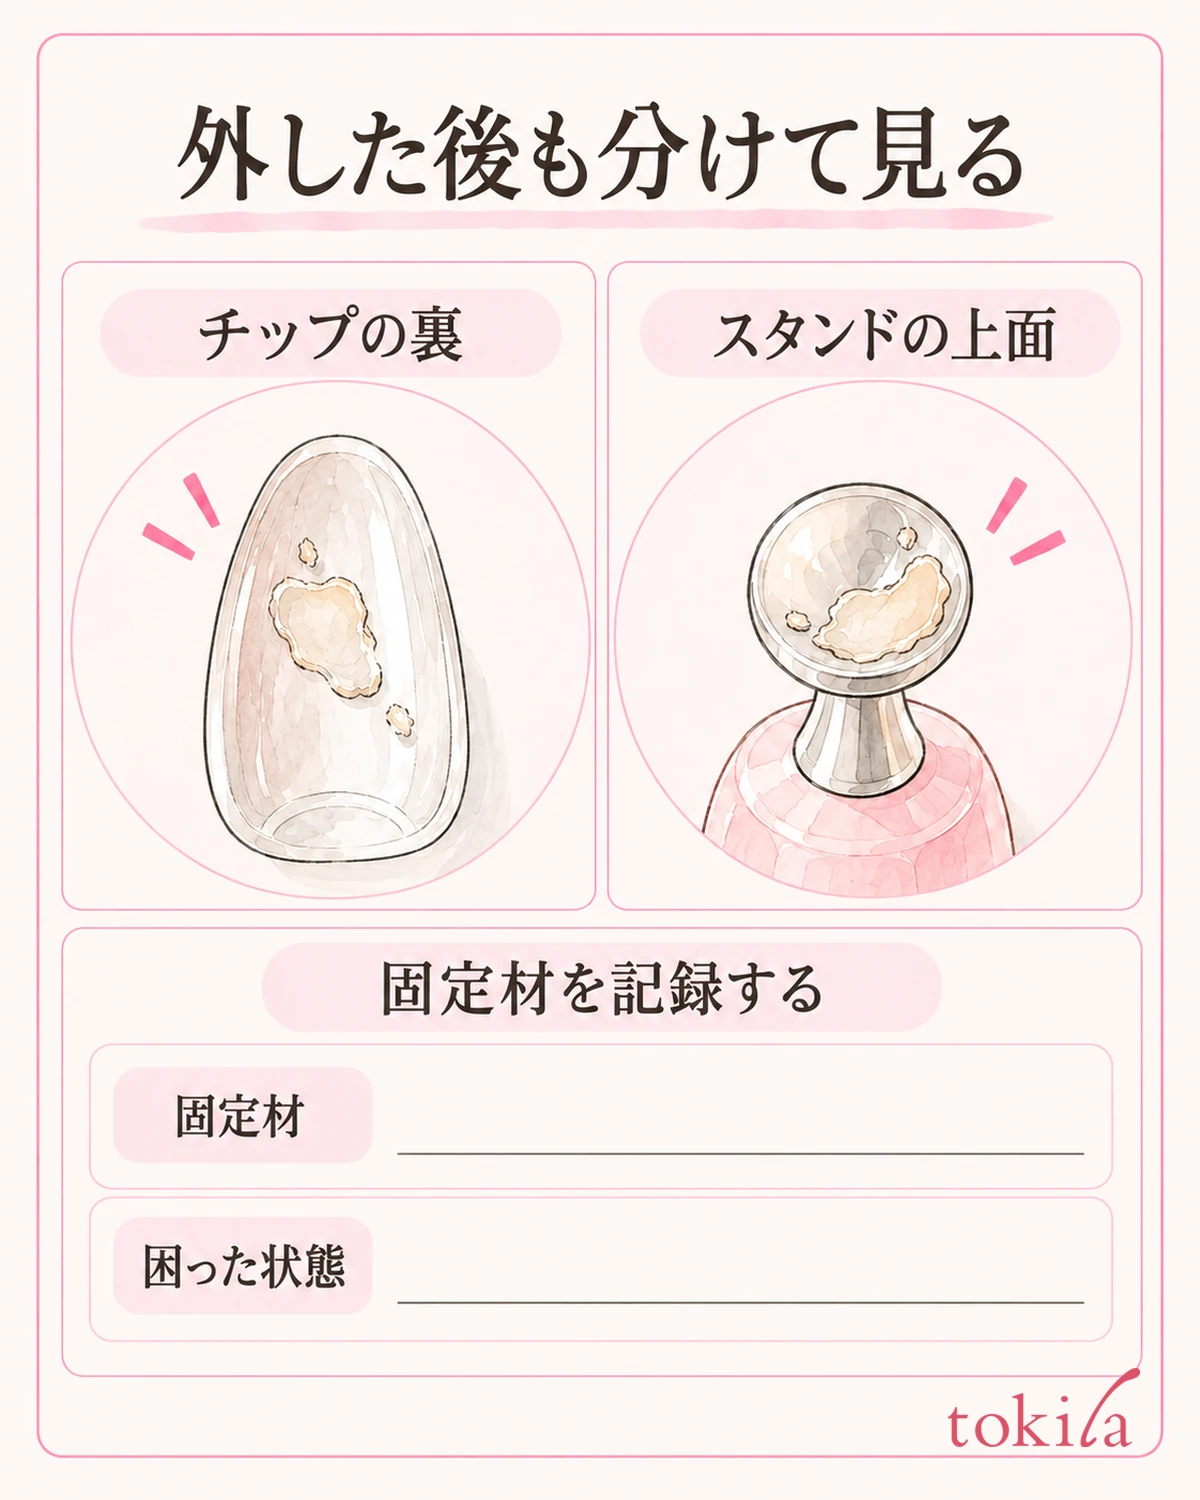
Finally, look separately at the back of the tip and the top of the stand. Whether leftover fixing material needs to be removed, or can simply be stored as is, depends on the material's instructions. If you find a thin, clear residue, check what material it is before deciding it is dirt and scraping it off.
Choose cleaning tools and liquids that suit each material and finish. Do not use a cleaning method meant for the tip on the stand's paint, or the reverse, on the tip's art. If cleaning leaves clouding or scratches, stop that method rather than continuing to polish with something stronger.
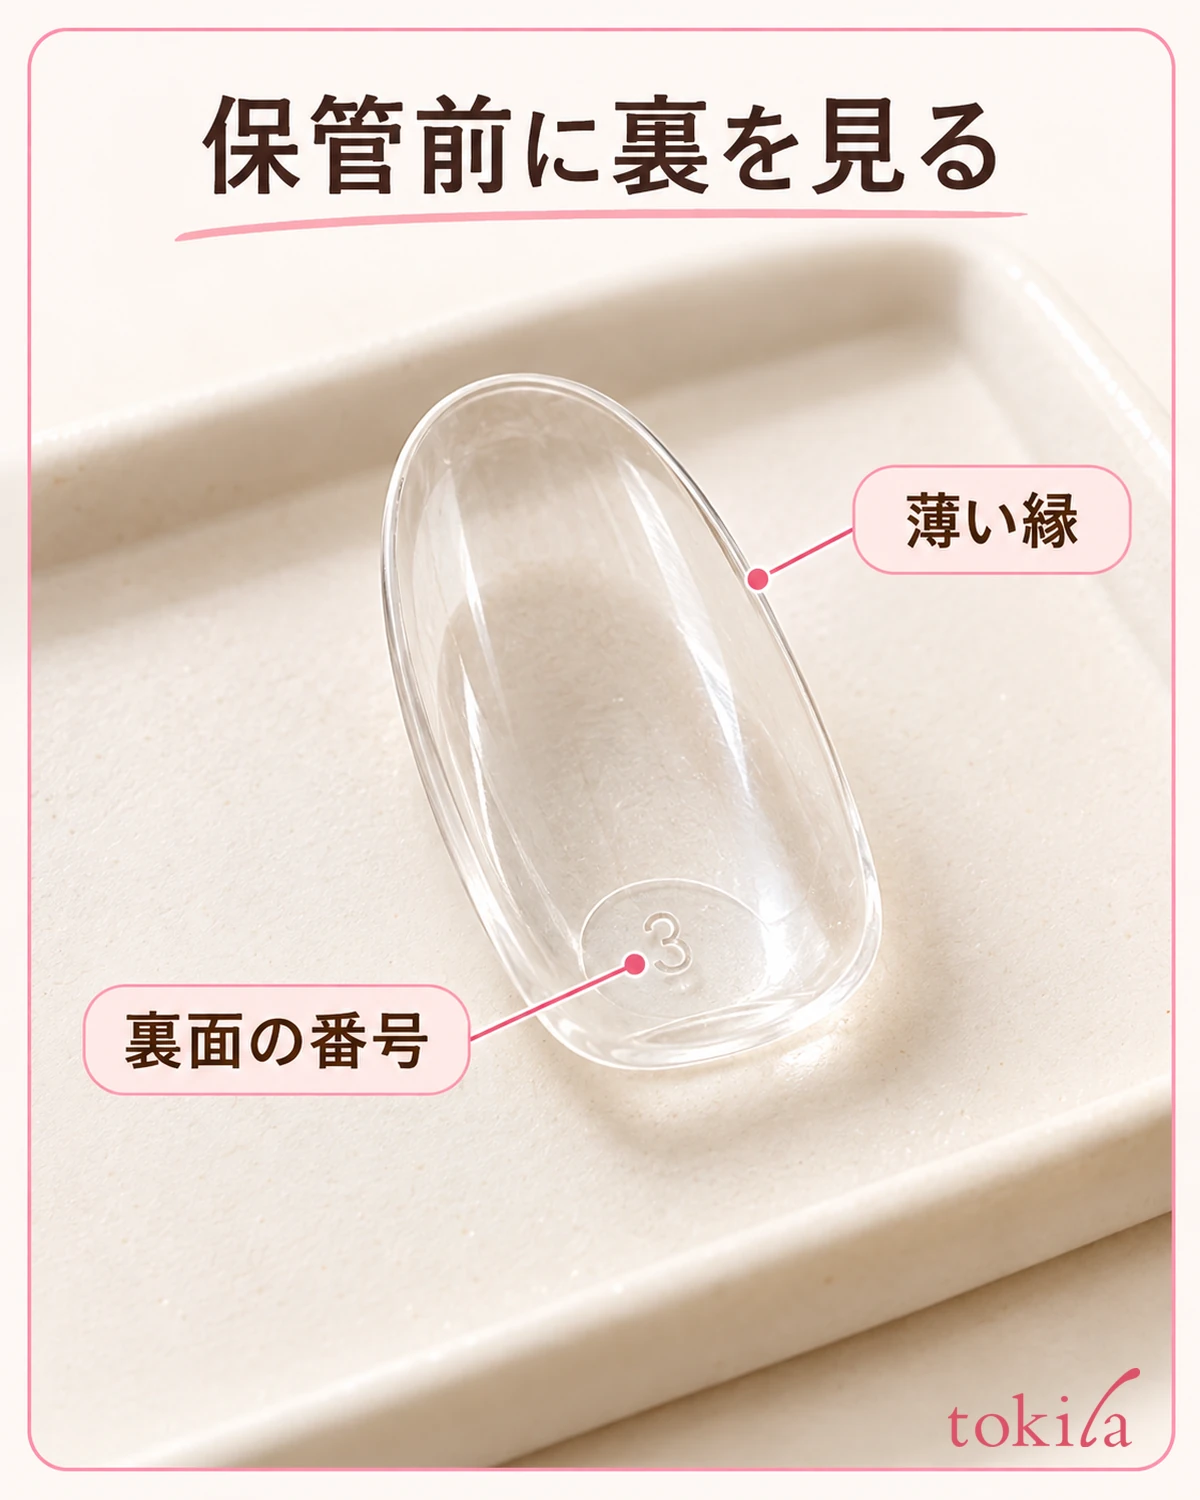
For pieces you will store, check the numbers and orientation on the back, and line them up so that left and right and the finger assignments are clear. Numbers and sizes need to be checked for each product. For organizing before application, checking nail tip orientation and numbers can also help.
In your work notes, briefly leave three items: "fixing material," "the part you supported" and "what gave you trouble when removing." For example, if the handle moved first, check the structure with the base and how it is positioned next time. Before deciding to use less material to fix how hard it is to remove, check the specified amount.
For next time, there is also a way to try attaching and removing on practice tips of the same type before moving on to the real piece. Do not treat the fact that a different tip with a different thinness or shape caused no problems as a guarantee for every piece. Record the results of your practice separately from the conditions you have not yet confirmed.
When removing a tip from the stand, separate the connections, read the fixing material's labeling, and check the finish and the support position before moving it a little at a time. If it bends, slips or you cannot see the connection, stop. In this order, try organizing what you can check before increasing force.



