
When you try to fasten a barrette, the fitting will not reach, or you think you closed it but it opens right away. In that case, before pressing hard, look again at the clasp on the back and the hair section you are catching. Even if the decoration on the front is large, the space that can hold hair is not necessarily just as wide.
This article focuses on the type in which a fitting connected on one side hooks onto a clasp on the other side, and sorts out what to check before use. Shapes and ways of opening and closing differ from product to product. Priority goes to making sure the instructions for the item you have match the real thing; it does not cover adjusting by bending the fitting or removing parts.
1. Look at the Back and Separate the Part That Opens from the Part That Supports
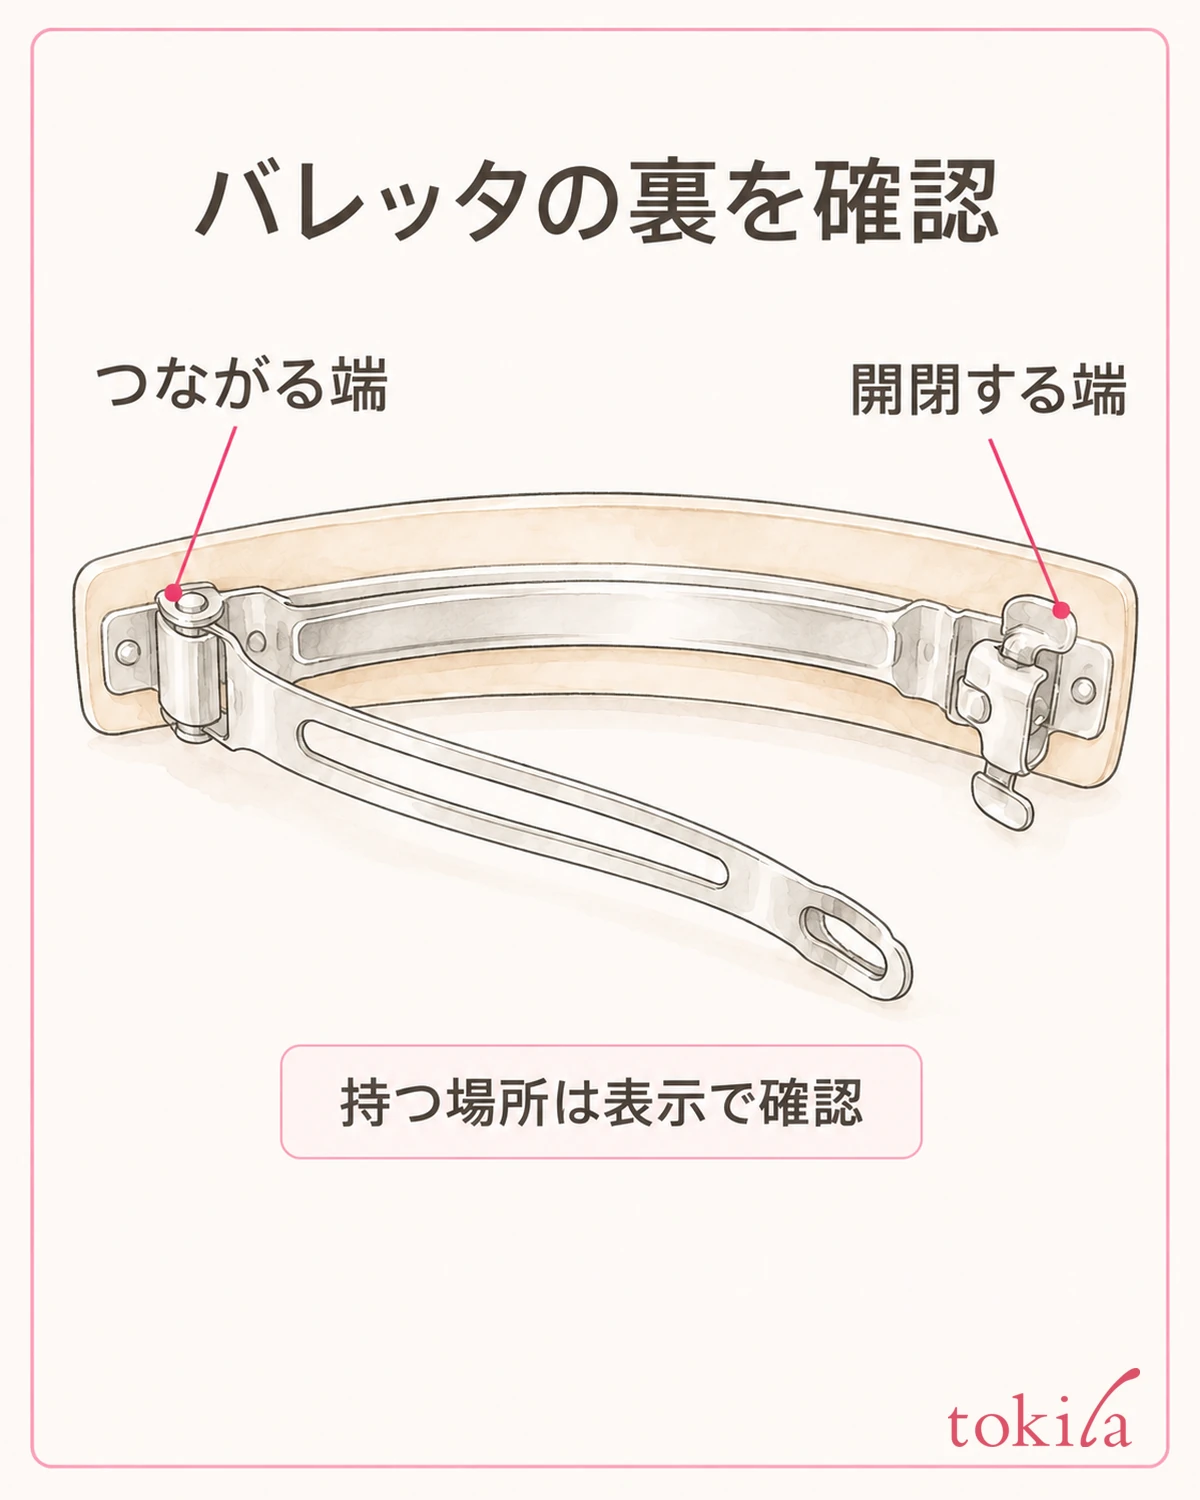
First, without putting it in your hair, turn it over on a bright table. See whether it has a structure in which one end of the long fitting is connected to the body and the opposite end fits into the clasp. It operates differently from a hair clip that opens its teeth from both sides, or a pin that bends the whole plate. It is important not to apply the same operation just because of what the item is called by its appearance.
When you read the instructions, look not only at the direction to open but also at the shape of the fitting after it is closed. Lining up a photo of the clasp and the back in the same orientation makes it harder to mix up left and right. If your item has a fitting of a different shape, even if you find a similar diagram, do not transfer how it moves as is; go back to the model number or the accompanying guide and check.
Separate the place where you release the clasp from the place where you support the body. Do not pinch and pull the stones, pearls, or thin petals or ribbon of the decoration; hold the sturdy part named in the instructions. Even for ones that open by pressing the ends of the back fitting from both sides, check on the real thing which protrusion to press. Do not make it a task of bending unknown protrusions one after another to find what moves.
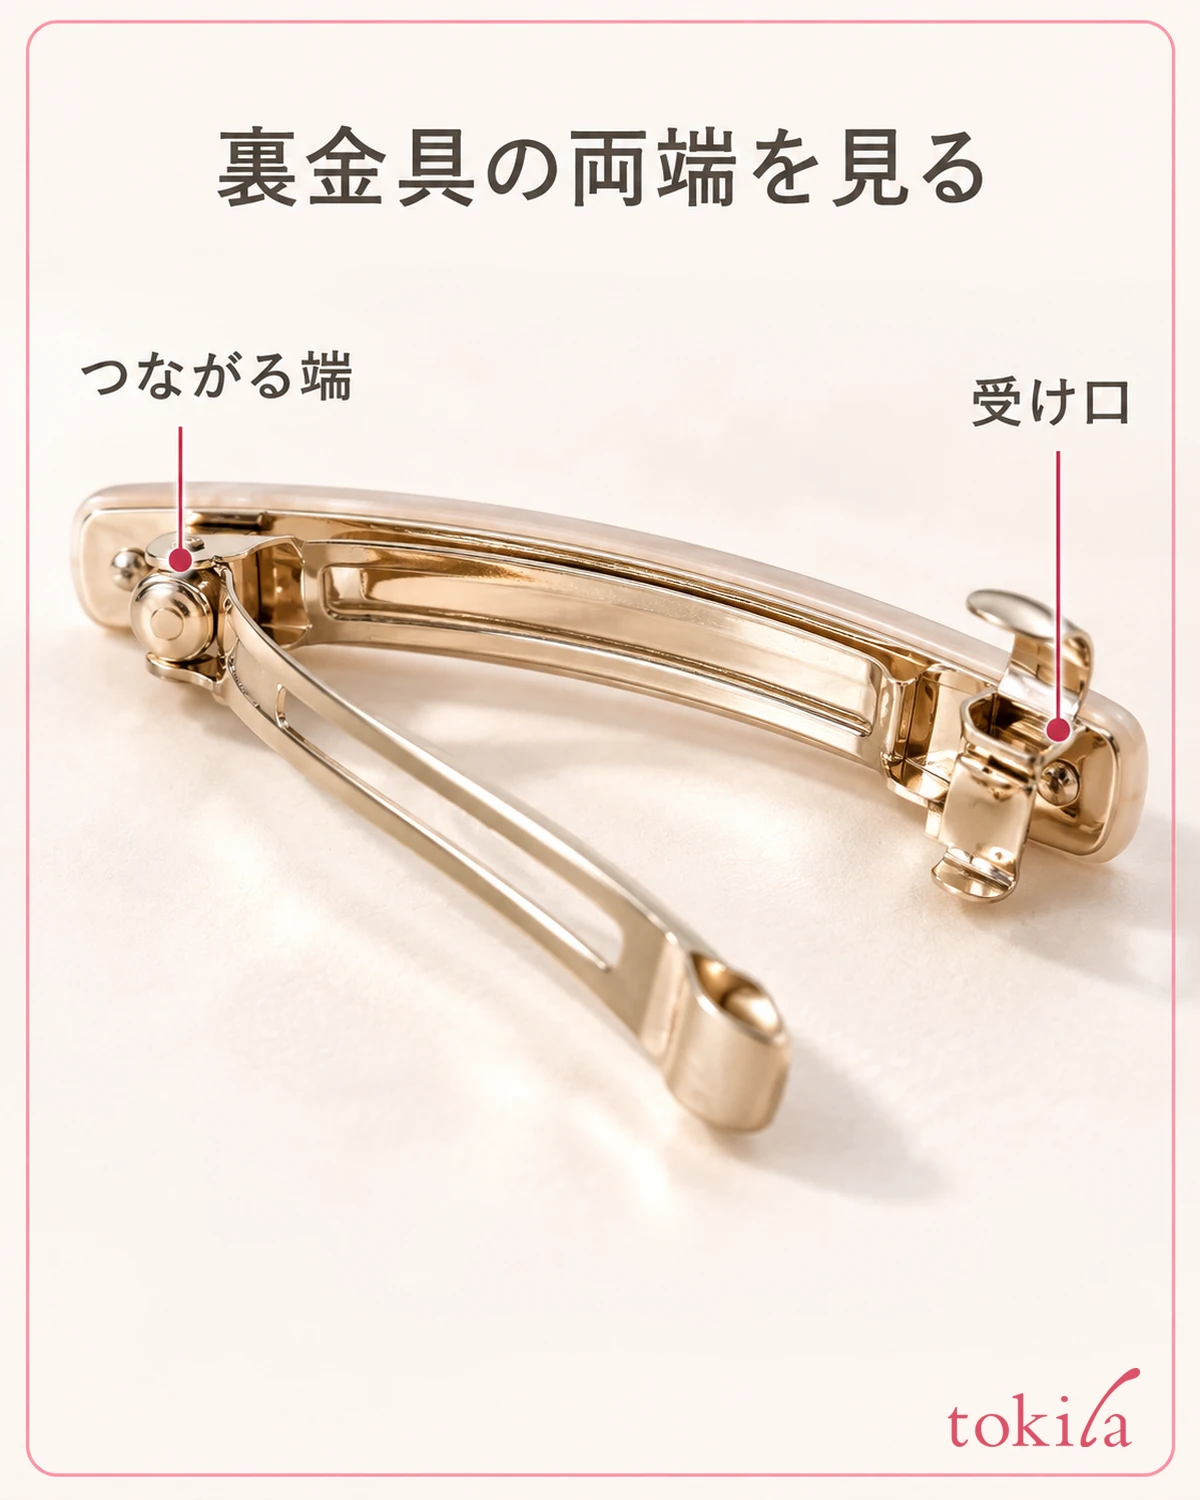
In the open state, look at the position of the joint that serves as the pivot and of the receptacle on the opposite side. A curve in the long, thin fitting is not in itself judged to be a malfunction. On the other hand, if there is a twist different from before, a chip, or a part that is coming loose, stop using it before you catch any hair. Do not try to restore it with your fingers or pliers when you do not know the original shape.
If you choose by the outer length alone, it is easy to overlook the difference from the part that can actually hold hair. Look separately at the width including the decoration at the ends and the range over which the back fitting moves. Even if a figure is written, check whether it is the full length of the decoration or the dimension of the fitting. Do not judge from the size in the photo that your hair section will fit.
For a product whose instructions describe a check of closing it without hair, open and close it just once by that method. If it is hard to close even at this point, the amount of hair is not the only cause. Do not think that putting hair in will make it stable when you wear it with an abnormality still present.
2. Separate the Hair You Want to Fasten and Reconsider the Thickness
First decide which hair you want to fasten. The thickness that goes into the fitting changes depending on whether you want to catch a little of the side hair or do a half-up at the back of the head. Do not gather all your hair from the start; support the hair section where you will fasten it with one hand and separate it from the hair you will leave. Also think together about the position where you want to show the decoration and the position where the fitting will sit.
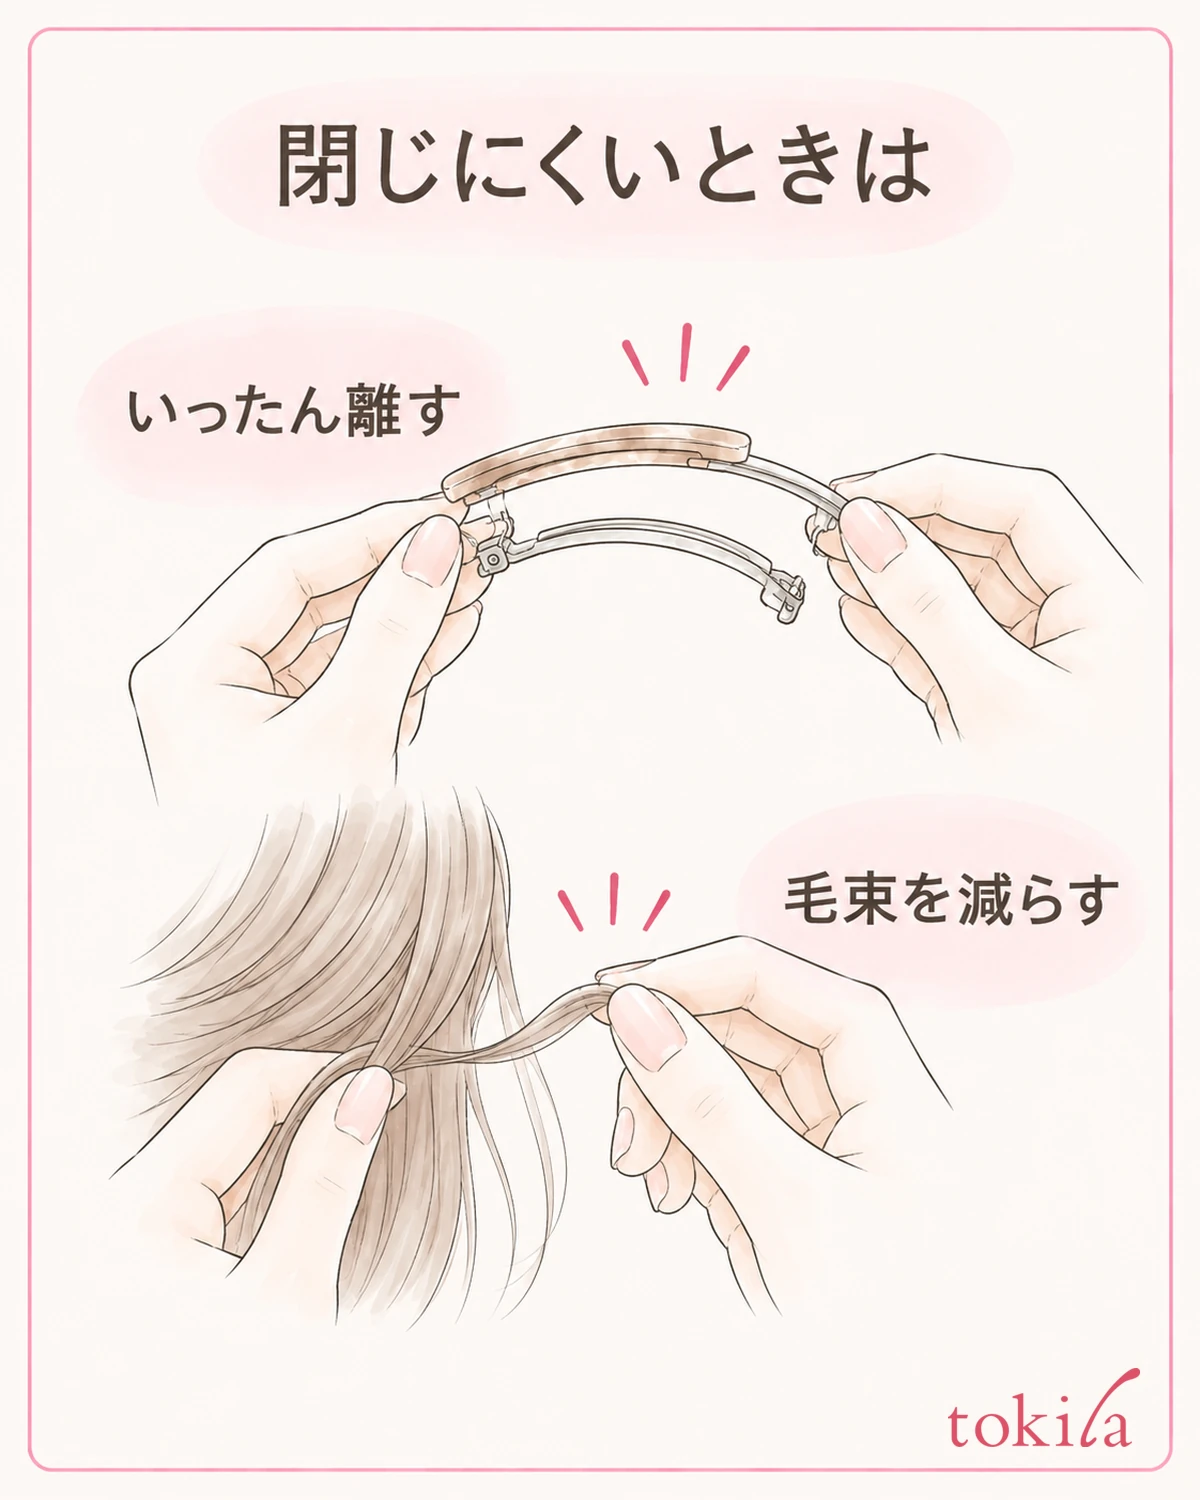
Rather than twisting the hair section hard to make it look thin, place it temporarily at the thickness it has when gathered naturally. If the tip of the fitting does not easily reach the receptacle, or the hair section sticks far out past both ends of the fitting, release it once and reduce the amount. Instead of pushing it in with force many times, choose to make the range you fasten smaller, such as only the upper hair or only part of the side.
Even after you reduce the hair section, it may be too thin and shift. Do not decide that "less is better"; look for the range where it closes without strain and does not fall when you move lightly. It changes with the length, thickness and slipperiness of the hair, so no number of strands or width common to everyone is specified. Judge it including the choice to change the type or size of the clasp.
If you are layering it as a decoration over a place already tied with a hair elastic, check whether the product can be used that way. Catching the elastic together increases the thickness and can make the position of the fitting hard to see. Do not force-crush it to hide the knot; think of it separately from the case where you gather hair with the barrette alone.
When fastening the back, arrange it so that you can check the position with a hand mirror. Rather than repeatedly catching it again by feel, lowering it once and separating the hair again makes it easier to check for hair that has been caught up. Also refer to how to put together an updo for the basics, and choose a range you can handle.
If your arm gets tired from keeping it raised while looking in the mirror, lower your hand once. Do not repeat the closing motion many times when you are tired and your fingertips cannot apply force easily. Separate the step of dividing the hair from the step of handling the fitting, and if you are likely to drop it, move near the table and prepare again.
3. Look at the End of the Fitting and Close It Without Catching Any Hair
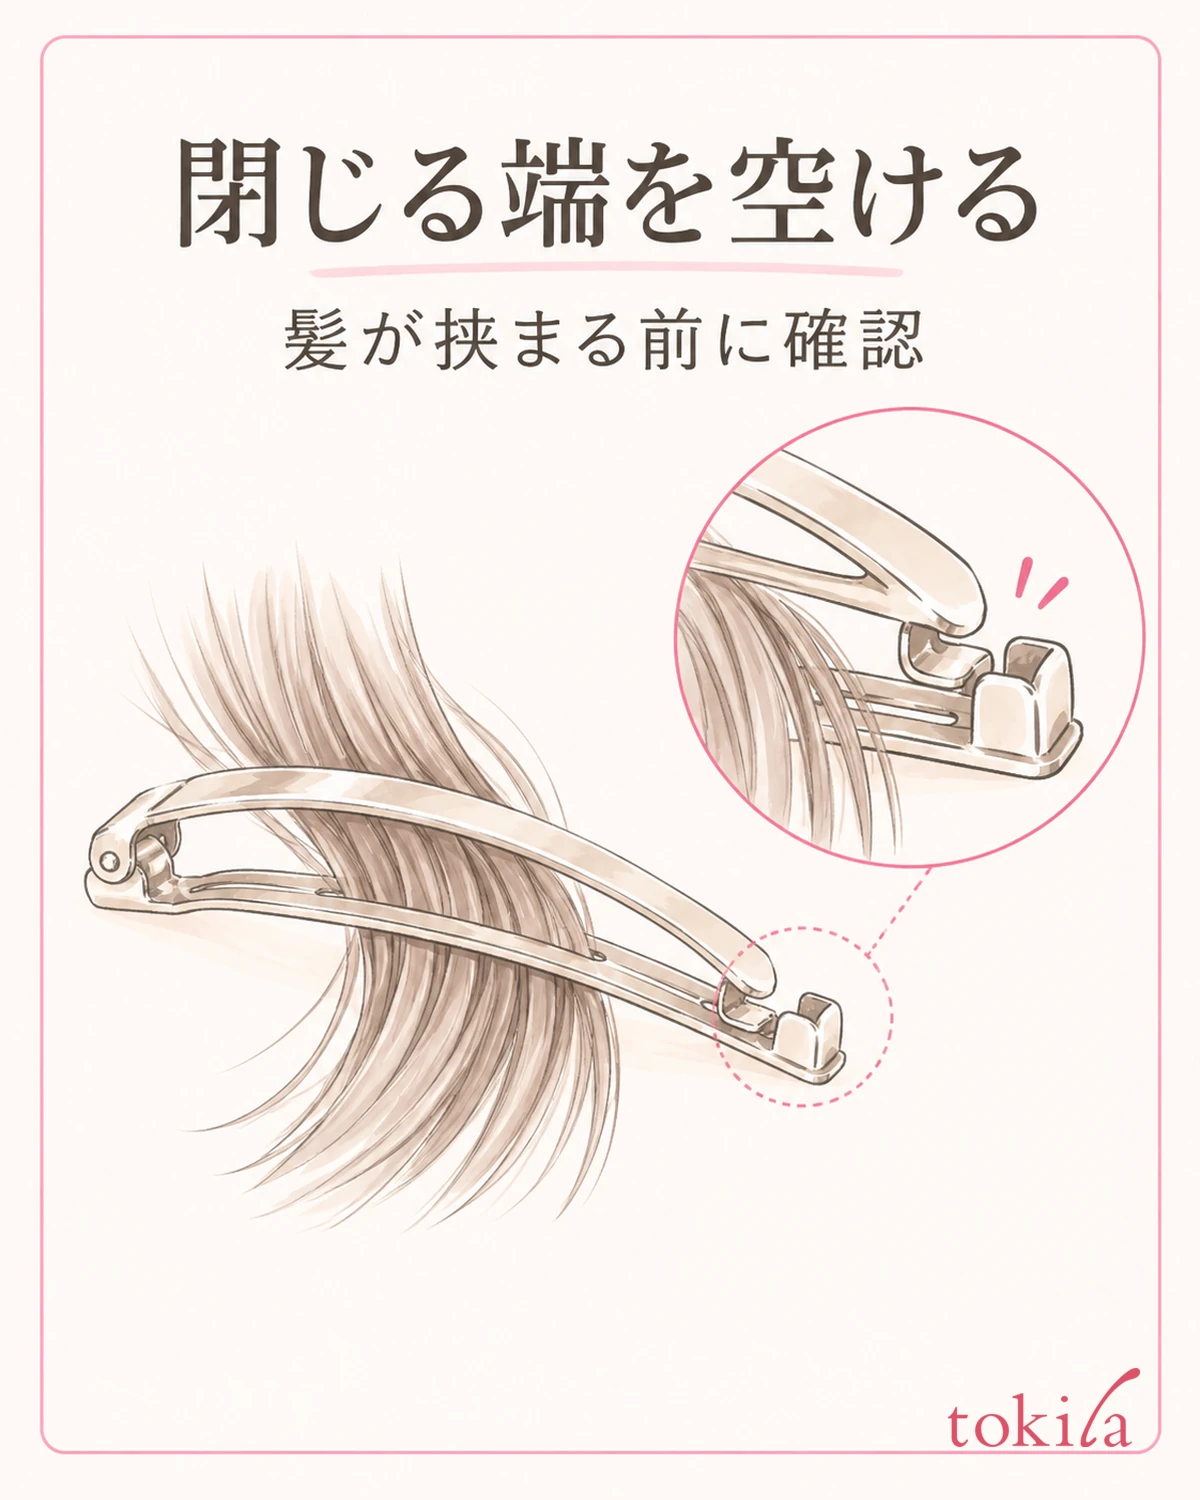
While supporting the hair section, hold the open fitting against it and look to see whether any hair is covering the receptacle of the clasp. If a few strands straddle the contact point of the fitting, move that hair aside with your fingers before closing. Not letting the force of closing push the hair in along with it is the key to noticing a snag.
Check where to hold the body, and close it slowly in the orientation that suits the product. Do not twist the decoration to line up the ends or press and bend the fitting with a fingernail. If you feel strong resistance partway, open it once and review in order the thickness of the hair section, the hair blocking the receptacle and the orientation of the fitting. Change the conditions for closing before adding force.
Even for products that click, do not decide it is fully fastened by the sound alone. Before you let go, check that the end of the fitting is seated in the intended position. If the closed end is raised, opens at a light touch, or presses against your skin and hurts, do not decide to go out like that.
Rather than pulling on your hair to test how firmly it holds, release your hand slowly and move your head within a natural range to see. If it tilts to one side from its weight, redo where you catch it and the hair section. Before trying to use a large amount of styling product to keep the fitting from moving, go back first to the combination of the tool and the hair section.
Once it is fastened well, check the close-up of the fitting and the view of your back from a little distance separately. The decoration on the front looking nice and the clasp on the back being seated are separate checks. If it is in a position that your clothes' collar, a hat or a bag strap touches, decide the place while imagining your usual movements.
4. When Removing It, Support the Hair Section and Release It Before Letting Go
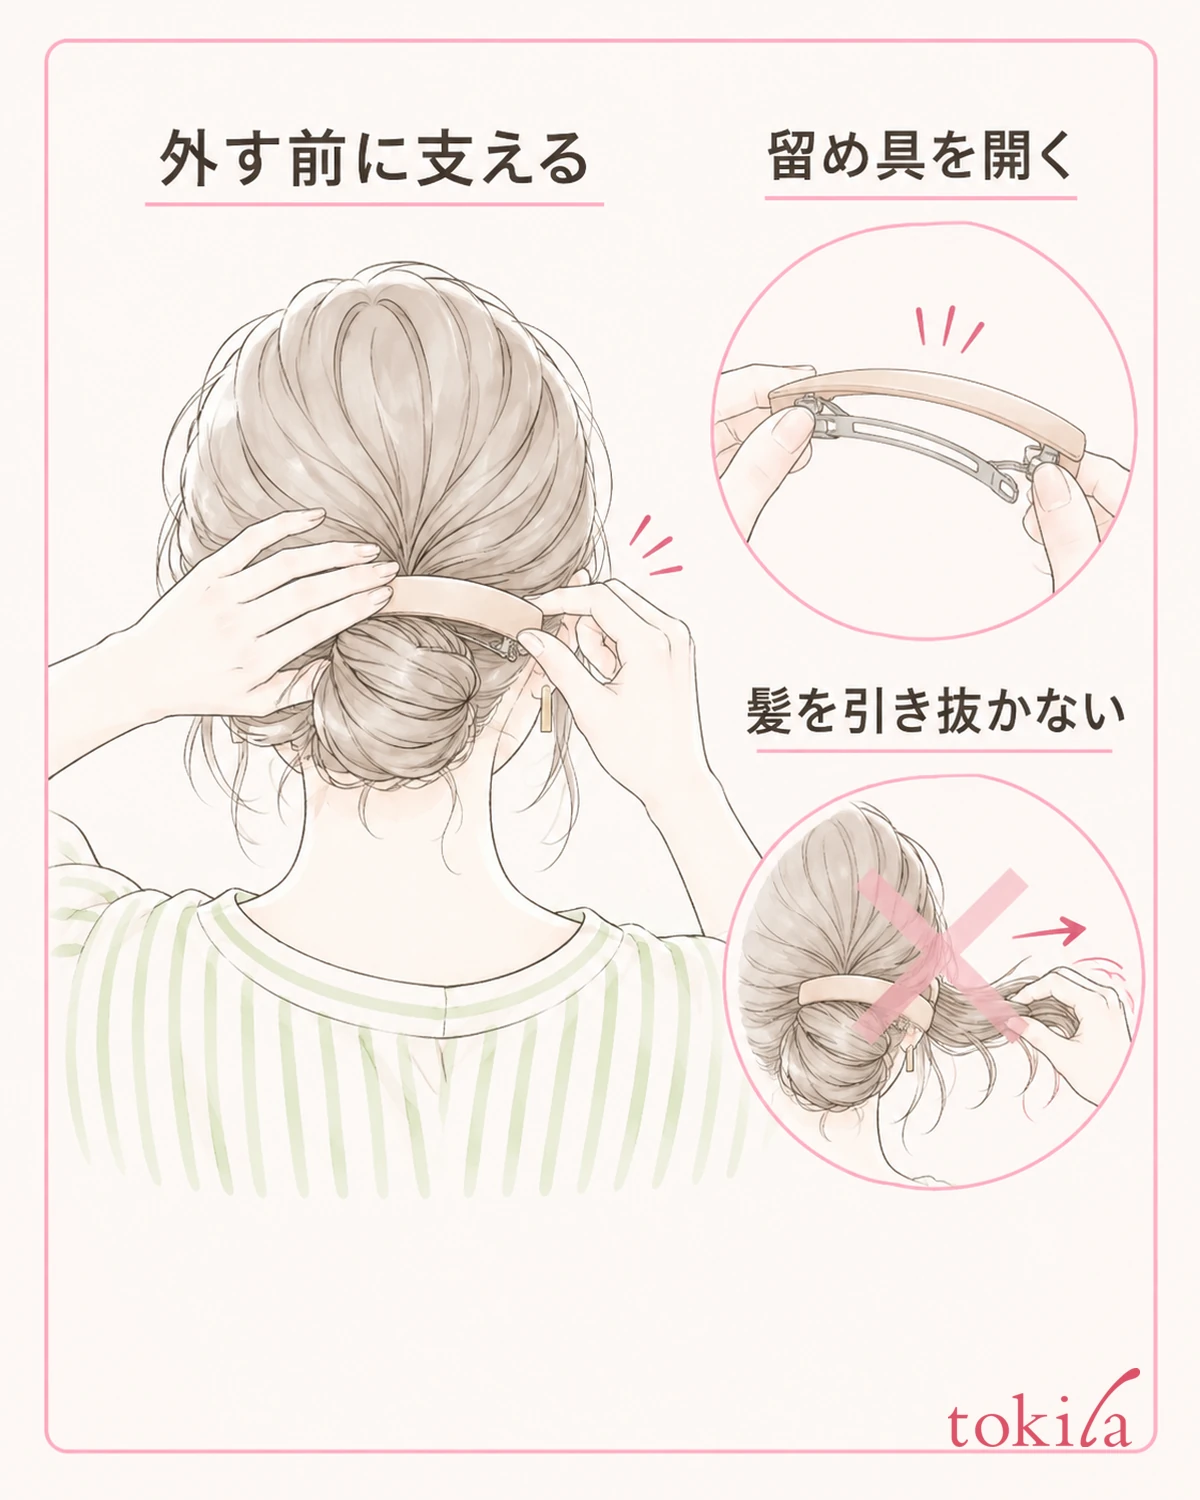
Before removing it, check which side opens. Support the hair section near the barrette with one hand and hold the specified part with the other. If you grab only the decoration on the front and pull it out toward the tips of your hair, it easily becomes a motion of trying to pass hair through the closed fitting, so release the clasp first.
Once the fitting is open, look to see whether any hair remains between before you let go. If you feel only a few strands being pulled, stop right there, loosen the hair section you are supporting a little, and look for the place where it catches. Rather than pulling hard to remove it all at once, release the few strands you can see one by one. For the back of the head, which is hard to check by eye, use a mirror or ask for help.
Hair may also have gotten in between the decoration and the base. Even if the clasp is open and it does not move, do not bend the fitting further. Do not adjust it yourself, such as prying in with a tool or cutting only the parts you cannot see near the hair; check a way to remove it without strain. Do not continue the work if there is pain.
After removing it, do not tie it tightly again at the pulled section; let your hair down naturally and look at its condition. If there are tangles, separate them in small sections from the tips. Think of removing the tool and fixing the hairstyle afterward as separate steps, and also see how to fix creases left by a hair elastic.
If it catches in the same place every time, review not only the position where you put it on but also the state of the fitting and the decoration. Do not assume you will keep using it on rushed mornings; there is also a way to switch to a different tool for holding hair and check it when you can see your hands.
When reviewing the order of removal, remember separately whether it was already pulling before you removed it or caught only after you released it. The former is a clue to look at the hair section or the position you wear it; the latter is a clue to look at the remaining hair or the contact point of the decoration. Use it not as a record that decides the cause, but as a note for narrowing down where to check next.
5. Separate Care from Storage and Leave the Conditions for Next Time
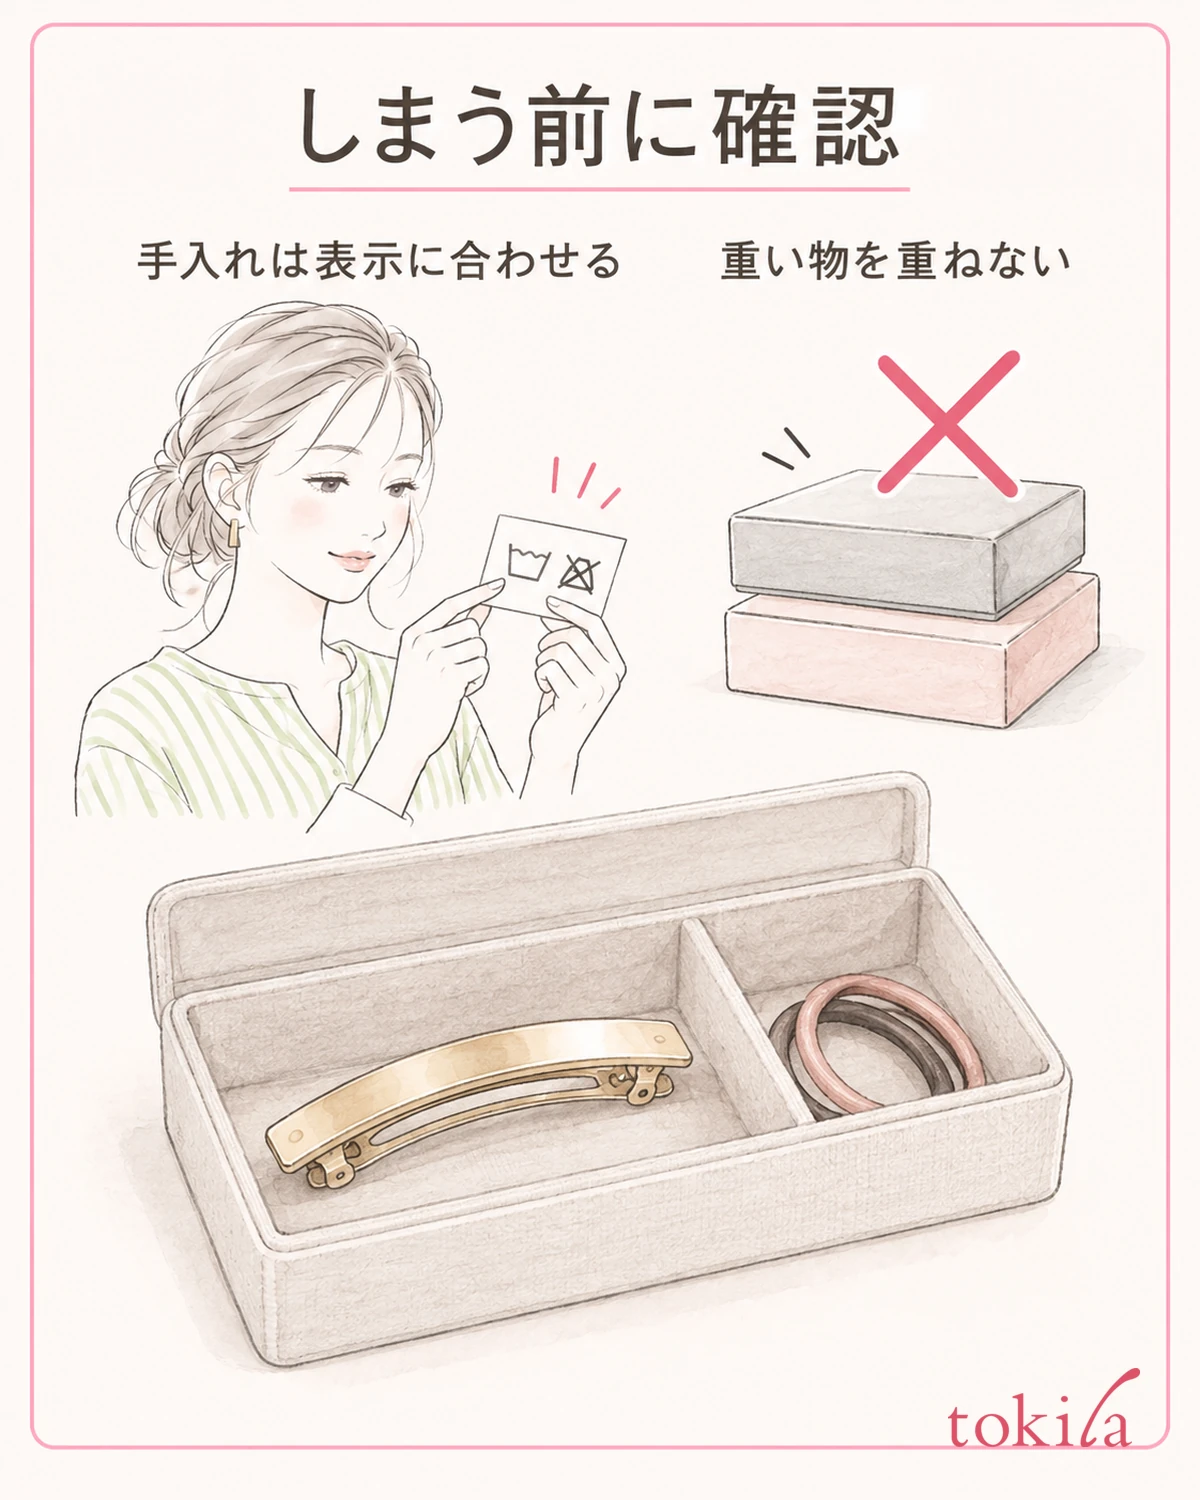
From the back, check whether any hair is left on the removed barrette. Even when you release hair that comes off easily with your fingers, take care not to catch the decoration. If it cannot be removed unless you take the fitting apart, or has gone deep into the glued part, do not remove parts on your own judgment.
Whether you can use water, alcohol, detergent or a wet cloth is decided by the material and the label. Do not assume that because you look only at a metal clasp, the same care is fine for the body and decoration too. When sweat or styling product has gotten on it, tidy it by the specified method, and do not put it in a case while still damp.
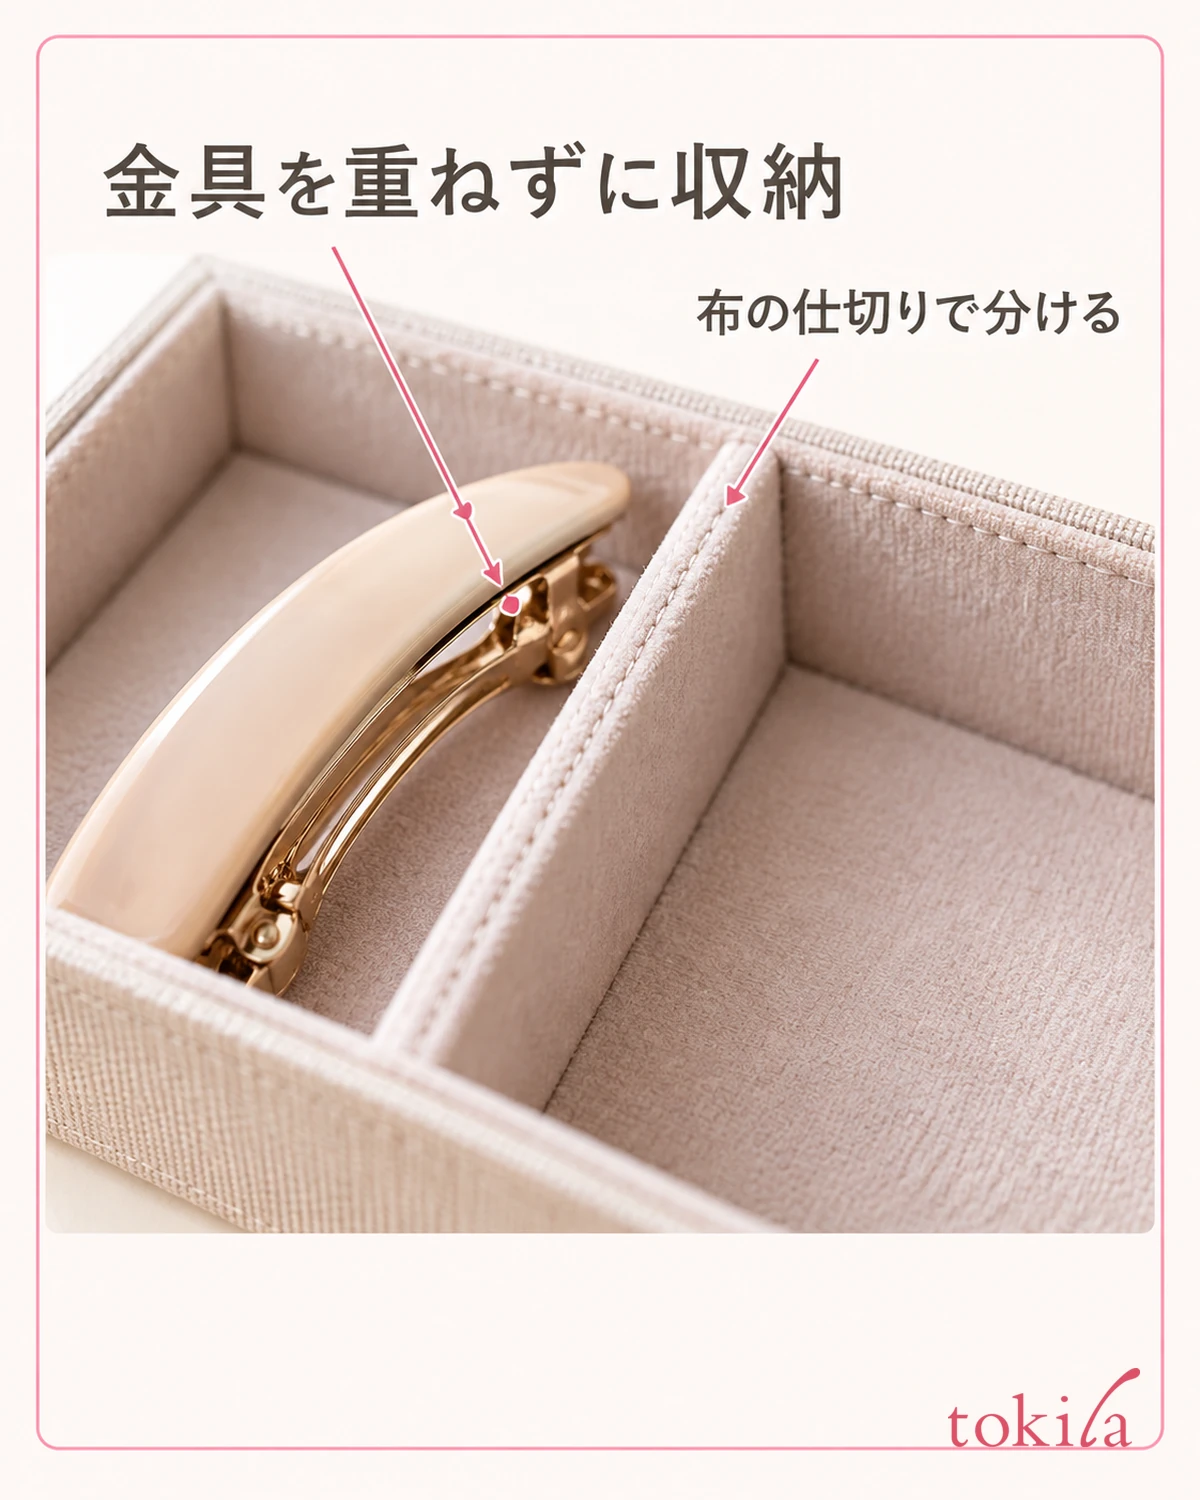
For storage, choose a place where nothing heavy will press on the fitting and decoration. Keep items with fine decoration apart with a case compartment or soft cloth so they do not keep rubbing against other accessories. Whether to leave the fitting open or closed should also follow the shape and any storage instructions.
For next time, leave one changed condition, such as "gathering all the hair at the back makes it hard to close" or "a small amount at the side fits." Comparing without greatly changing both the amount and the position of the hair section at the same time makes it easier to find the combination of your hair and the tool. Do not make the standard that operating it the same number of times each time is enough.
Remove from your candidates for next use anything with a cracked body, a deformed clasp or a wobbly decoration. Do not keep pressing to fix a visible misalignment; separate checking whether it can be repaired from choosing what to use today. Look at the structure, adjust the hair section, check the closed end, release and remove it. Proceed in this order, matching it to the label of the item you have.



