When buying gloves, you may wonder whether to choose your usual S or M. Even if the fit around your hand seems right, the fingertips may have extra space, or the back of your hand may feel pulled when you bend your fingers. There is more than one area to check. Before choosing a color or material, distinguish what each number in the size chart measures to make comparisons easier.
This article covers gloves worn with everyday outfits, including how to read labels, measure your hands, check the fit when trying gloves on, and revisit your choice when unsure. For work gloves, sports gloves, and other purpose-specific types, prioritize the selection guidance for that use. The photos and illustrations are examples for checking measuring positions and construction; they do not show the dimensions or fit results of a particular product.
First, distinguish hand measurements from glove measurements
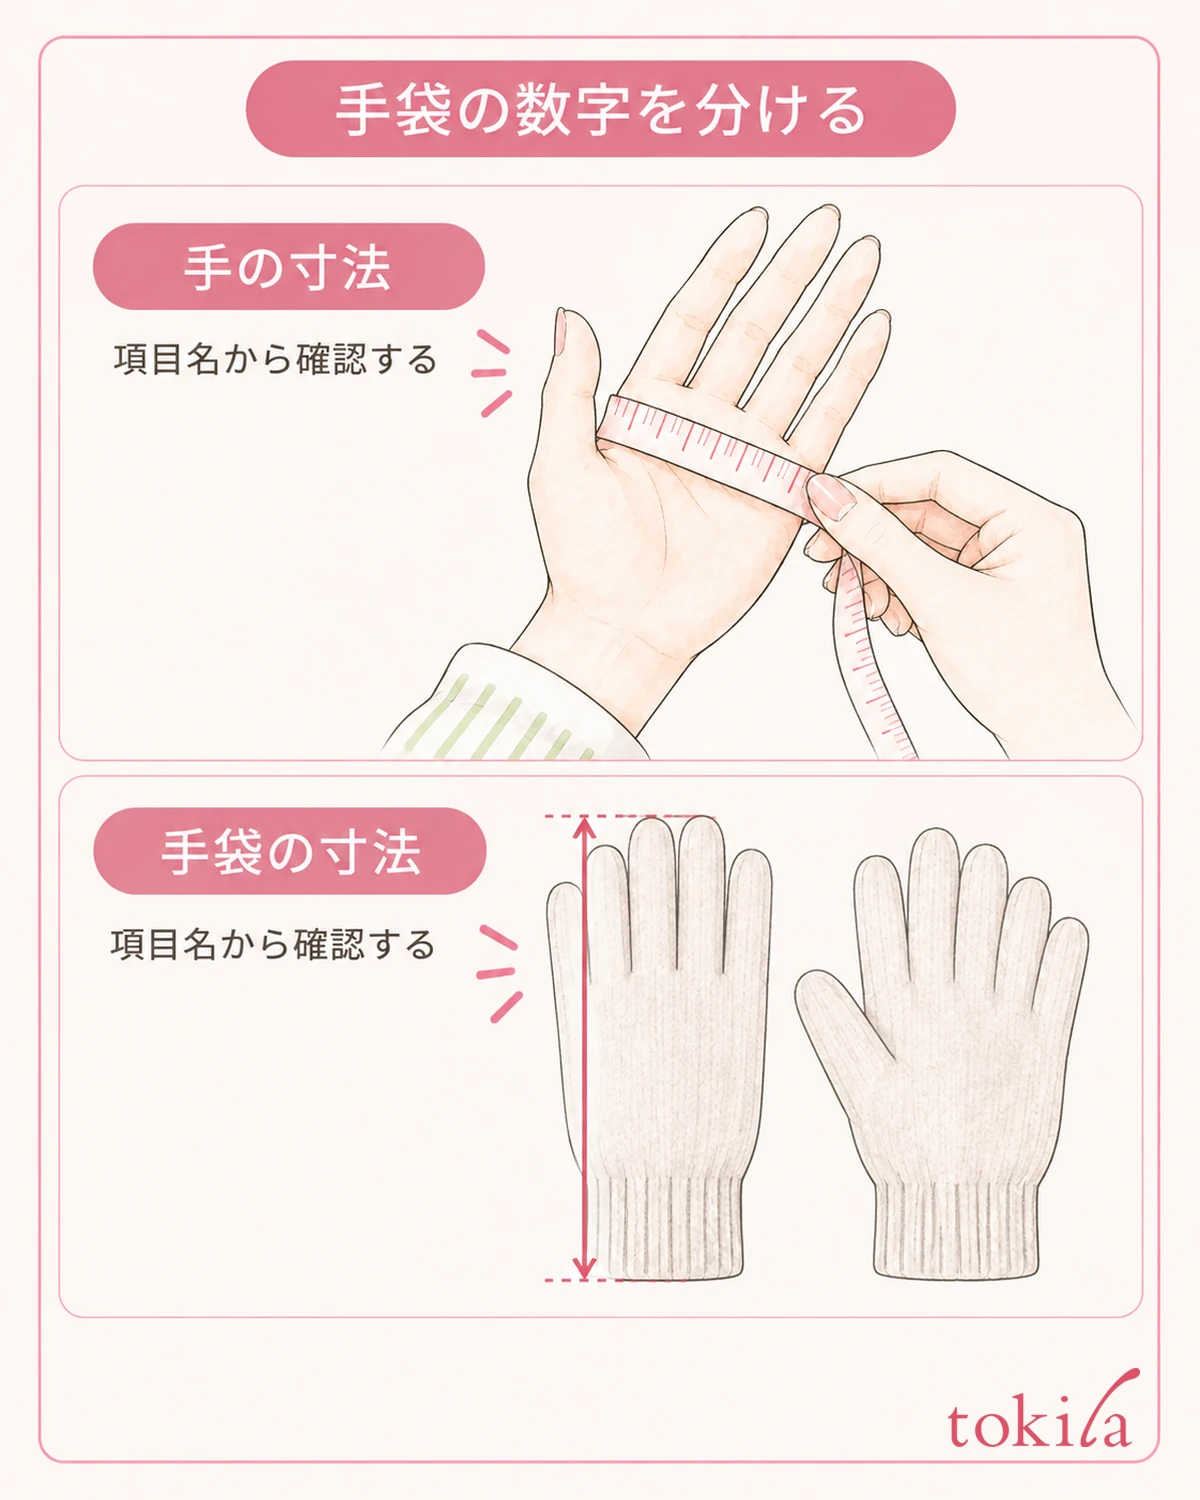
When you find numbers in a product listing, first read the measurement names. Figures labeled “hand circumference” or “suitable hand size” cannot simply replace measurements such as “total length” or “width” taken with the glove laid flat. Comparing your hand circumference with a flat width can make it hard to understand why the numbers differ.
Hand circumference is the distance around your hand. Hand length measures its length, but check the measuring guide for the starting point, endpoint, and hand position. Even when the same term, “hand circumference,” is used, first check where the guide’s measuring line runs. A useful starting point is to avoid automatically applying a measuring method learned for one product to another.
Even if sizes are labeled S, M, and L, those categories may not be shared across all products. Check whether the numbers are in centimeters or use another sizing system. Record the product name, size label, measurement name, and unit together in your notes. This makes it easier to return to what you are comparing when moving between several pages.
Also check the material, whether there is a lining, and whether the fingers are separated. Similar-looking gloves may have different internal construction. Rather than choosing a smaller size because the knit looks stretchy or assuming leather will always mold to your hand, first match your measurements to the size guidance for the actual candidate.
Do not overlook differences between labels such as “reference,” “approximate,” and “suitable measurements.” A range in a chart is a starting point for comparison, not a guarantee of how the gloves will fit. If hand length is listed as a reference measurement, do not assume it carries the same weight as hand circumference; follow up by checking the fingertips.
When choosing from photos alone, remember that the model’s hand size and the camera angle are not the same as yours. Even if the fingertips look short, you cannot read their actual dimensions from the image. Use visual impressions to narrow down styles you like, then return to labeled measurements and your own measurements for sizing.
Measure the specified positions with a soft measuring tape
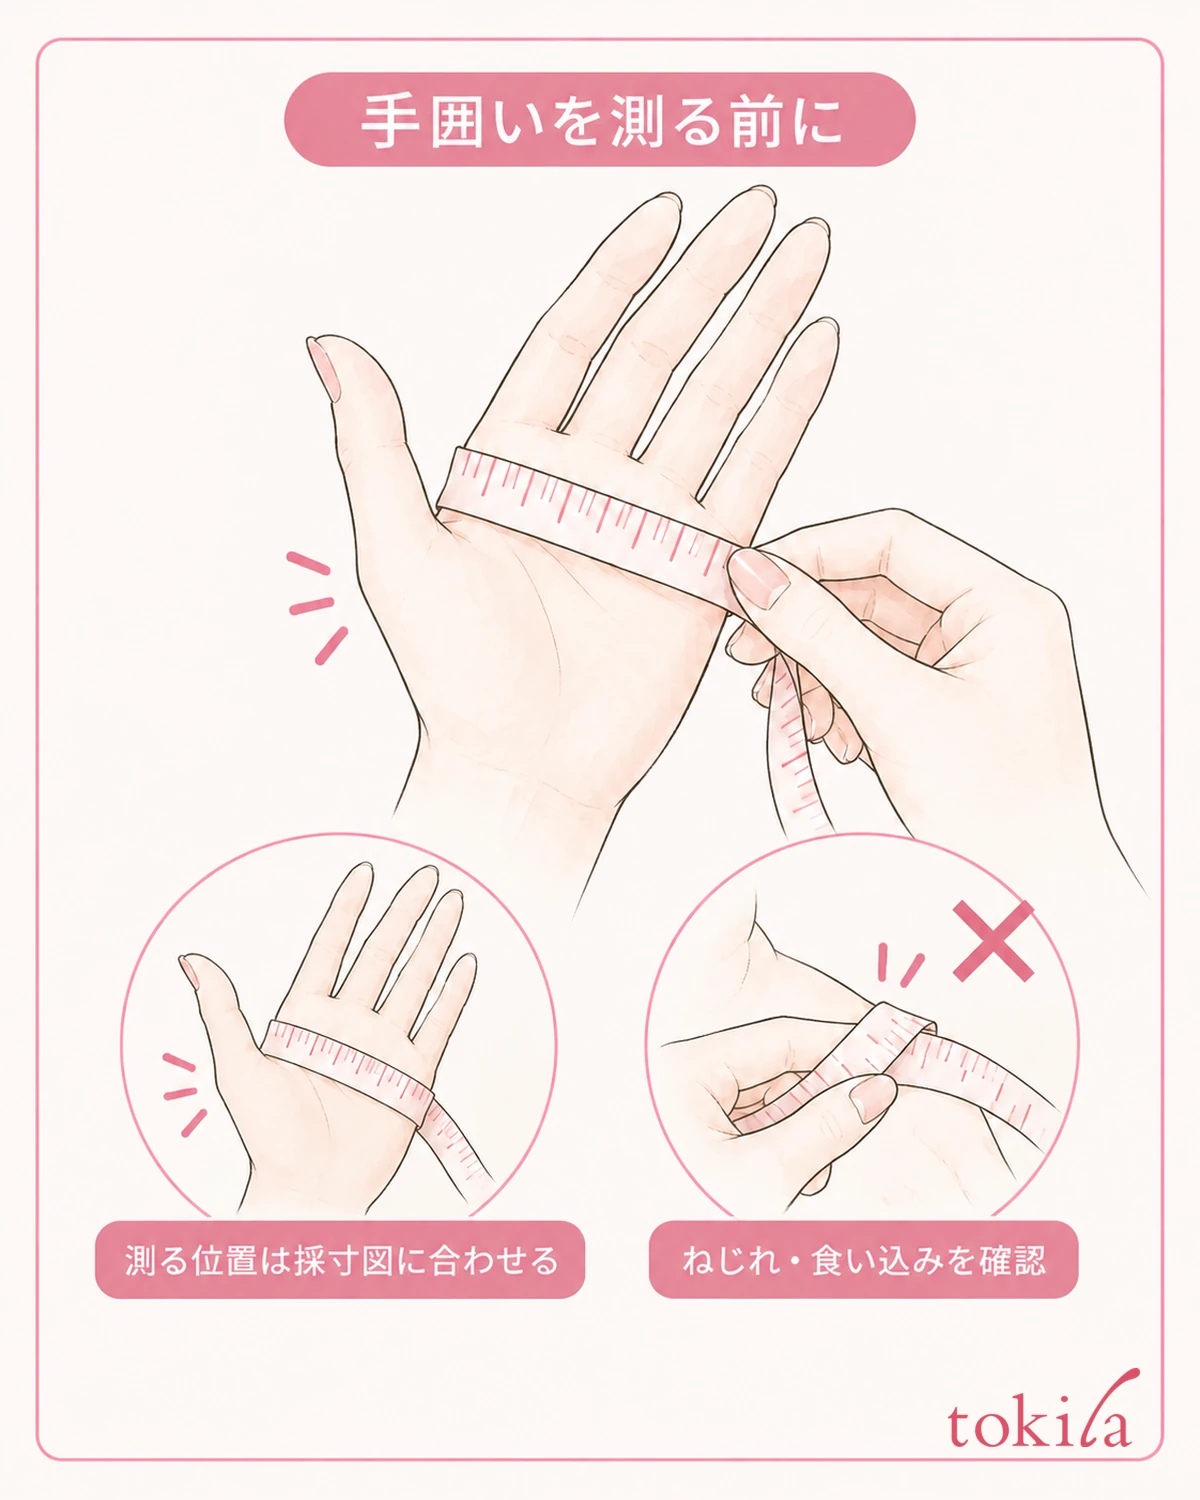
Before measuring, set out the candidate’s measuring diagram, a soft tape measure, and a notepad. Remove rings or other items if they cross the measuring line, and follow the hand position in the guide without forcibly bending your hand backward or clenching it tightly. Match the thumb side and little-finger side to the diagram so that you do not confuse hand circumference with wrapping the tape around the thumb as well.
Place the start of the tape at the specified point and wrap it around your hand. Check that it has not slipped diagonally or twisted, then read the scale where the tape overlaps. Do not press it into your skin to produce a smaller number or read it while it forms a loose, raised loop. If you cannot keep the line in place with one hand, another person can help hold its position.
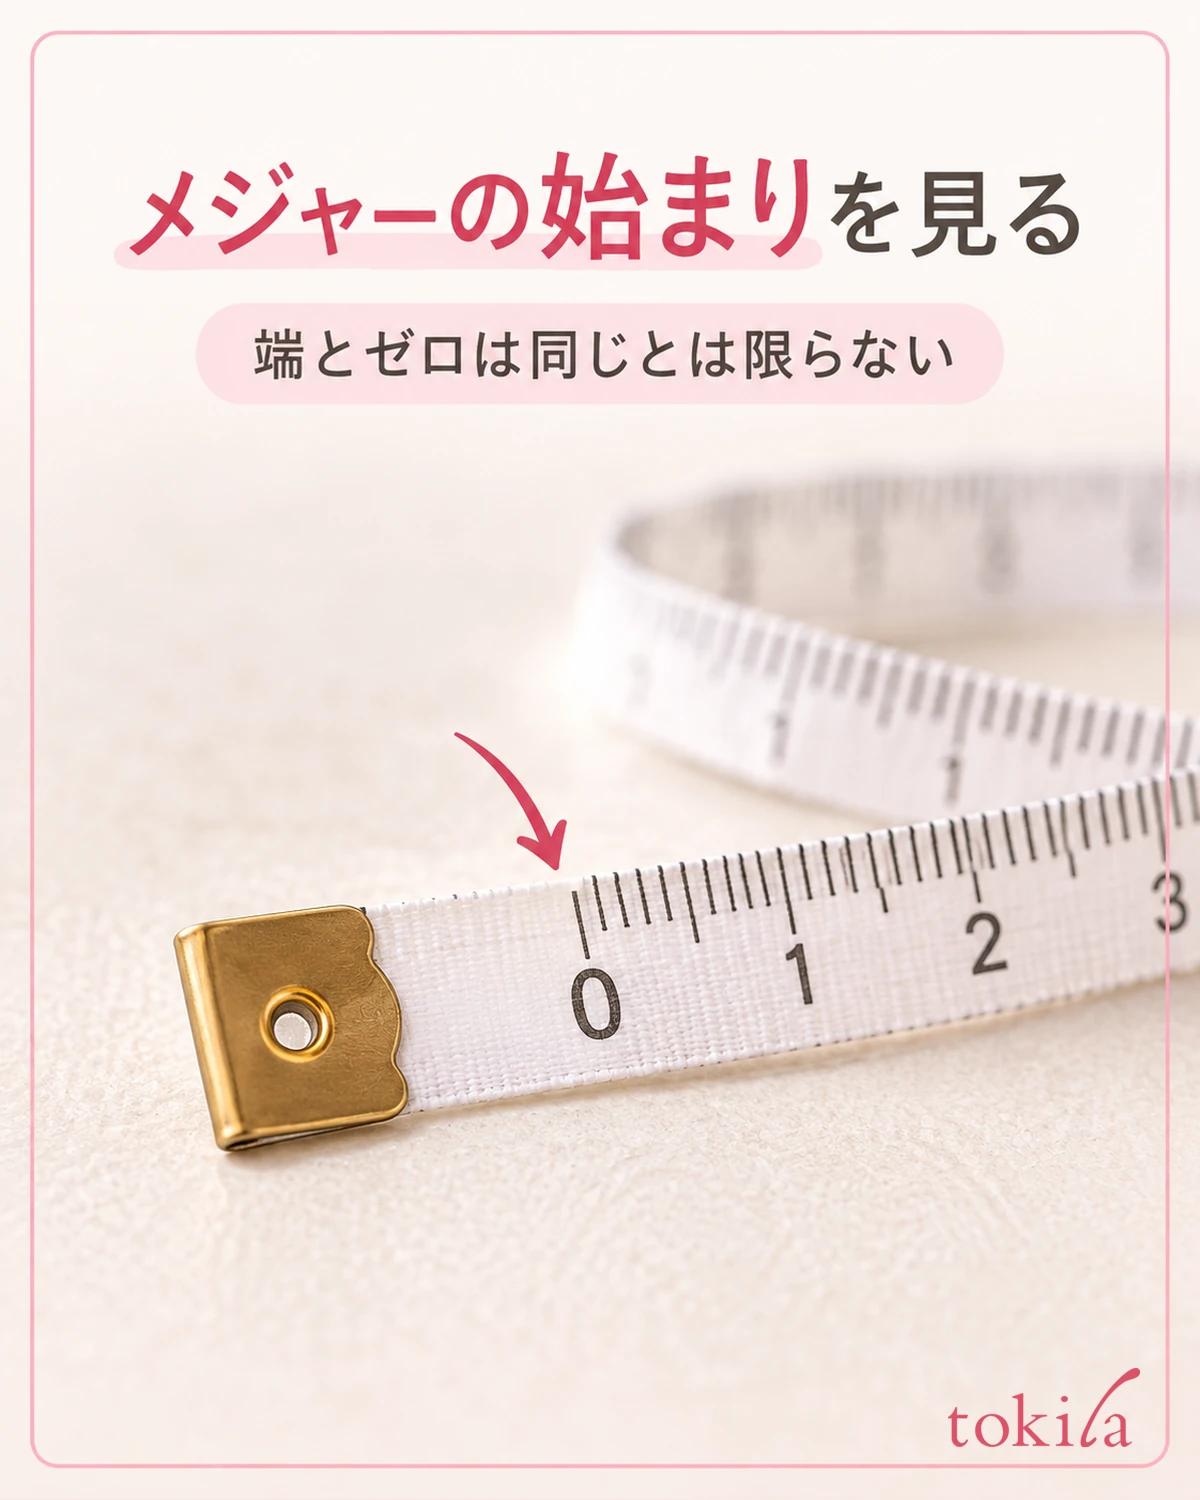
Some soft tapes have an unprinted margin before the zero mark. Check where the numbers begin rather than treating the physical end as zero. If the overlap hides the scale, adjust your grip just enough to see the reading point without changing how tightly the tape is wrapped.
Remove the tape once and measure again under the same conditions. If the numbers differ greatly, first review the line’s position and the tape’s tension. Make the measuring method consistent before choosing whichever number is convenient. If you measure both hands, label left and right separately rather than mixing the results into one hand’s record.
If hand length is also required, measure it separately from circumference. Check which wrist line and which fingertip to use, and match your hand’s orientation to the diagram. A glove’s total length may include the part covering the wrist, so do not treat the difference between your hand length and the glove’s total length as extra space at the fingertips.
Match the same measurement names and units in the size chart
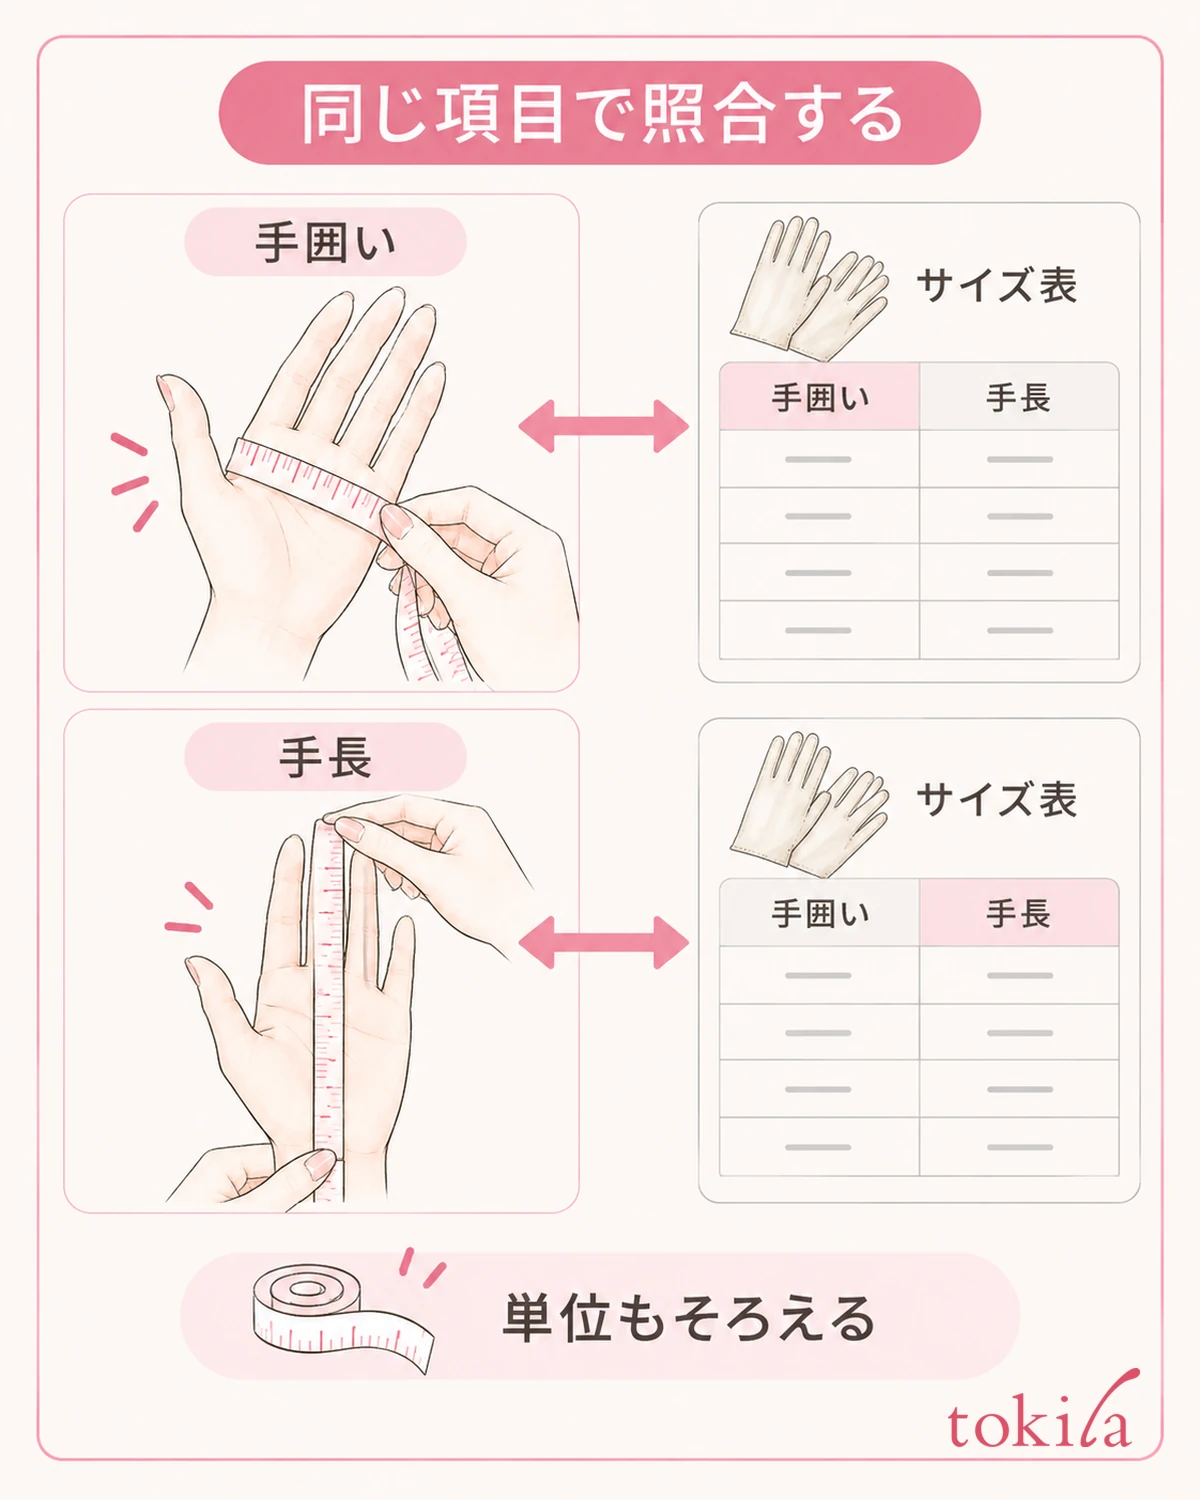
Once you have written down your measurements, return to that candidate’s chart. Match your circumference to the hand-circumference column and your hand length to the hand-length column. Do not put circumference into a “width” column or transfer only a size label from another product’s chart. If ranges are shown, check each one to see where your measurement falls.
If you are close to the boundary between two sizes, do not simply round the number and decide immediately. Read the product’s guidance for borderline sizes, lining, and intended use, and try both sizes if possible. Avoid universal rules such as “always size up between sizes” or “always size down for leather.” Leave room to check the fingertips and the fit when bending your fingers.
If hand circumference suggests one size and hand length suggests another, do not average them to arrive at a size in between. Follow any stated guidance about which measurement to prioritize; if none is given, keep both measurements. When asking a question, sharing the candidate and the measurements you took communicates the situation better than asking only, “Should I choose M?”
When shopping online, read the conditions for trying on and exchanging gloves before buying. Understand the seller’s rules, including whether you must check the fit before removing tags and what condition the gloves must remain in for a try-on. Do not order several pairs assuming exchanges are available or decide that you can return them after wearing them.
When comparing notes for different candidates, avoid putting them in one column merely because they share the same size label. Leave fields blank where the measurement names differ, and do not guess missing dimensions. You can also put a candidate with insufficient information on hold and choose again based on conditions you can verify.
If you save a comparison page, keep the size chart and product name together. Where similar names exist in one series, avoid mixing charts for models with different materials or linings. Even when using old notes, check that the chart still matches the current candidate before copying the numbers.
When trying gloves on, check the fingertips separately from the fit when bending
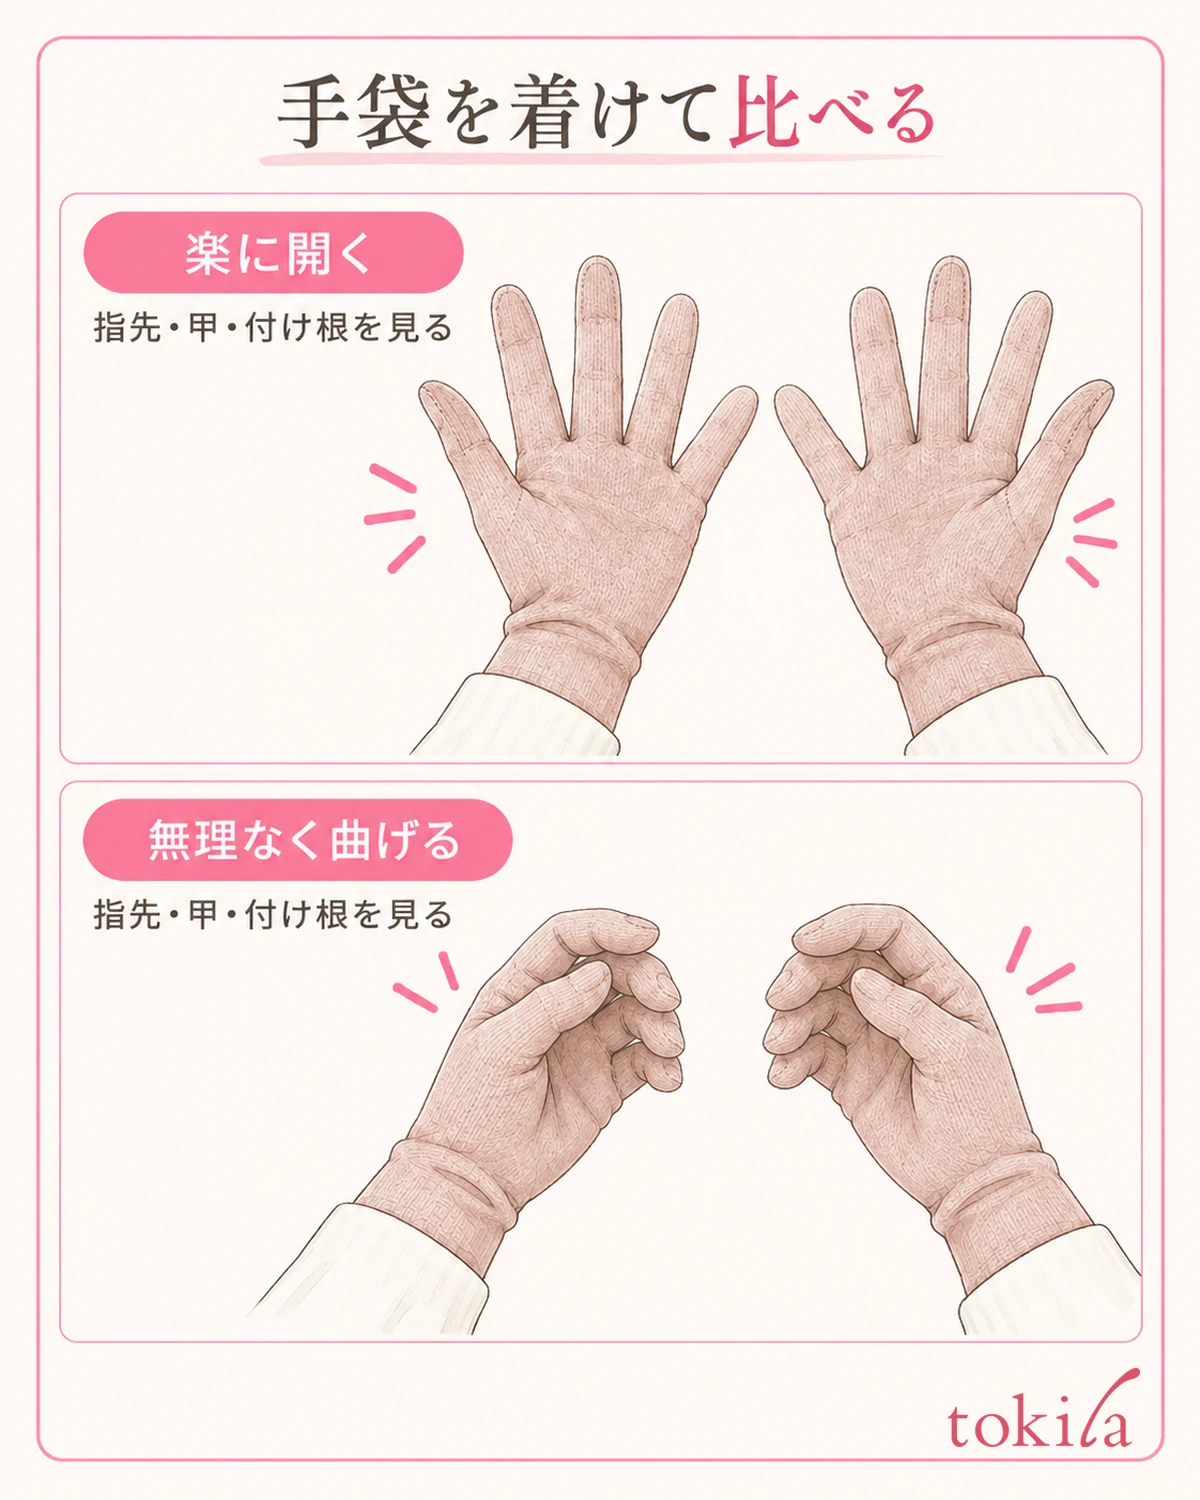
If you can try the gloves on, ease each finger into place using the recommended method. Instead of pulling hard on the fingertips to force your fingers farther in, calmly check the positions of the finger bases and tips. Also check wrist length, while distinguishing extra fabric under a sleeve from extra room inside the hand area.
First, open your hand comfortably and check how much space remains at each fingertip. Then bend your fingers within a comfortable range, checking whether the back of the hand or finger bases feel strongly pulled and whether any seams press against you. Do not set one universal number of millimeters for extra room; return to the guidance for the product’s intended use.
Do not finish after trying on only one glove; check both sides as far as the try-on conditions allow. If grasping feels difficult, note whether only the fingertips have extra room or fabric also gathers across the palm, rather than summing it up as “too big overall.” Conversely, even if the gloves look right with your fingers extended, a pulling feeling when you bend them is not a reason to choose that fit.
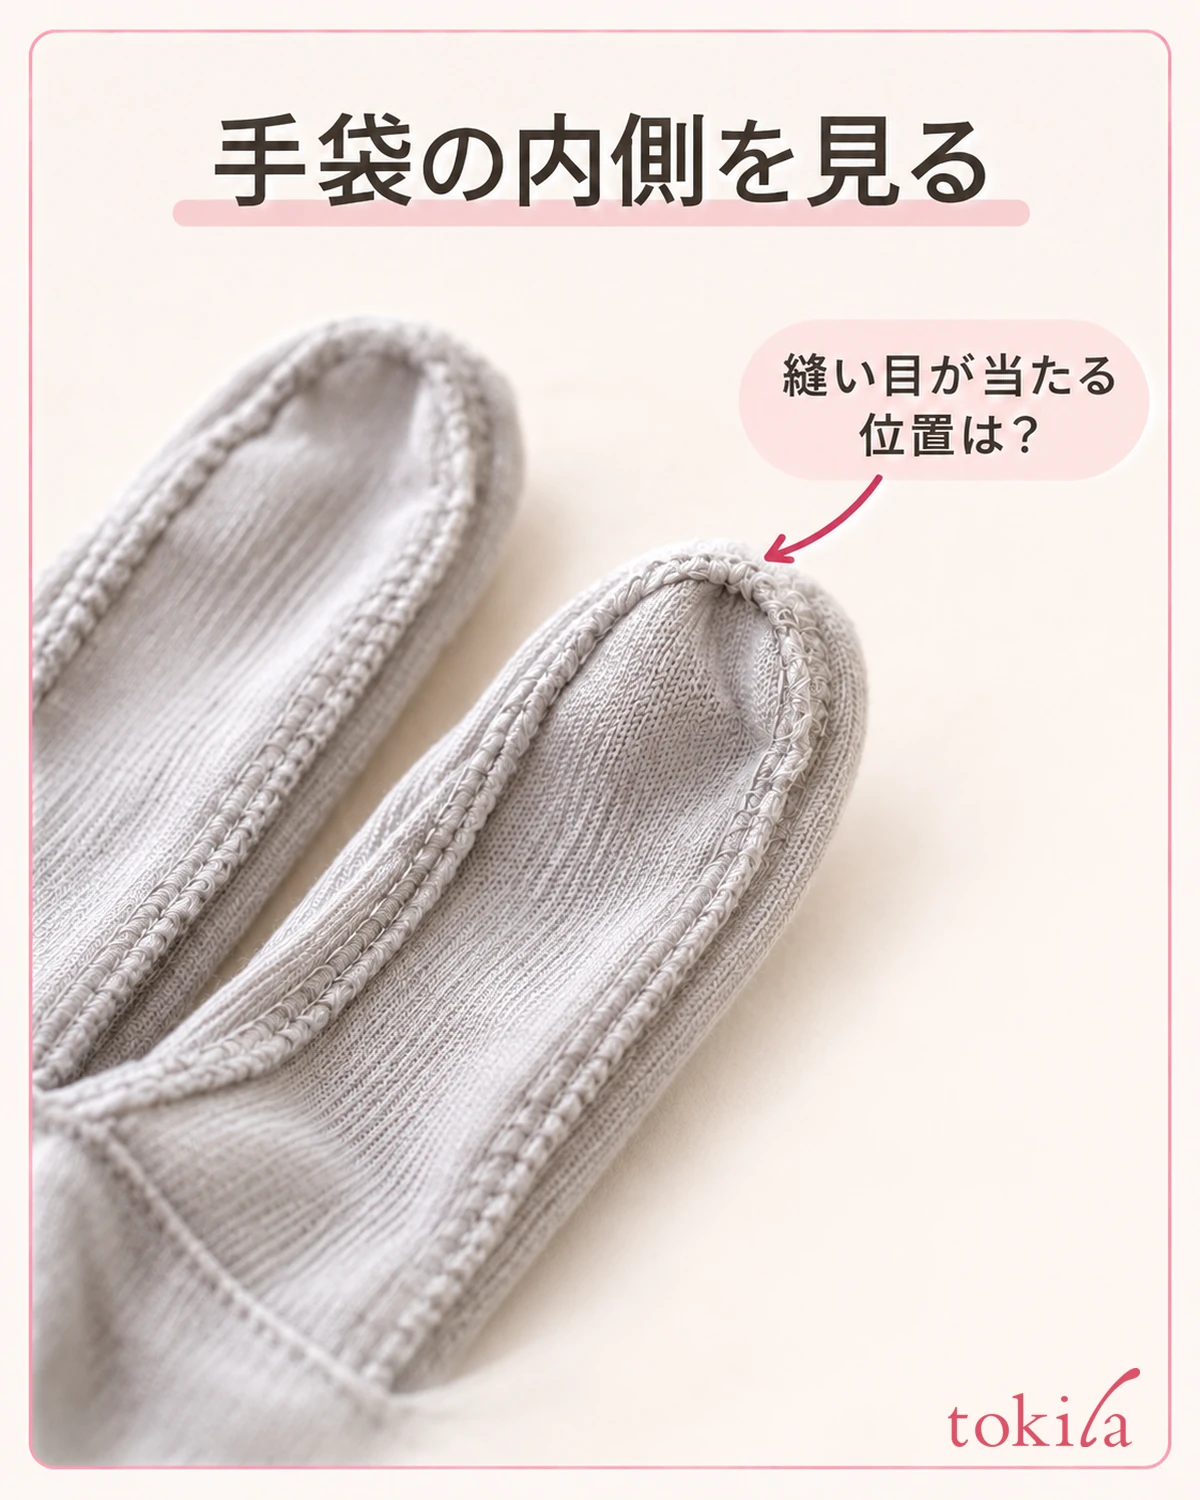
If you feel pain, numbness, or strong pressure, remove the gloves instead of trying to break them in. Also avoid deciding on your own to change their dimensions by heating or wetting them. Consider whether a different size is likely to help or whether the finger length or shape does not suit you, and leave room to switch to a different style.
You can also include your usual coat and cuffs in the try-on conditions. Decide whether you want the sleeves to cover the gloves or to leave your wrists visible, and check that in a mirror separately from the fit around your hands. When thinking about the colors of your whole outfit, also look at how to coordinate clothing colors to help choose sizing and appearance separately.
When unsure, return to one difference to narrow your choices
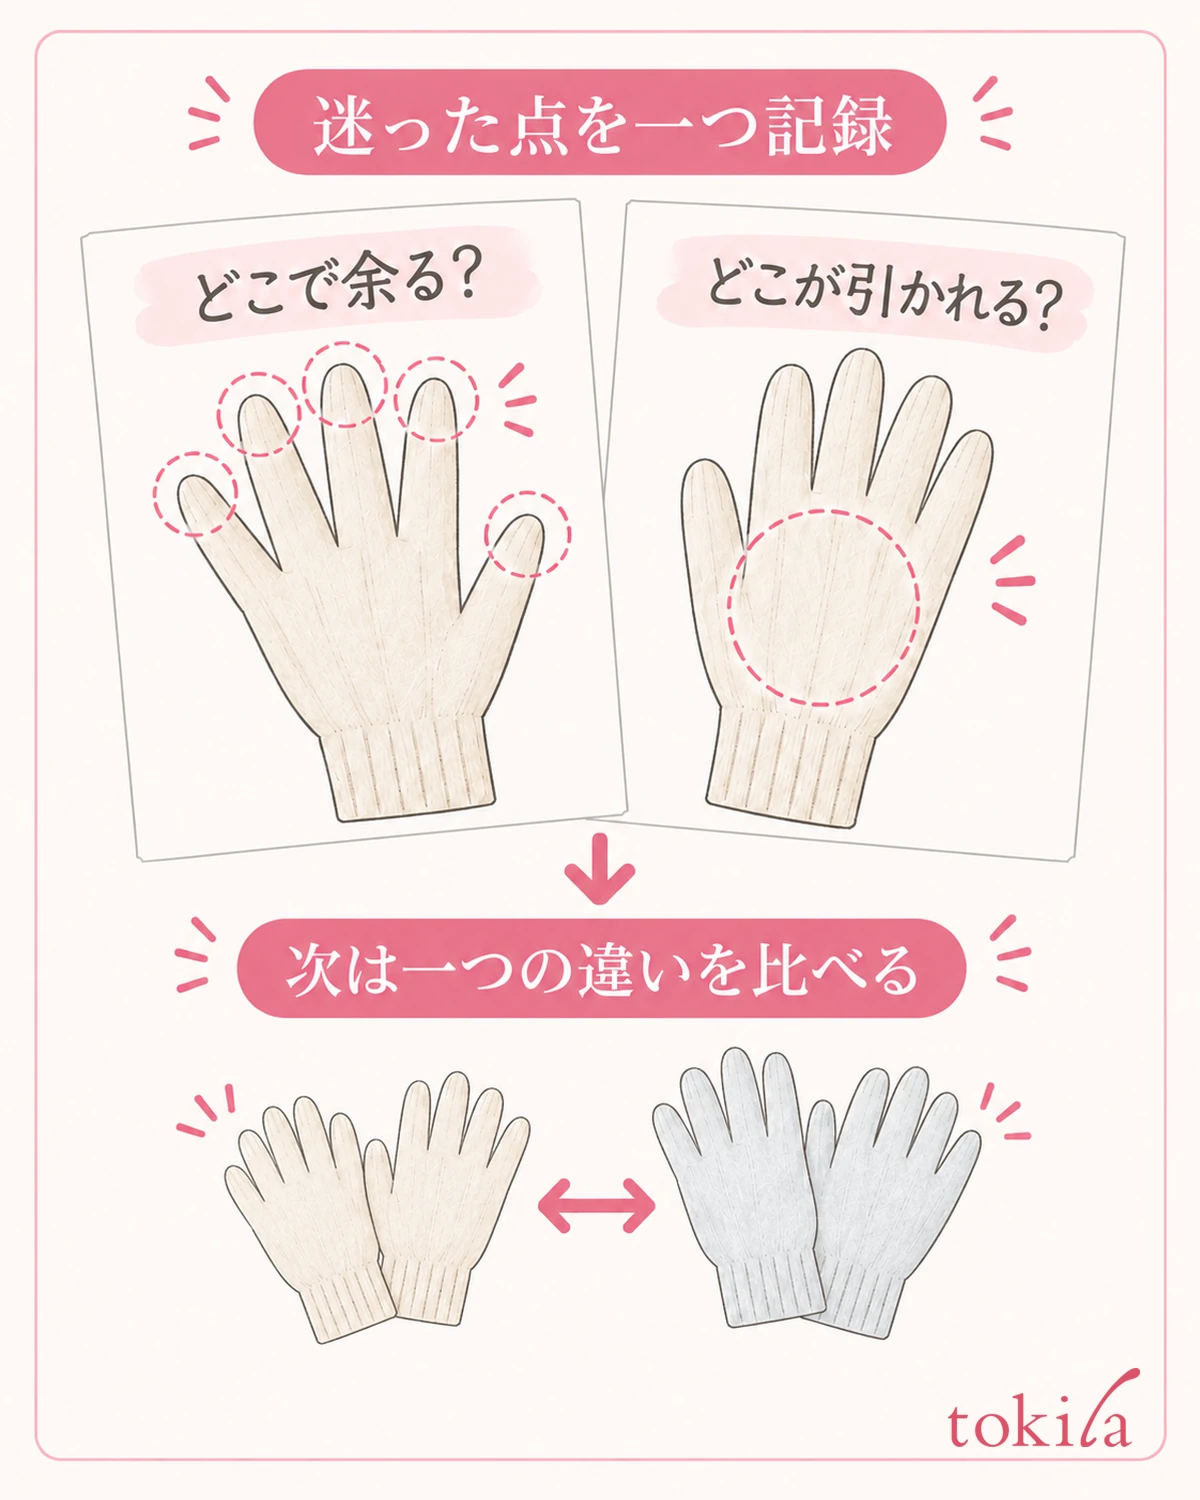
Before changing sizes, describe your uncertainty in one sentence. Combining a location with an action—such as “the circumference seems right, but the middle fingertip has extra room” or “the fit is fine when open, but the back feels pulled when bent”—makes the point to review clearer. Moving beyond “it just does not fit” can help avoid repeating the same try-on.
For the next try-on, choose one difference to compare, such as the adjacent size of the same product or a candidate with a different finger shape. Changing color, material, and size all at once makes it harder to identify which difference affected the fit. Even if you have already chosen a favorite color, first check whether a suitable fit is available before coordinating it with your outfit.
If you own gloves that fit well, use what you like about particular fingers or areas as a reference rather than choosing a new pair by size label alone. Older gloves differ in stretch and wear, so do not reinterpret their flat measurements as the suitable hand measurements for a new pair. Briefly recording what feels good when wearing them is more useful for the next comparison.
Record the date, measurements for each hand, the route followed in the measuring diagram, the candidate’s size label, and the movements you tried. If photos are allowed, use the same open-hand position for easier comparison while avoiding unnecessary personal information or price tags in the image. Do not treat the photo as a measurement of pressure or material stretch.
Finally, review whether your measurements fall within the chart, how the fingertips and bent fingers fit, and how the gloves work with your sleeves, in that order. If anything remains unclear, it is fine to put that candidate on hold. Keeping your hand measurements together with the product’s labels will help you compare another pair later without relying too heavily on size names.