
When you put a bag on your shoulder, the strap flips over partway and bunches into a thin band on top of your shoulder. If it twists again as you lift the bag even after you thought you had fixed it, it is easier to sort out if you take the bag off and check the direction from one end, rather than pulling at it while it hangs on you.
This article focuses on the flat shoulder strap found on an everyday bag, and explains where the twist is, the fittings that attach it, and the order for putting it back on. Some designs have a twist built in from the start, so the aim is not to remove every twist you can see. Work according to the original shape and the intended use of your own bag.
1. Put the bag down and find where the twist begins

First, set the bag on a stable surface and take the strap off your shoulder. A heavy load makes the fittings hard to move, so take the contents out and make it lighter before you check. Choose a surface with no dirt or snags, and place the bag so that leather and metal parts aren't dragged.
Face the front of the bag toward you and look at the left and right attachment points and the middle section that rests on your shoulder. Separate the cases: is the whole strap making a full turn, is it folded only near the length adjuster, or is only the shoulder pad flipped? If you remember the first place you noticed, it is easier to compare before and after the fix.
Follow the same edge with your eyes from one end of the strap to the other. If there is a spot where the front and back swap, lightly support the strap before and after it and check. Seams and surface texture are useful markers, but the back side is not always the one that faces inward. For a bag with a built-in twist or a set left-right orientation, give priority to its condition at purchase and its care instructions.
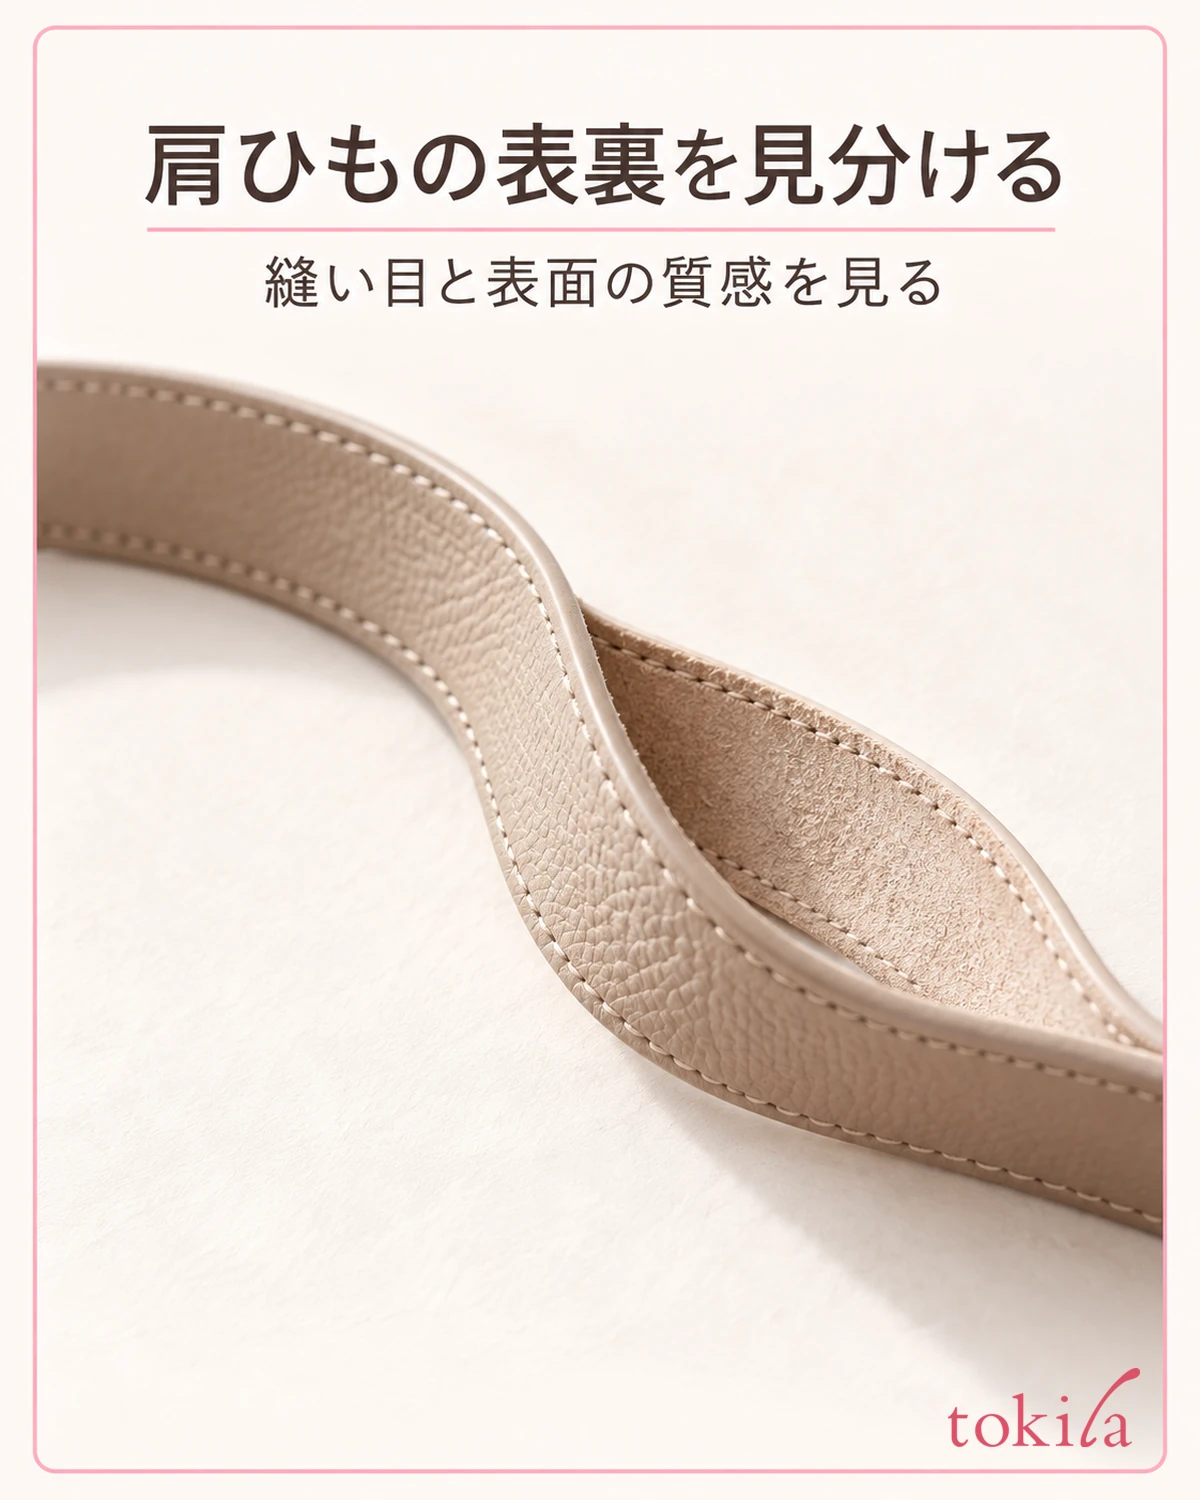
A twist is different from leather warping or a fold crease. If one spot stays sharply creased even when laid flat, it may not be something that simply turning the end will correct. Don't move on to treatments such as wetting it, applying heat or pressing it with a weight; first just tell whether front and back have swapped.
Chains, round cords and braided handles are not read the same way as a flat strap. It is important not to mistake a decorative twist or a joint for a connection that can be taken off. Please see the figure in this article as an example for checking the flow of a wide, flat strap.
If it folds only when it is on your shoulder, check later how it overlaps with your collar, hood or shoulder pad. If you change the length first, it becomes hard to tell the effect of undoing the twist, so keep the length adjustment where it is at the start.
2. Tell the detachable fittings from the fixed parts
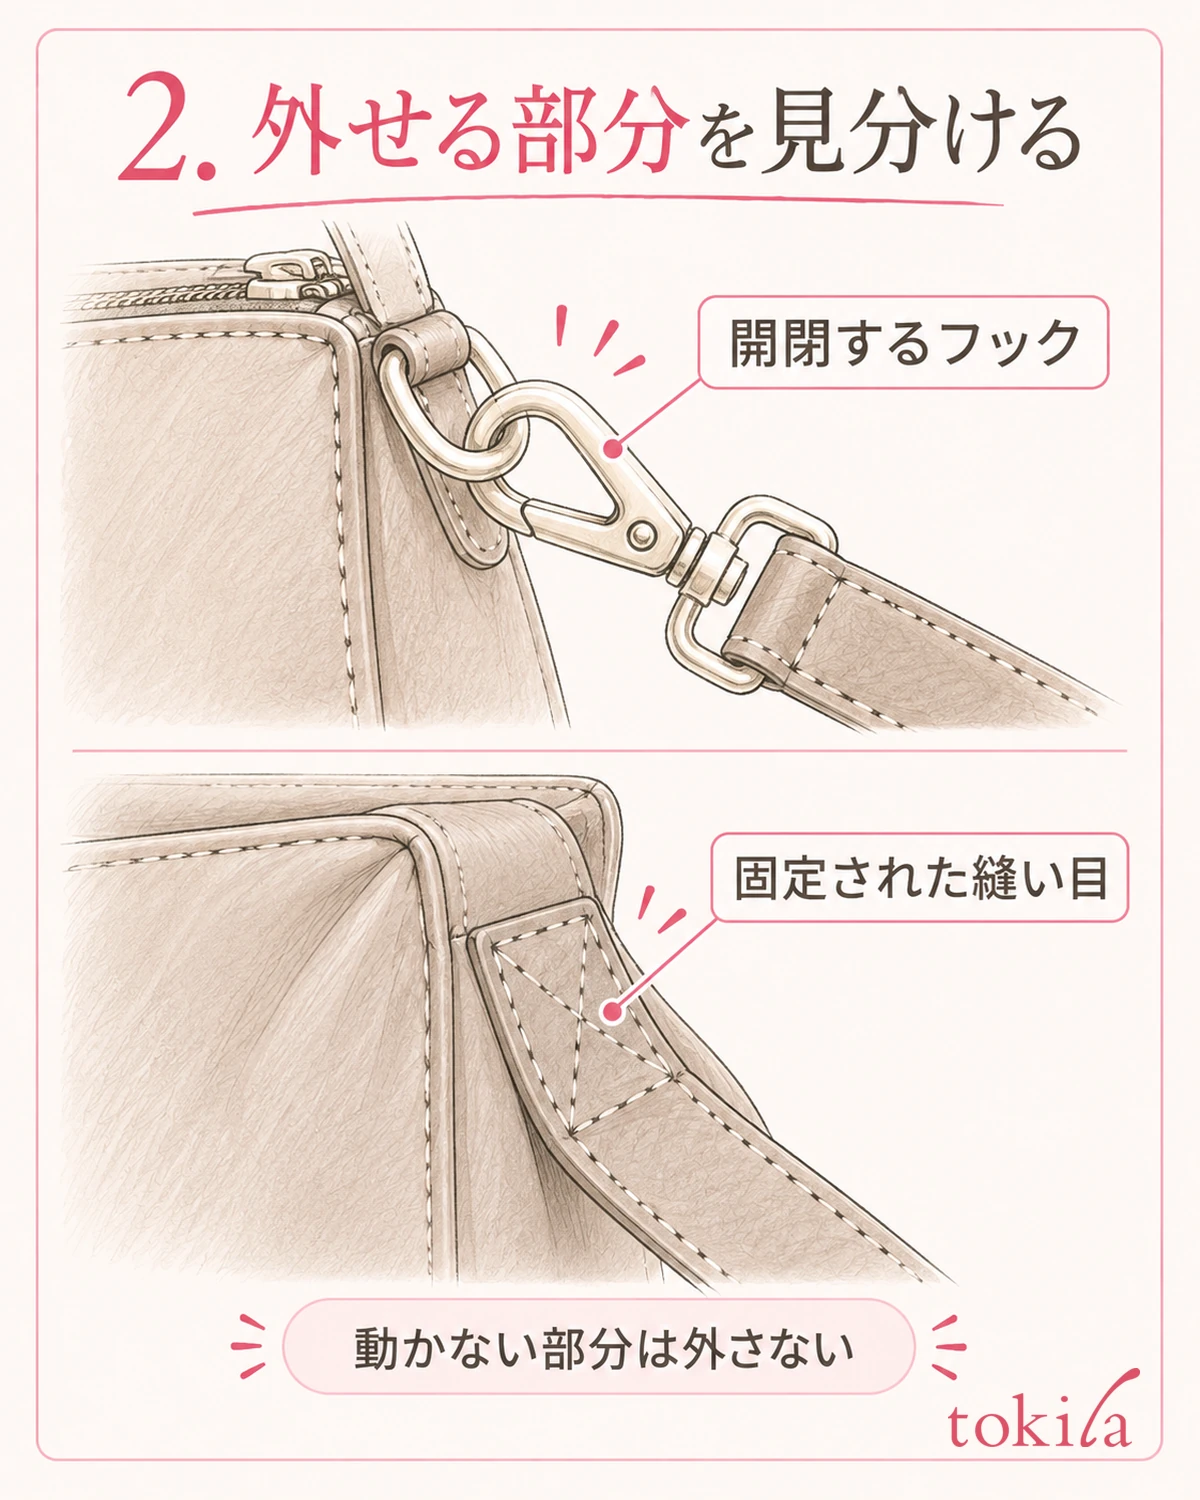
A strap with a hook-shaped fitting at the end that opens when pressed often attaches to a ring on the bag. But having a fitting does not always mean it can be detached. On your own bag, check what opens and what swivels.
The part of the hook that opens and the swivel at its base do different jobs. On some, only the gate that lets a ring in and out moves; on others, the base turns. Don't twist a part that doesn't move because you think it swivels, and don't pry open the gap of the ring with a fingernail or a tool.
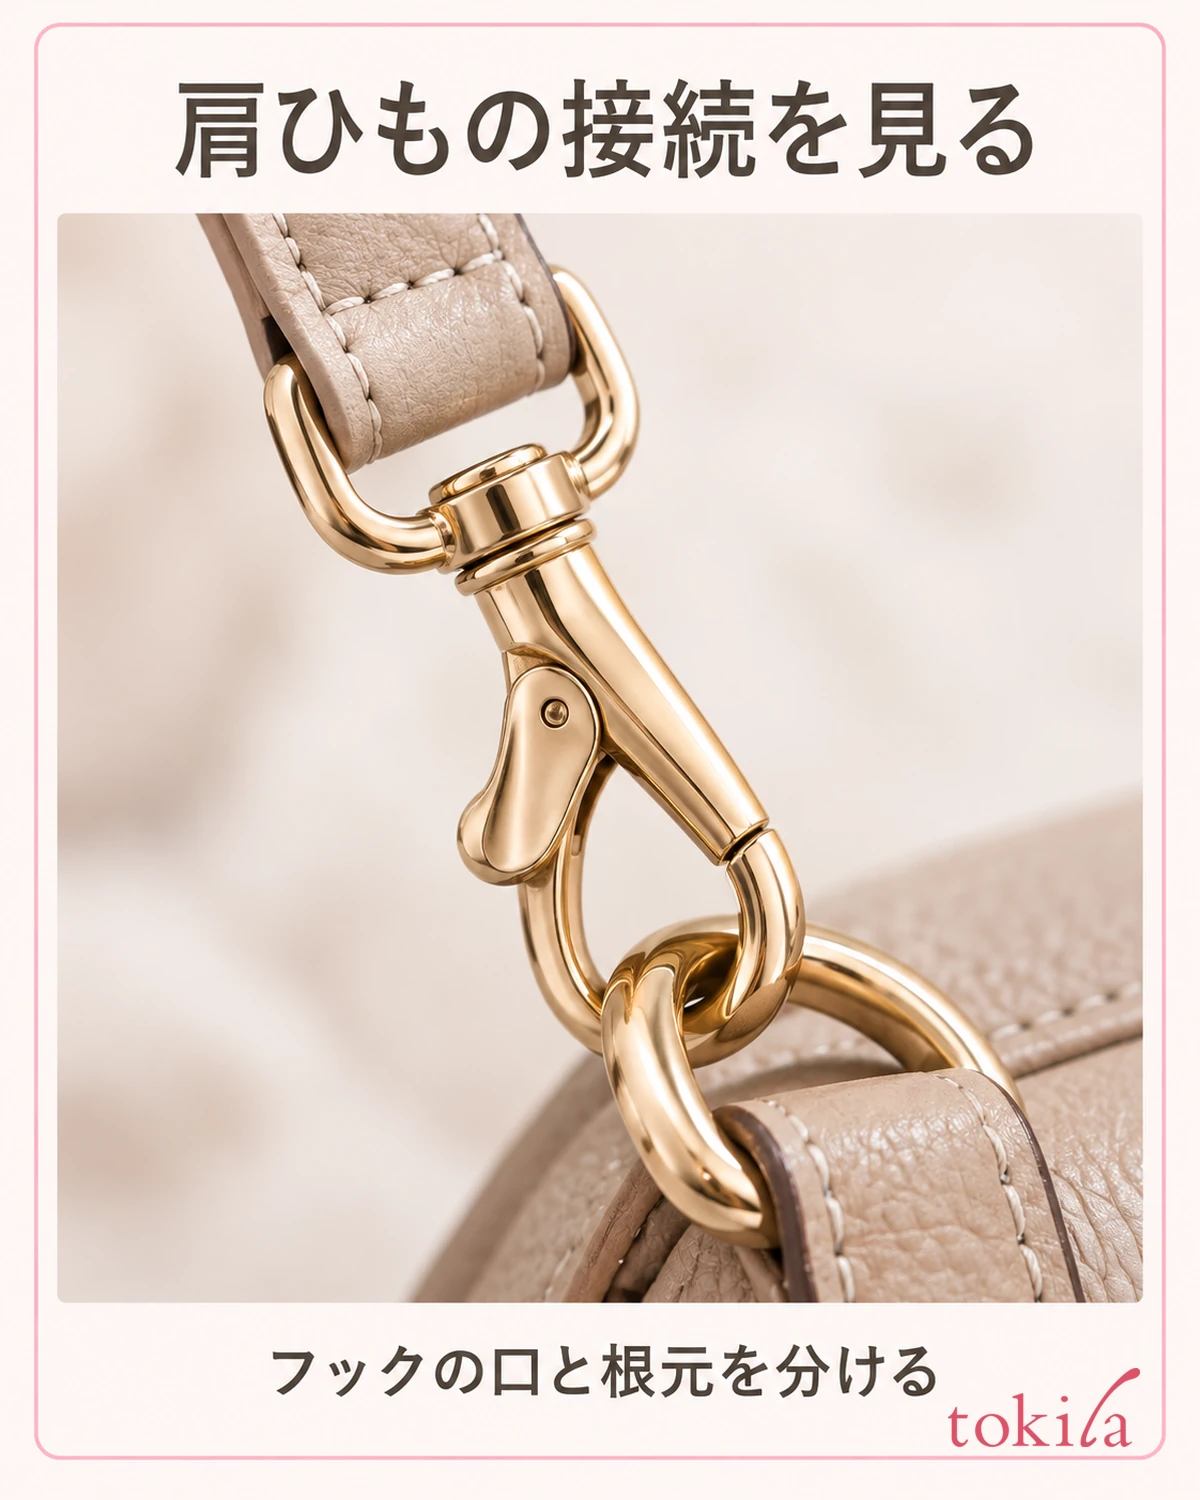
If it is detachable, support the bag on the table and work with no load on it. When you open the fitting, don't pull hard on the base of the leather or on the fabric, and operate it where your fingers won't get pinched. If you don't know how to open one, don't force it; check only as far as you can follow the path of the strap.
Leave alone the ends sewn onto the bag, fixed rings and decorative connections. Cutting stitching, prying open a ring, or taking parts off to disassemble them is a modification, separate from re-hanging the strap. Even if a strap can't be detached, there is no need to pull the band completely out of the length adjuster.
If the gate of a fitting doesn't return, a ring has worn thin, or the base of the leather is torn, don't keep trying to fix the twist. The contact points between a hook and a ring can wear with use, so don't judge its condition only by the fact that it looks closed.
If you may lose track of the left and right positions before you take it off, record the overall orientation by hand. A photo in which the front of the bag and both ends are visible lets you look back at the original connection. If a product has specified handling, don't re-attach it in a position different from that.
3. For a flat strap with one detachable end, trace the band and re-hang it
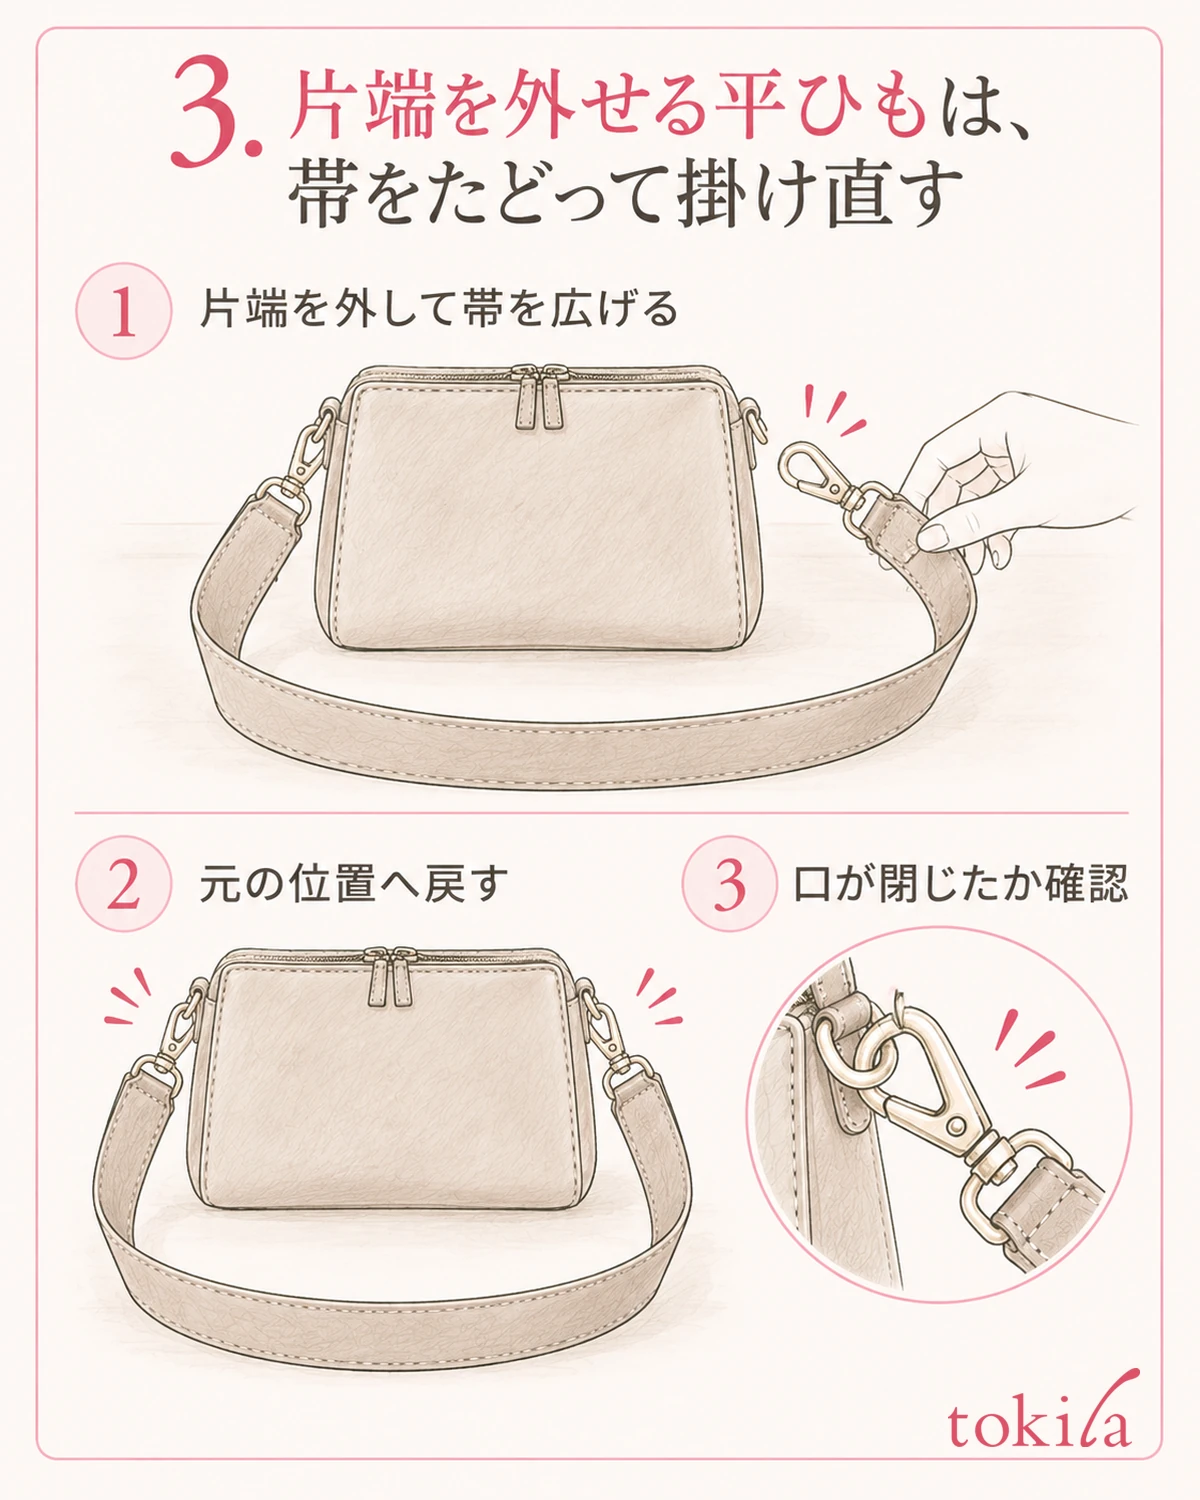
From here is an example of a flat strap with detachable fittings at both ends that can be returned to their original attachment points. With the bag still set on a stable surface, remove just one end. Leaving the other end attached makes it easier to keep a clue to left and right and to front and back.
From the side you left attached to the side you removed, spread the strap a little at a time so its width shows. Lightly support both edges of the band with your fingers and let the twist in the middle work out. Rather than pulling the whole length of the strap taut, undo each folded spot one at a time.
If the shoulder pad is designed to move, also check whether the band has flipped at that part. Don't remove the stitching or fasteners that hold the shoulder pad in place, and handle anything that doesn't move as it is. Even when only the band beneath looks twisted, don't force it out.
Put the removed fitting back in its original attachment position. At this point, trace the same edge to the end to check that you haven't attached the strap with another half turn. Which way the front of the strap faces depends on the bag's design, so don't treat lining up the left and right fittings in the same direction as the only right answer.
Once attached, take your fingers off the opening part and check by eye that the gate closes properly and surrounds the ring. Also see that no leather tab or fabric is caught in the gate. With the bag still on the table, hold the strap lightly and check that the connection doesn't look likely to come off. This is not a step for testing load capacity by pulling hard.
For a strap that can't be removed, don't keep rotating the bag itself; instead straighten the direction of the strap before you lift it. If it still twists in the same place, stop at checking whether it differs from the original design. It is important not to apply the detachable-strap steps to a structure you don't understand.
4. When it folds near the adjuster, check the original path of the band
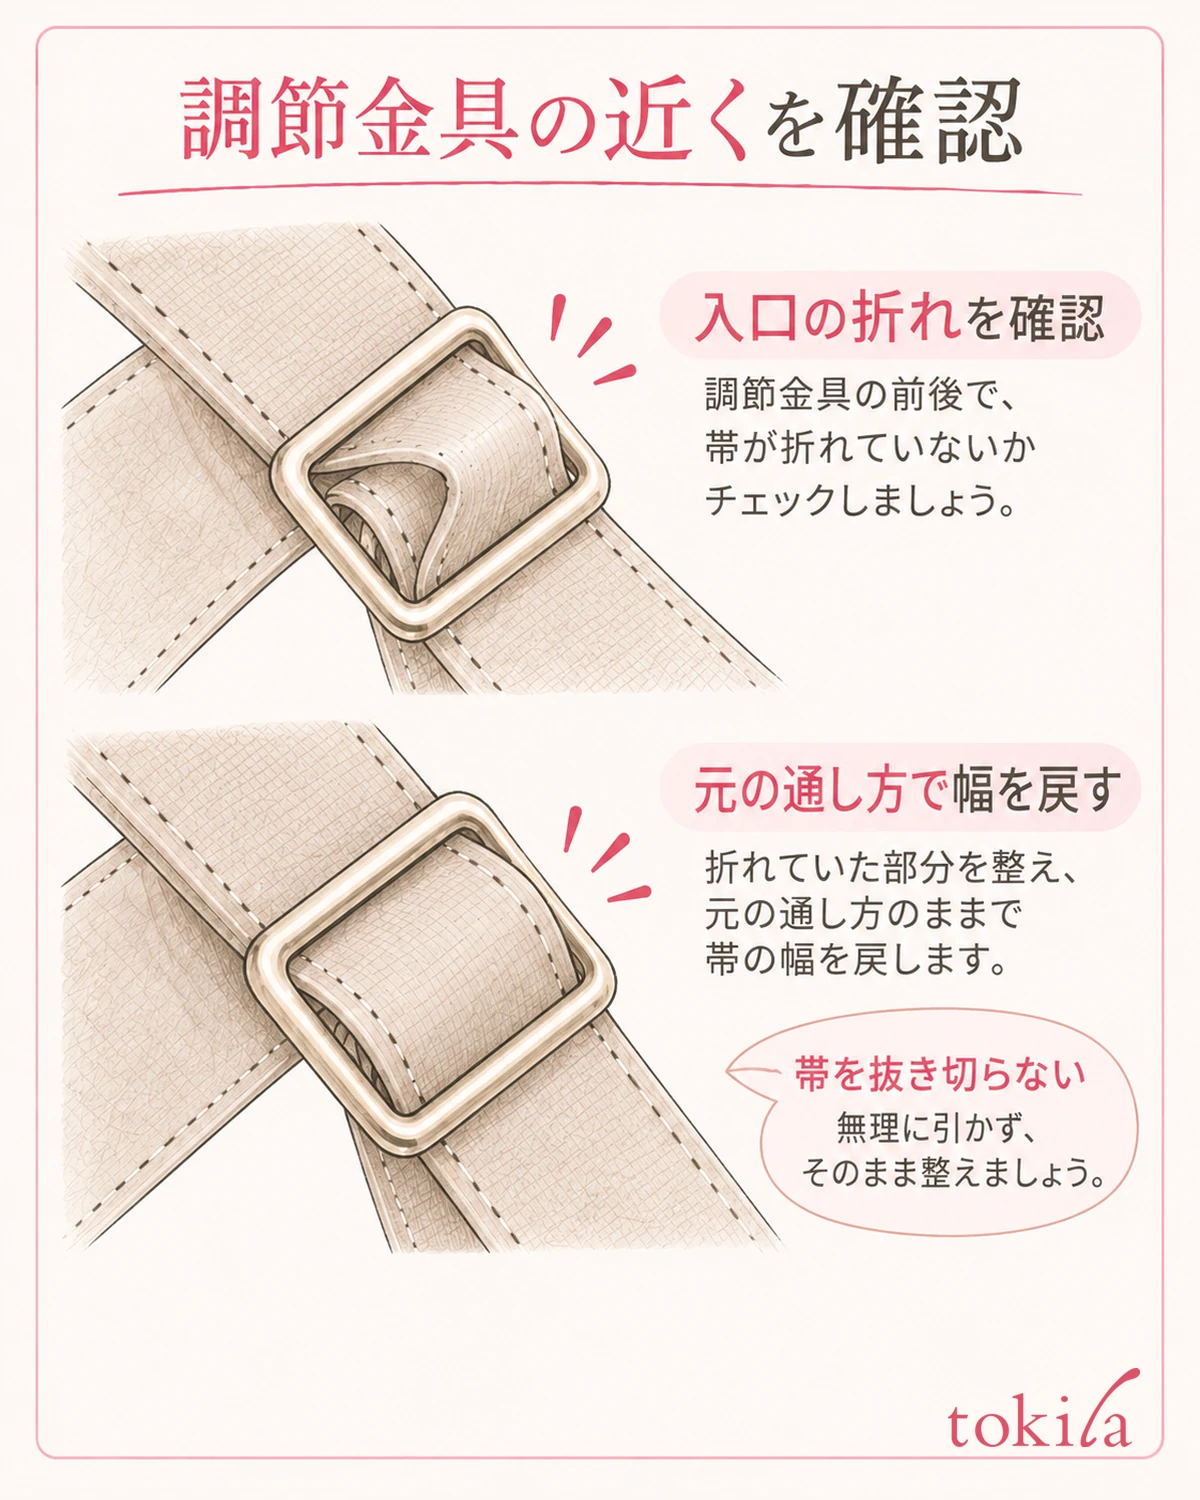
Even after you line up the direction of the ends, the band can fold narrow just near the length adjuster. Here, check whether the band has flipped before and after the fitting, and whether a doubled-over part overlaps at an angle. Separate a twist from a structure where the band simply overlaps itself.
Before adjusting, remember the current length and the position of the fitting. If it is the type that moves, loosen it just a little with the load removed, keeping the way your bag is threaded. If the band is folded at the mouth of the fitting, straighten it as far as you can restore its width with your fingertips, and bring it back close to the original length.
If the band shifts to the side of the fitting partway, don't pull hard on only the narrow part either. See whether it passes through while keeping its width, and stop if it doesn't move. Don't force a thick stitched section or a shoulder pad into a fitting it won't pass through.
If you lose track of the order in which the band goes through the fitting or which side faces which way, don't thread it again by following the diagram for a similar-looking bag. Adjusters come in several structures, and just because the band passes through does not mean it will hold its length when used. Keep the state before you pull the band all the way out, and check the original instructions.
Even for a swivel fitting, if it catches, don't oil it or bend it with pliers to make it move. It may be a design that does not rotate, or the part may be damaged. Keep what you can move lightly from the outside separate from work that is a repair of your own.
Handle a belt for clothing only after you check how the band and the loop relate. How to Tidy the Excess End of a Belt explains how it differs from a loop on clothing, but the same threading order is not meant for the adjuster on a bag.
5. Re-hang it and check the direction of the shoulder, fittings and bag
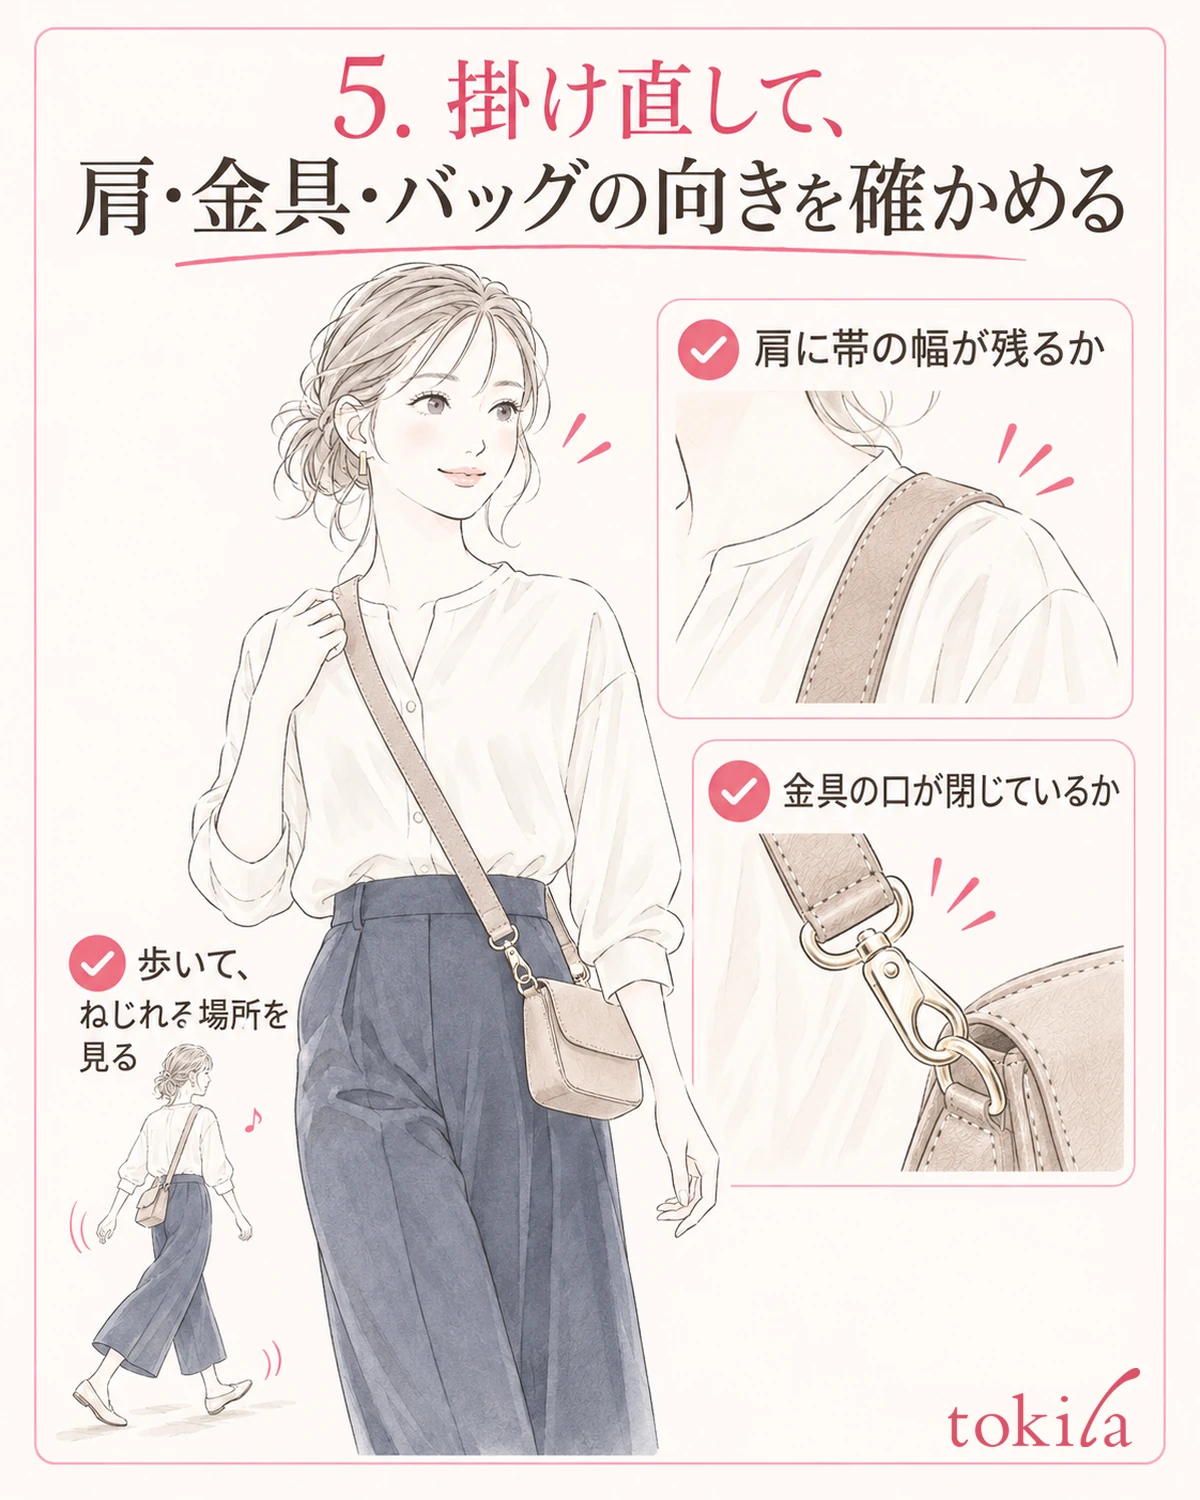
Once you have checked the connections, re-hang the bag, kept light, on your usual side. While supporting the body of the bag with one hand, see whether width remains where it rests on your shoulder and whether the strap flips partway across your back or chest. Use the mirror from the side as well as the front.
When it looks right standing still, take a few steps indoors and try the motion of pulling the bag forward and letting it back. Separate whether only the bag body turns when you lift it, whether the area near the fitting flips, or whether only the shoulder pad moves. Also look back at whether you are turning the bag body once around each time you put it on without taking the strap off.
If the strap has slipped in under the collar of your clothes or your hood, support the bag, take it off your shoulder, adjust your clothes and then put it on. That lets you see where it was caught, instead of pulling the band hard and moving it while it is on. On days you use it with a stole, Checking the Position of a Stole and the Way You Hold a Bag can also help.
If it twists again with the same action, narrow the next change down to one thing, such as the orientation of the bag body when you put it on. If you change the length, the left and right connections and the side you carry it on all at once, you can't tell where it flipped. You don't have to put up with a sore shoulder just to keep it looking neat.
If a fitting won't close, the attachment point is damaged or you can't confirm the correct way to thread it, stop using that shoulder strap. When you consider repair or replacement, organize things so you can explain where it twists and the condition of the parts. If you switch to a different strap, first check that its width and fittings suit your bag.
When the twist bothers you, go in this order: put the bag down, trace the same edge, handle only the structures that can be removed, check the closed connections, and look at it in everyday movement. Before you restore the shape by force, start by finding the one place where the strap flips.



