
Does the lead keep breaking when you sharpen a makeup pencil, or does only the casing get shaved without the tip taking shape? Before applying more force, check whether it is a type meant to be sharpened, whether the sharpener is compatible, and whether any shavings are left inside. The place to start is at a desk, away from your face: insert the pencil straight, turn it lightly, and check as you go little by little.
This article explains how to prepare and care for cosmetic pencils that you sharpen before use. It keeps this step separate from how to draw brows or eyeliner, and starts from choosing a tool that matches the labeling of the pencils you already have. Not every lead needs to be the same length or have the same tip shape.
1. Check on the body and the labeling whether the pencil is meant to be sharpened
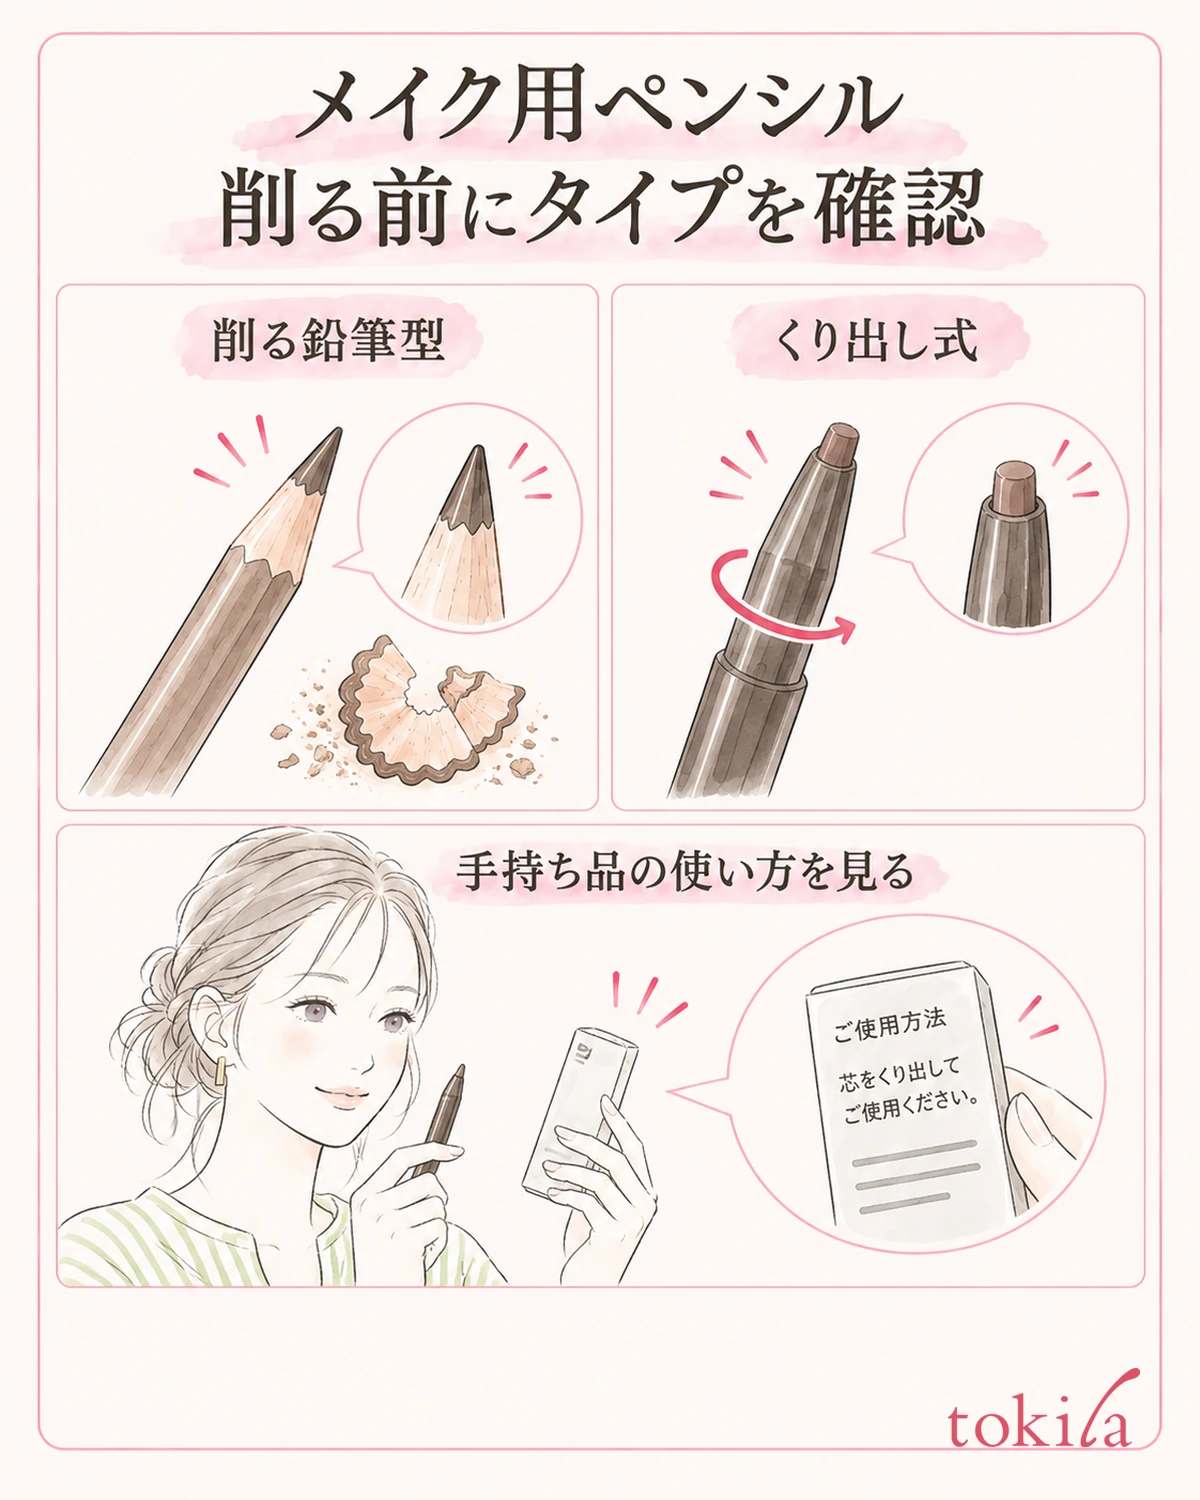
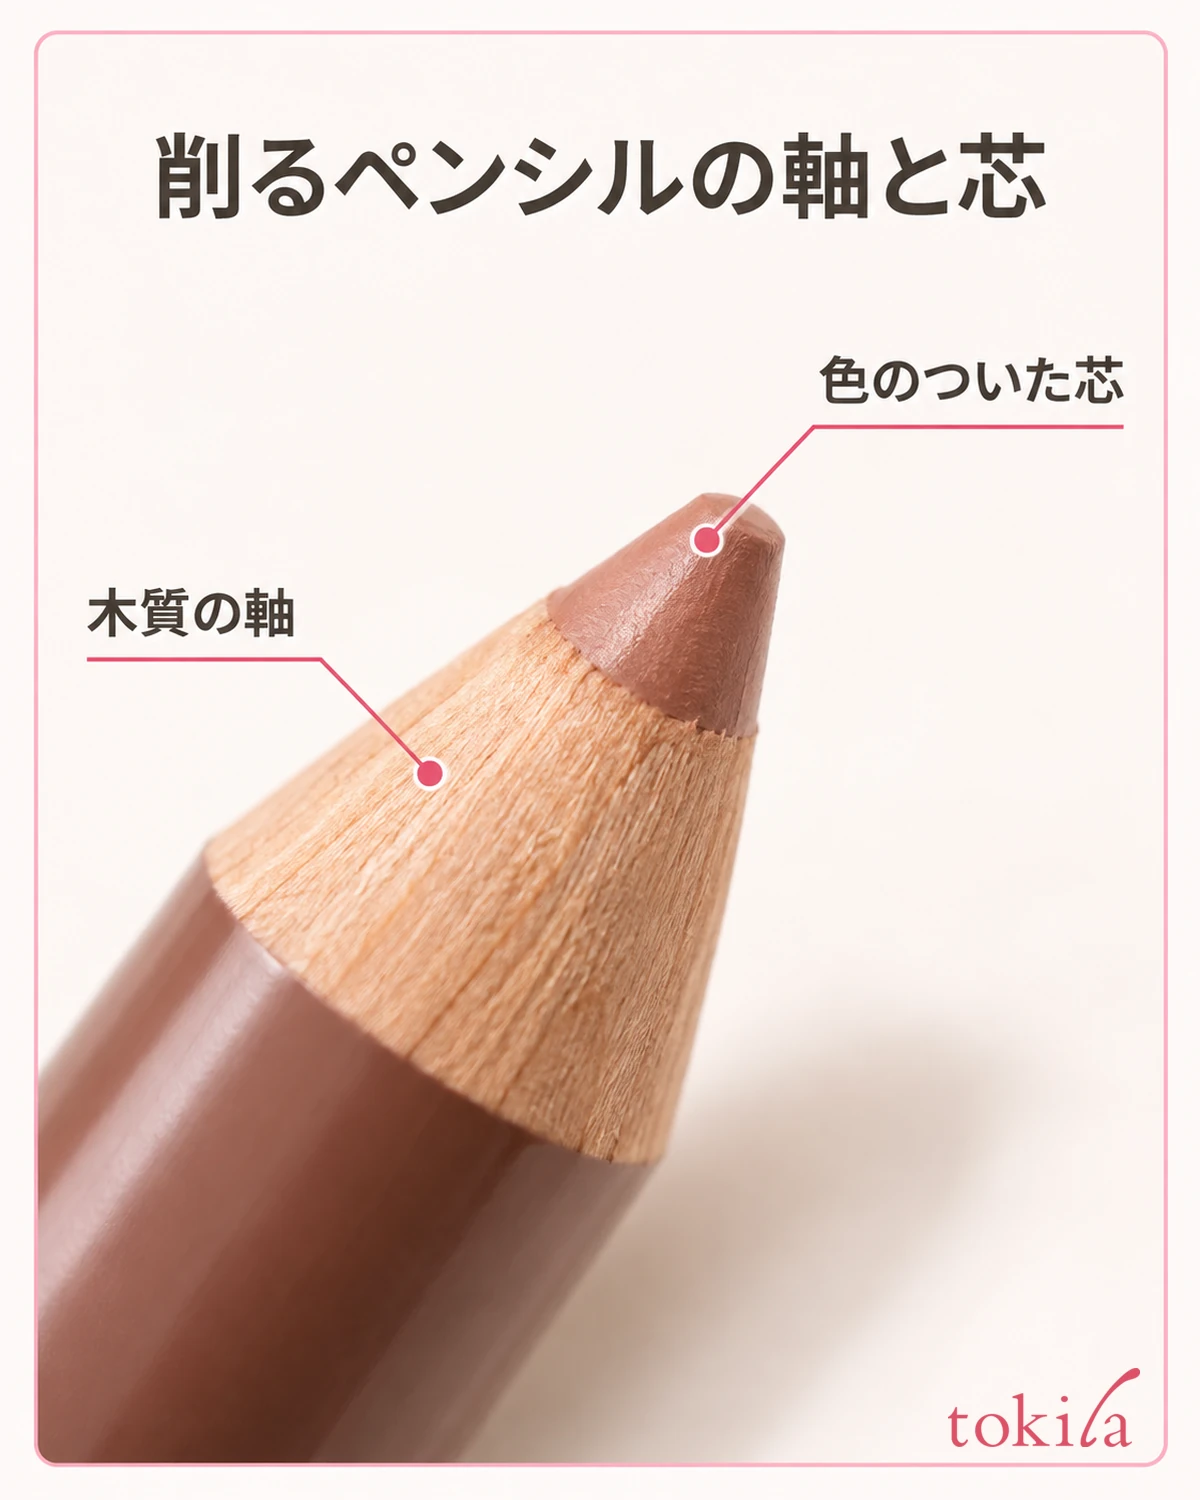
First take off the cap and look at the pencil and the labeling on its outer box. Don't decide from appearance alone, such as "the barrel looks like a pencil, so it can be sharpened" or "the lead is thin, so it must be twisted up." Check how it is meant to be used, such as "sharpen to use" or "twist-up type," and first sort out whether a sharpener applies. Even a barrel that looks like resin cannot be judged by the look of its material alone.
Don't put a twist-up type into the same hole as a sharpen-type wooden pencil. Some products come with a part that shapes the tip, but follow the dedicated instructions for using that part. Avoid extending a lead that twists out and then thinning it from the outside with a blade. If you can't read the instructions, check how to use the product before you start sharpening.
Whether it is for brows, eyeliner or lips does not by itself make the way to sharpen the same. Make sure you can confirm the name or model number of the pencil you have, and then look up the compatible sharpener. Even within the same brand, a dedicated tool may be specified for each product, so don't carry over how you handled a previous pencil as it is.
Before sharpening, also check the barrel for cracks, the tip for chips, and the inside of the cap for broken pieces of lead. If something is unusual, such as the lead breaking repeatedly right after a drop, use that change as a clue. You don't need to judge from appearance alone what is going on inside the lead, or keep sharpening again and again just to use it up.
If color only fails to show when you apply it to the brow, see also what to check when an eyebrow pencil won't draw. This article deals with the trouble that stops at the sharpening stage.
If you use both types together, set them apart one by one before sharpening. Match each barrel you are about to handle with its labeling, so you don't put a twist-up type into the sharpener in the momentum of taking off the cap.
2. Choose a compatible combination, not just a hole of the right size
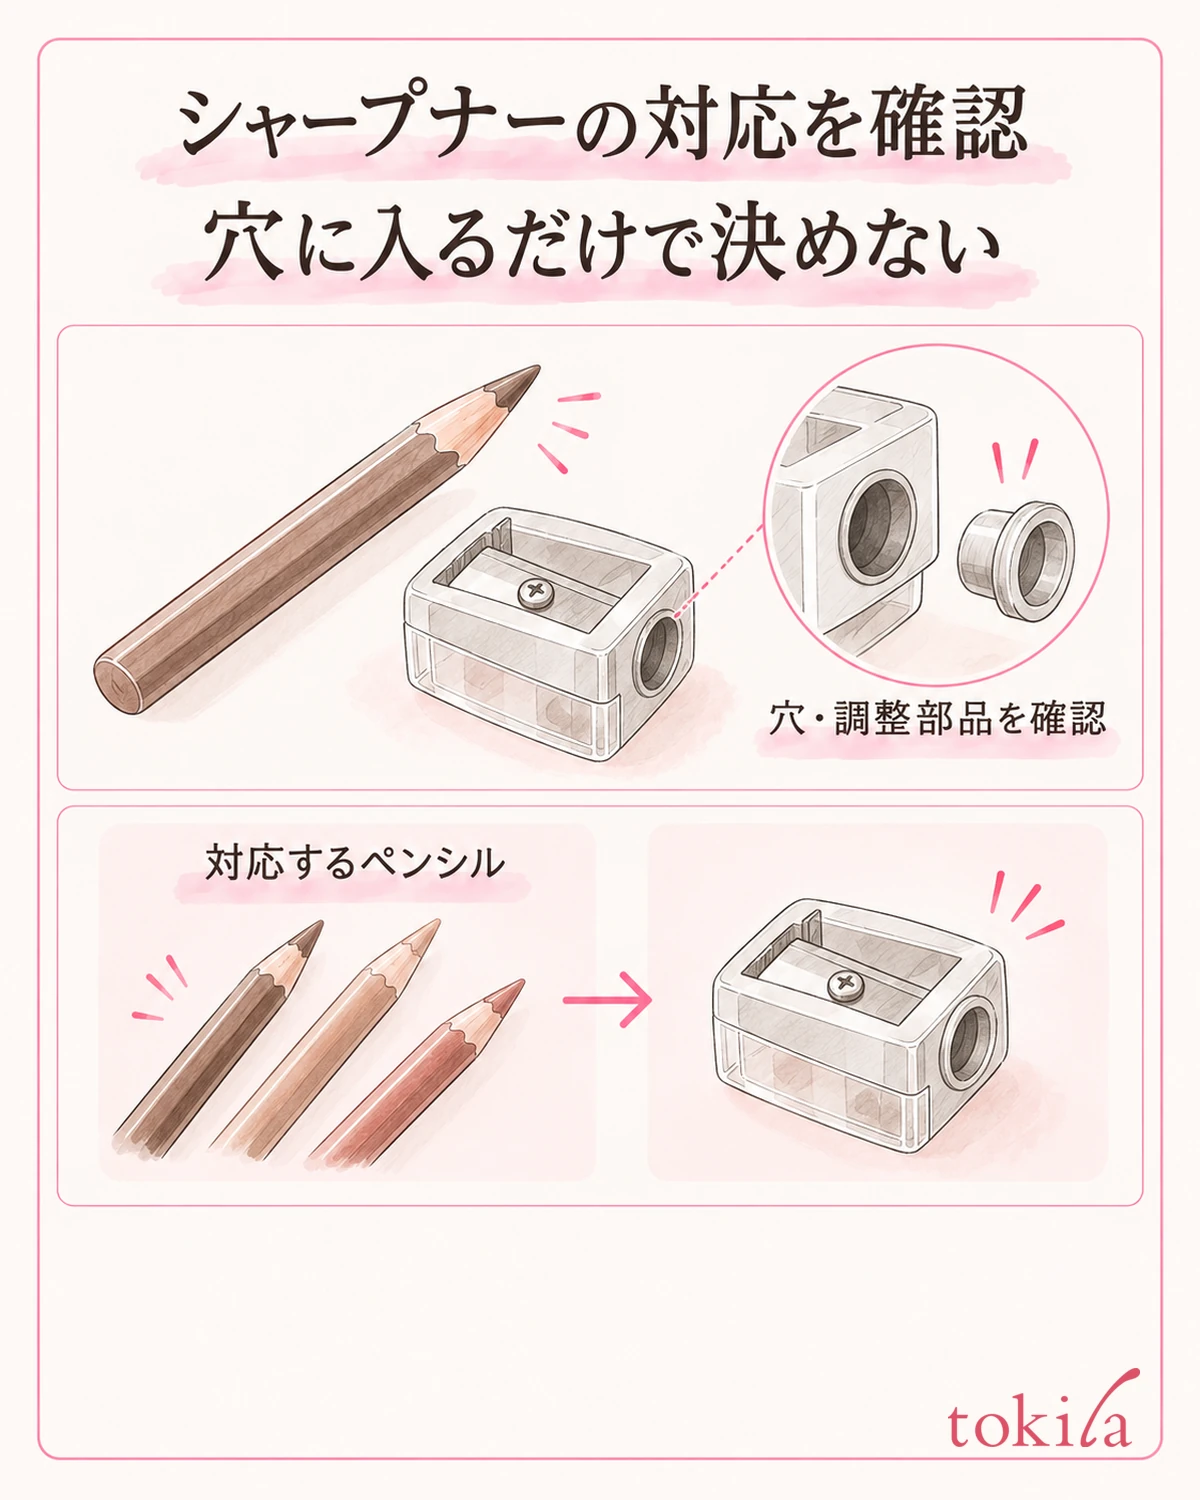
For cosmetic pencils, prepare a cosmetic sharpener that is compatible with the pencils you have. Don't choose by thinking it's fine because it fits into a stationery pencil sharpener. Besides whether it fits in the hole, whether the barrel and the blade angle match is also a point to check so you can sharpen without strain. Don't force a tool whose compatibility is unclear to fit.
If the sharpener has holes of different sizes, check which one is compatible with your pencil. Some products let you remove an adjustment part such as a ring, but not every product has the same mechanism. Don't remove a part inside the hole thinking it is shavings; first check whether it is a part shown in the instructions.
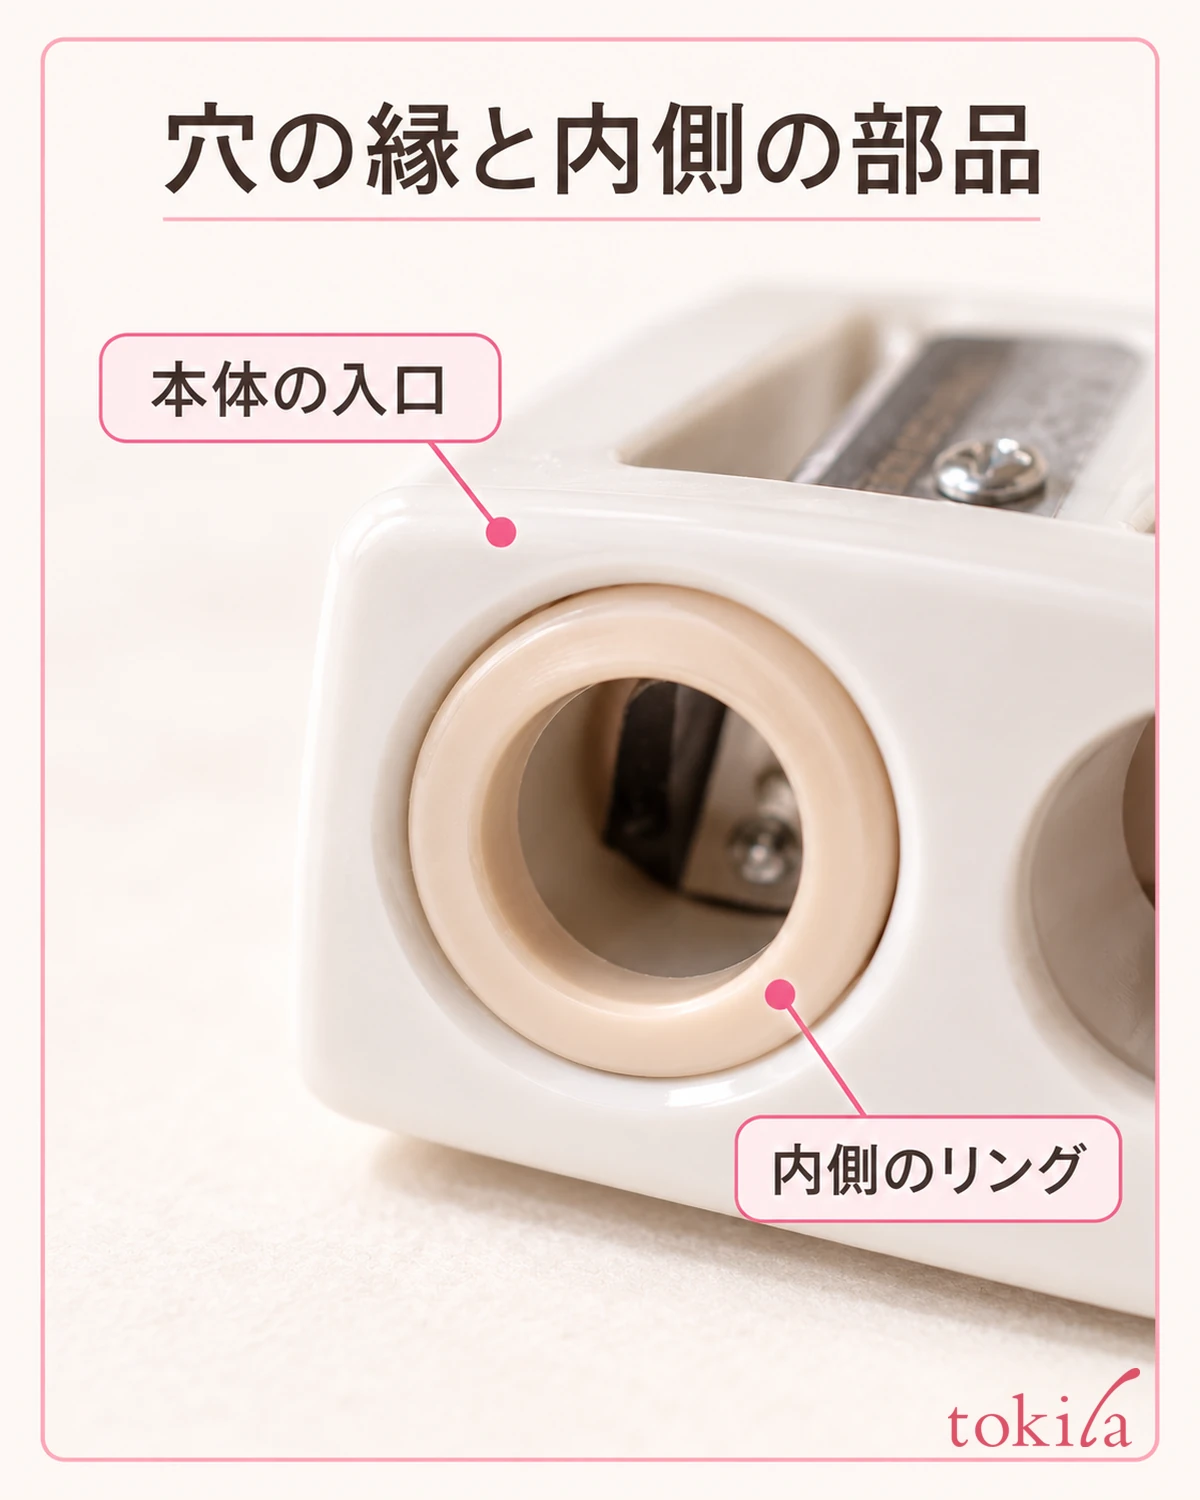
See whether the pencil goes in straight without strain, or only fits if you tilt the barrel. Don't try to make up for a poor fit by pushing hard when it is tight or by letting the barrel wobble in a loose hole. If it doesn't go in, pull it out and go back to the compatibility labeling and how the parts are used; that is the next step.
Before buying more, checking the product name of the sharpener you already have and which pencils it fits helps you avoid choosing duplicate tools that look alike. If you keep separate ones for carrying and for home, check the fit of each rather than using something of a similar shape. Don't assume that everything is compatible across all brands.
Even if the new tool lets you sharpen, that doesn't settle which lead is harder or more comfortable to use. For now, stop at having prepared a compatible combination. Keep this separate from the decision to make the tip extremely long for a fine line.
Once you know the compatibility, one idea is to store that combination in the same place. Keeping the product name or model number is better than remembering by case color alone, since you can check again when you replace it with a different product of the same color.
3. Insert straight, turn lightly, and look at the tip partway
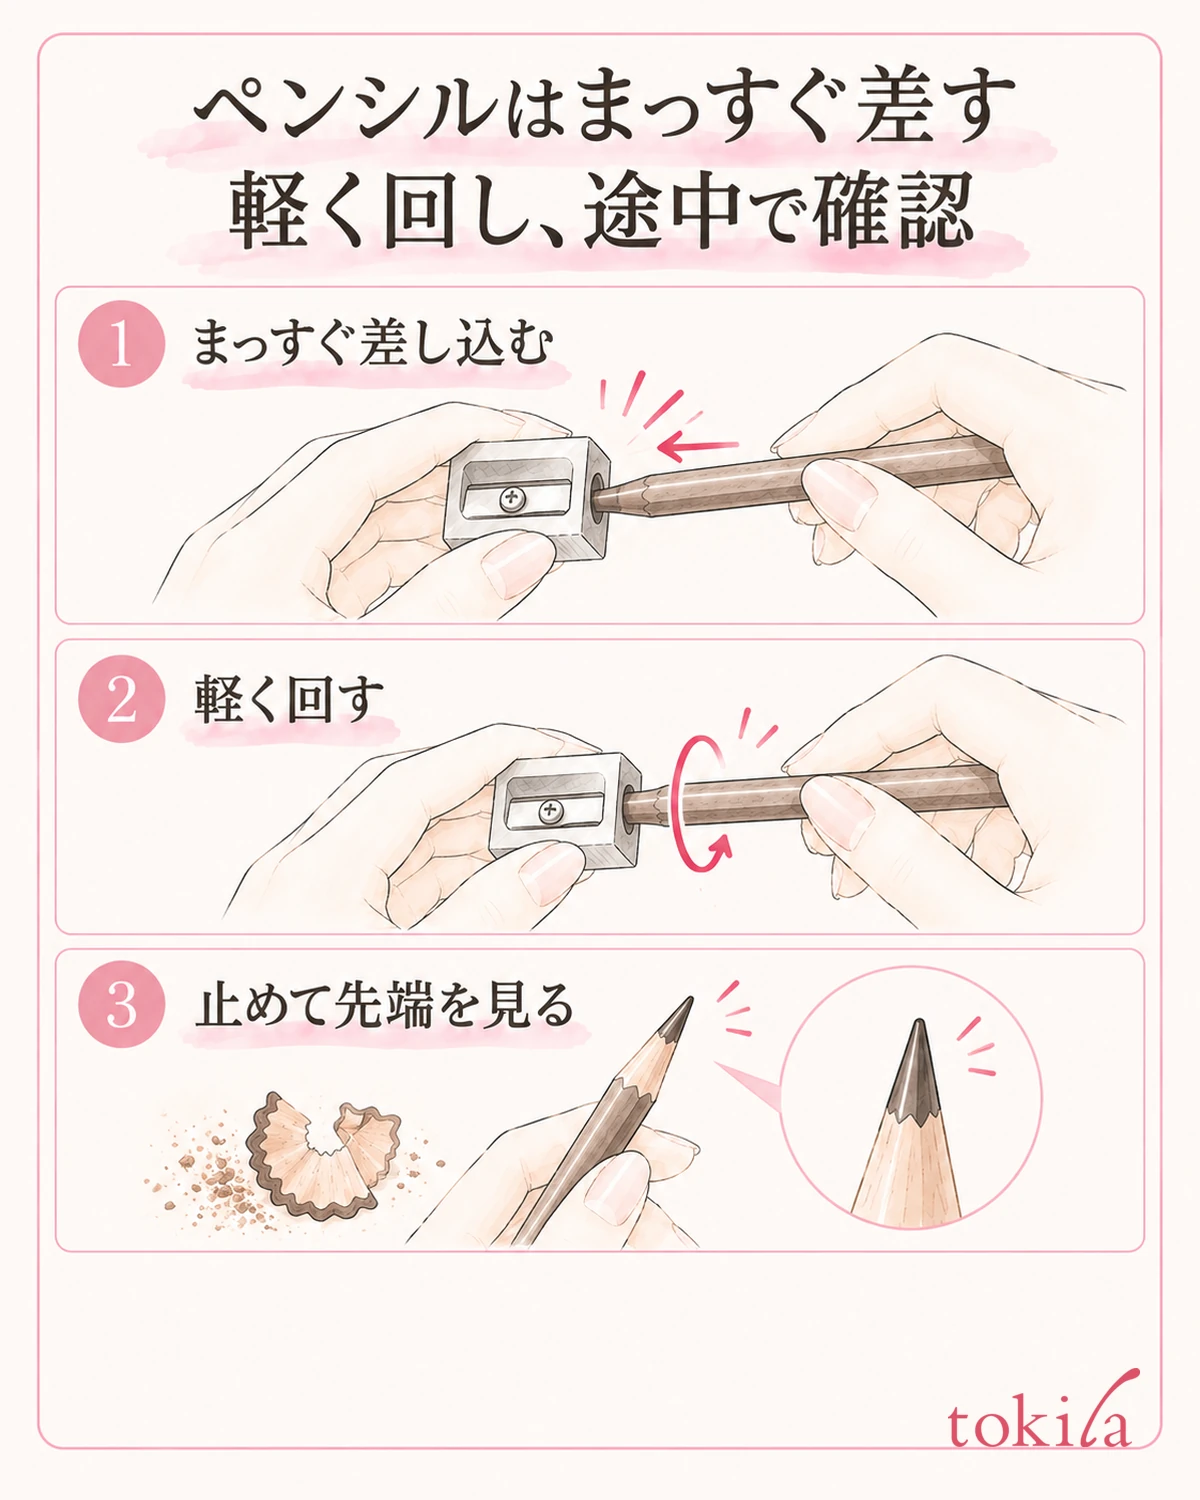
Choose a bright desk where you can keep your hands steady. Don't sharpen while pointing it at your face, walking, or rummaging through your pouch; prepare a place that can catch the shavings. Put the cap away from the pencil, and leave room to move so the sharpened tip doesn't hit other tools or the desk.
Insert the pencil straight into the compatible hole. Hold the sharpener steady and sharpen while turning the pencil lightly. Don't make levering the barrel sideways, pushing hard, or turning vigorously many times your basic technique. Keep your fingers on the outer part you hold, and don't put them into the hole with the blade.
After going a little way, stop turning and check the tip. Rather than fixing a number of turns for everyone, look at whether the barrel is catching around the lead, whether there are chips or shavings, and whether the tip is now usable for that product. You don't need to put a finger into the blade to check, or touch the lead while it is being sharpened.
Don't think that a longer, sharper tip is always better. Check the shape the product recommends and the surface you will use, and stop at the state you need. Don't expose only the lead long like a needle because you can't draw a fine line. Aiming for the same shape for a brow pencil and a lip pencil is not a shared condition for being finished either.
When you finish sharpening, check for chipped parts and splinters on the barrel before bringing it to your eye area. Rather than smoothing an uneven tip against your skin, go back and review the tool and how you sharpened. Check in order that you could insert it straight, that it sharpened with light handling, and that the tip has no problems, and then stop there.
When you change the lead color or the tool, first do the same check at the desk. Don't use strong force or a high number of turns as a guide; stopping when you see a change in your hands is what marks the end of the sharpening step.
4. If it breaks or jams, stop turning and sort out the cause
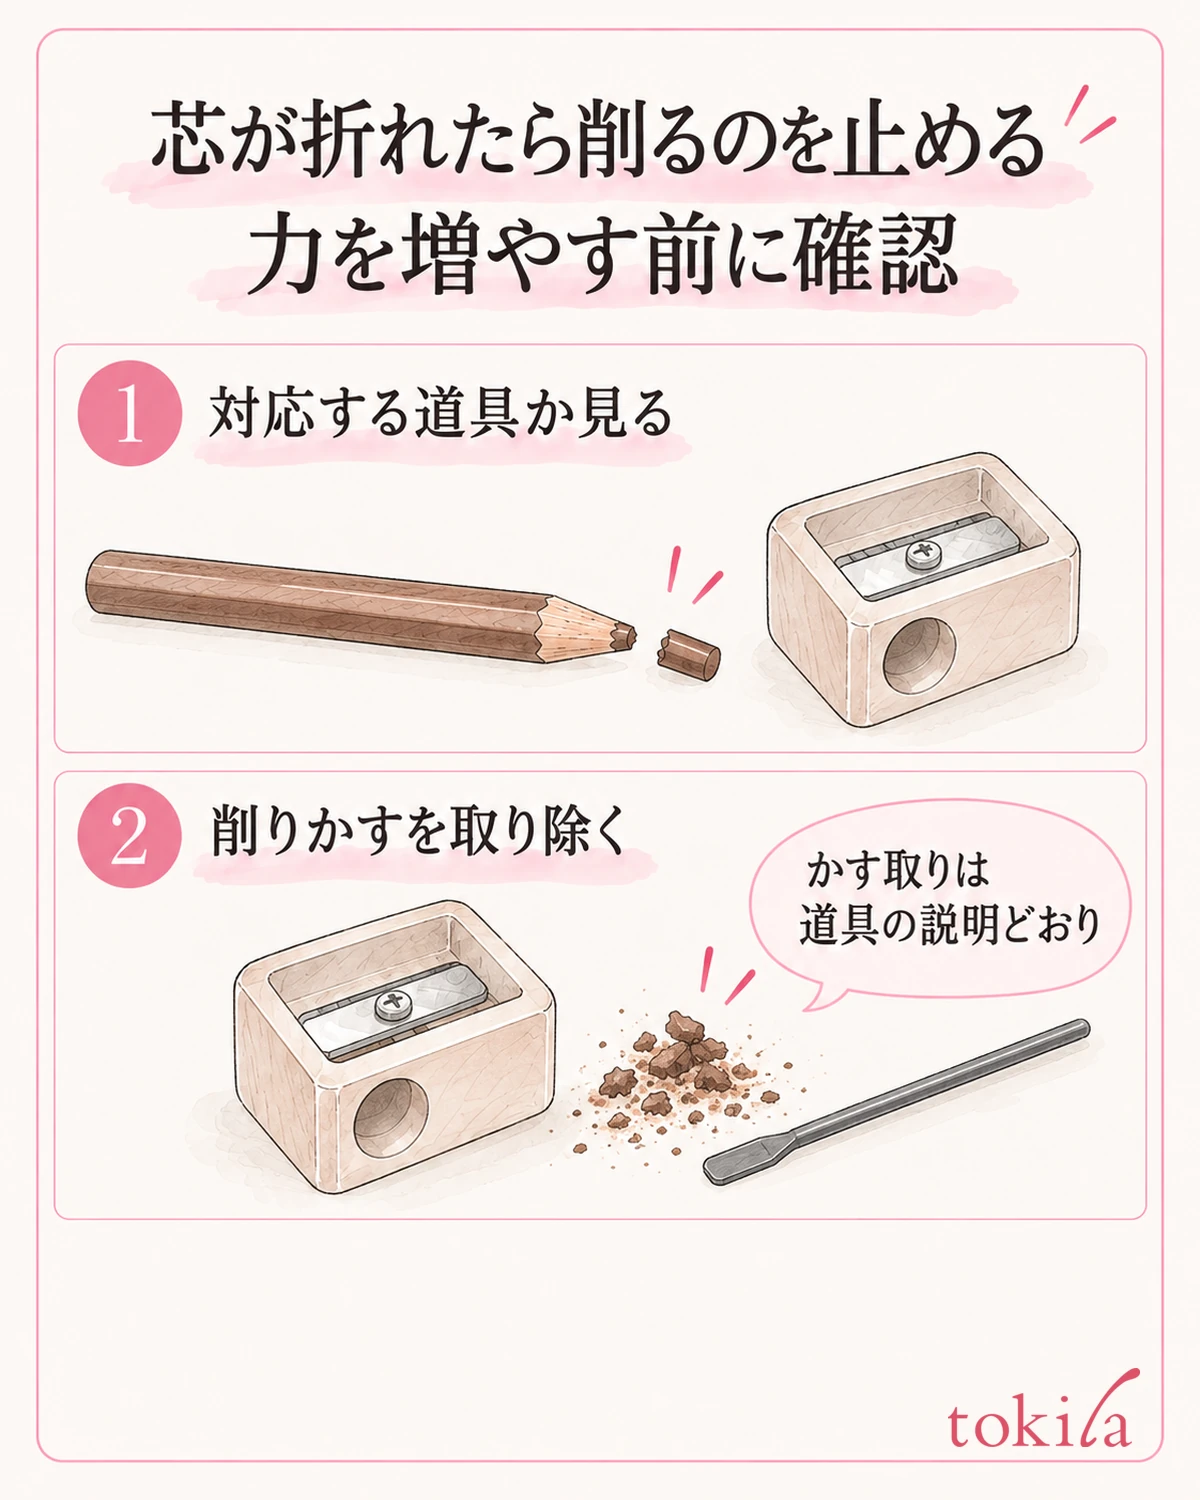
If resistance grows partway, the lead breaks repeatedly, or only the barrel gets shaved, stop what you are doing for now. Rather than turning harder, keep the pencil away from your face and check whether the tool is compatible, whether the pencil is going in straight, and whether shavings have built up. Don't pin it on a single cause; build an order for checking.
If shavings or broken lead are left, remove them as the sharpener's instructions say. For products that come with a cleaning stick, check how to use it and then use it. Don't move on to repairs of your own, such as touching the blade with bare hands, forcing things out with a needle or blade, or unscrewing parts that the instructions don't say can be taken apart.
If it still catches after removing the shavings, look again at the compatible hole and the adjustment parts. If it goes into the hole at an angle, review the combination before adding force. You also don't need to keep sharpening the leads you have just to test by swapping pencils. Gather the information on the pencil and the tool you have now, and choose to exchange it or ask for advice if needed.
Don't treat freezing or warming as a shared trick for making a soft lead easier to sharpen. Follow the labeling of the product you have for storage and use conditions. Don't decide that temperature alone is why a lead broke; it is important to check separately the compatible blade, how the barrel is inserted, and changes such as a drop.
If the blade or body is chipped, a part has come off and is unstable, or the tip problem does not go away, stop using it. Sharpening many times does not always bring it back to normal. Stopping here is also a choice to check the state of the remaining pencil and tool.
5. Remove the shavings, protect the tip, and put it away for next time
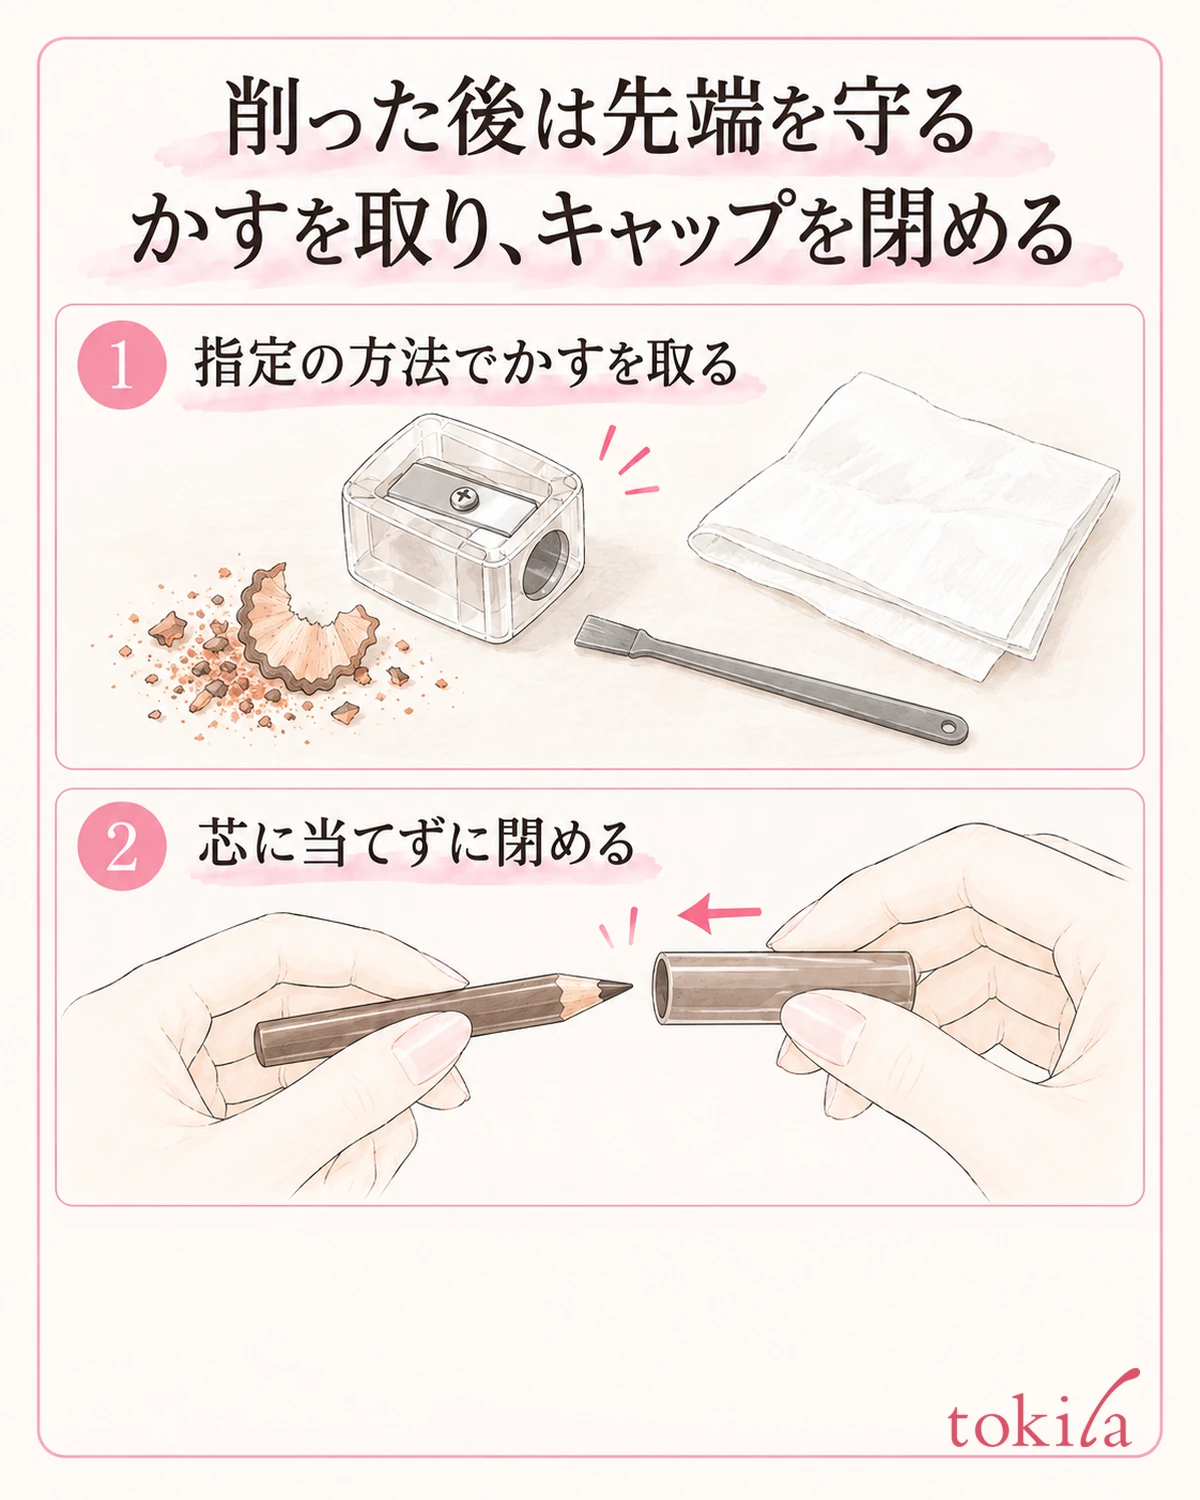
After using the sharpener, remove the shavings as the instructions say. For products that use a supplied cleaning stick or similar, the instructions may then say to wipe off dirt with a tissue or a dry cloth. Don't assume that everything can be washed with water; check for each tool whether it can be washed and how to dry it.
Also check whether dark-colored shavings are left around the blade. This is so that, the next time you sharpen a different color, you don't mistake the leftover shavings on the tip for the pencil's own color. Rather than forcing yourself to touch the blade and polish it, finish once the specified care is done. If you have removed a lid or parts, check in the instructions how to put them back too.
Close the pencil so the tip doesn't hit the edge of the cap. Don't push it into the cap with shavings still on it; look at the tip before putting it away. If the cap won't close, don't push a long lead to break it to fit; check for foreign matter inside and whether it is the compatible cap.
Choose a storage place according to the product's temperature and direct sunlight cautions. Avoid placing the sharpener where hands can easily touch the blade or where infants can pick it up, and keep tools in the pouch from knocking against each other. If needed, keep the outer box labeling you used to check how to use the product, together with the product name, so you won't be unsure next time.
One note is enough for next time, such as "I checked the compatible hole" or "I removed the shavings before sharpening." Review in this order: check the sharpen type, choose a compatible tool, sharpen straight and lightly, check the tip, and care after use. Rather than aiming for a long, sharp tip, aim for a state where you can handle what you have as the instructions describe.



