
You have inserted the shoehorn, but your heel catches. Even after your foot is in, the shoehorn will not come out. Before pushing harder, check the shoe opening and which surface of the tool touches your heel. A shoehorn is not a tool for forcing tight shoes wider.
This guide sets out the steps for using a typical handheld shoehorn. We will look separately at loosening laces or straps, positioning the surface along your heel, and removing the tool as your foot slides fully in. For products with a different structure, such as attached shoehorns, follow the instructions for your own product.
1. Put the shoes on the floor and prepare the openings and fasteners
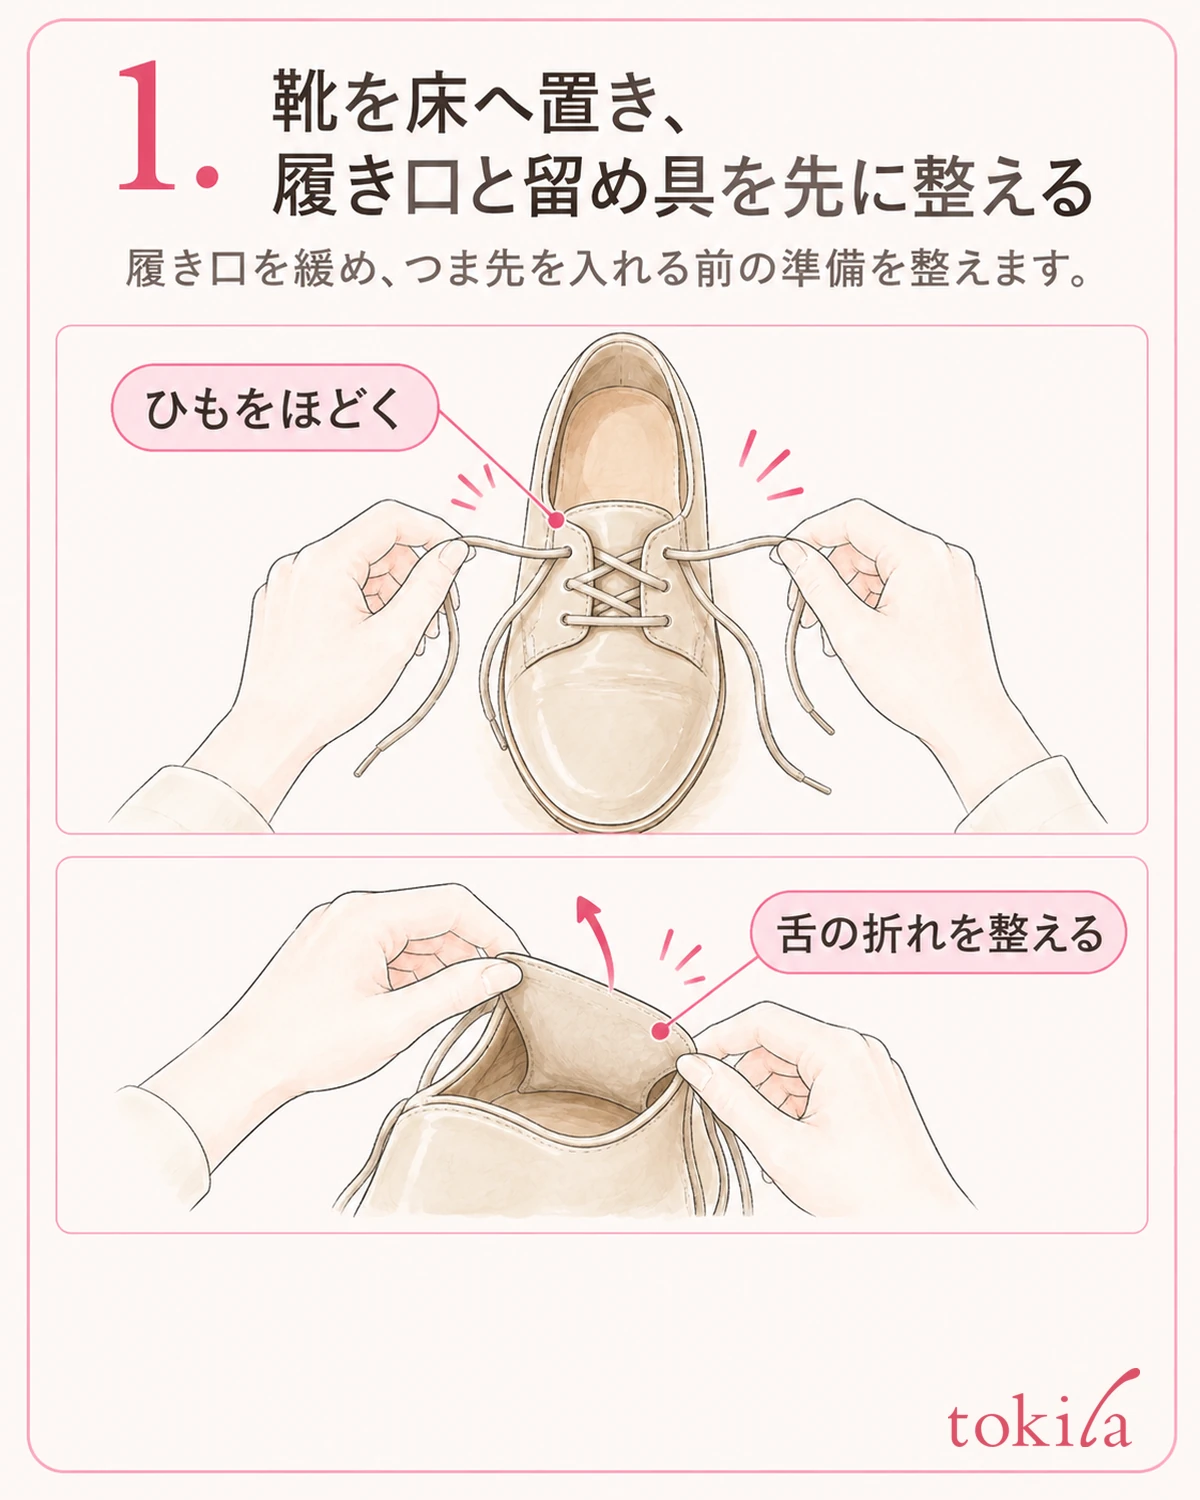
First, put the shoes on a flat surface that is not slippery. Do not rush into balancing on one foot; sit on a stable chair if necessary. Instead of leaning your weight against a wall or unstable furniture to hold the shoehorn, first find a position that lets you move your foot and hand.
For lace-up shoes, undo the knot and loosen the opening sufficiently. If the tongue covering the top of the foot is folded inward, straighten it by hand. For shoes that open with straps or hook-and-loop fasteners, use the parts intended for opening and closing them. Do not leave them fastened and push your foot in with the shoehorn.
Also check whether the back of the opening is already crushed or the inner lining has turned over. A shoehorn will not repair deformation or damage. If you see a hard crease or tear, do not use the tool to force that area wider; check whether the shoe is in a condition to wear.
If you plan to wear socks, prepare with the socks you will actually pair with the shoes. Adjust them if there is a lot of spare fabric at the heel or a seam has shifted under your foot. This is a step for checking the fabric's position before putting your foot in, rather than stretching the socks to solve tightness in the shoe.
For shoes with few opening parts, such as loafers, do not pry the opening wider. Use the tool only within what suits the shoe's construction and how your foot enters it. Shoes with straps or open backs also have different heel shapes, so do not assume that inserting a shoehorn in the same place will work for all of them.
Once you are ready, check left and right, and point each shoe in the direction your toes will enter. Placing the shoe and gently inserting your toes first makes it easier to identify where your foot catches than dragging the shoe across the floor while searching for it with your foot. Do not skip this preparation even just before going out.
2. Face the concave side toward your foot and follow the back of the shoe
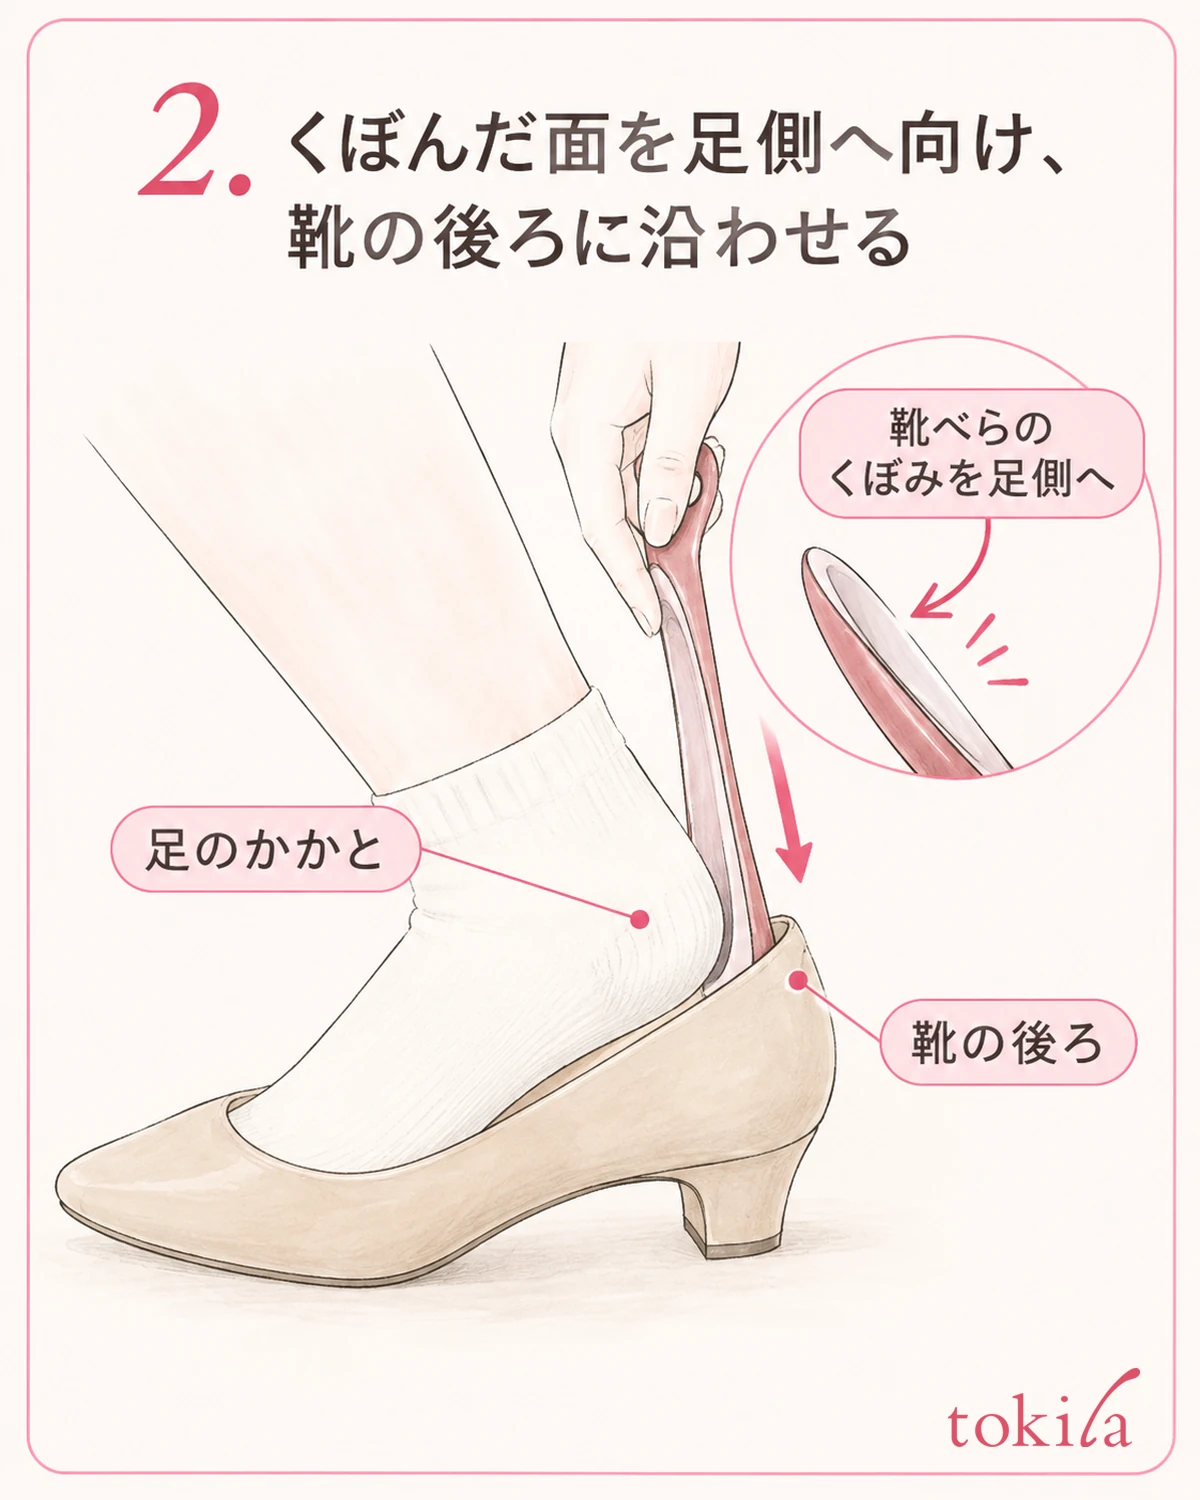
Some shoehorn tips have a broad section with a shallow curve that follows the roundness of the heel. With a typical shape, face the concave side toward your heel and the convex side toward the inside of the shoe. Do not decide which side to use solely from decorations or printing on the handle.
Put your toes into the shoe, and while your heel is still above the opening, insert the shoehorn along the inside of the shoe's back. Place the tool between your heel and the back of the shoe, rather than under your foot. Do not insert it from above while the back edge is crushed underfoot.
Match the insertion depth to the shapes of the tool and shoe. Rather than aiming to reach the bottom, check that the surface your heel will slide along spans the opening. If the tip presses hard into the inside of the shoe, or the surface will not align unless you tilt the handle a long way, start again from the positioning step.
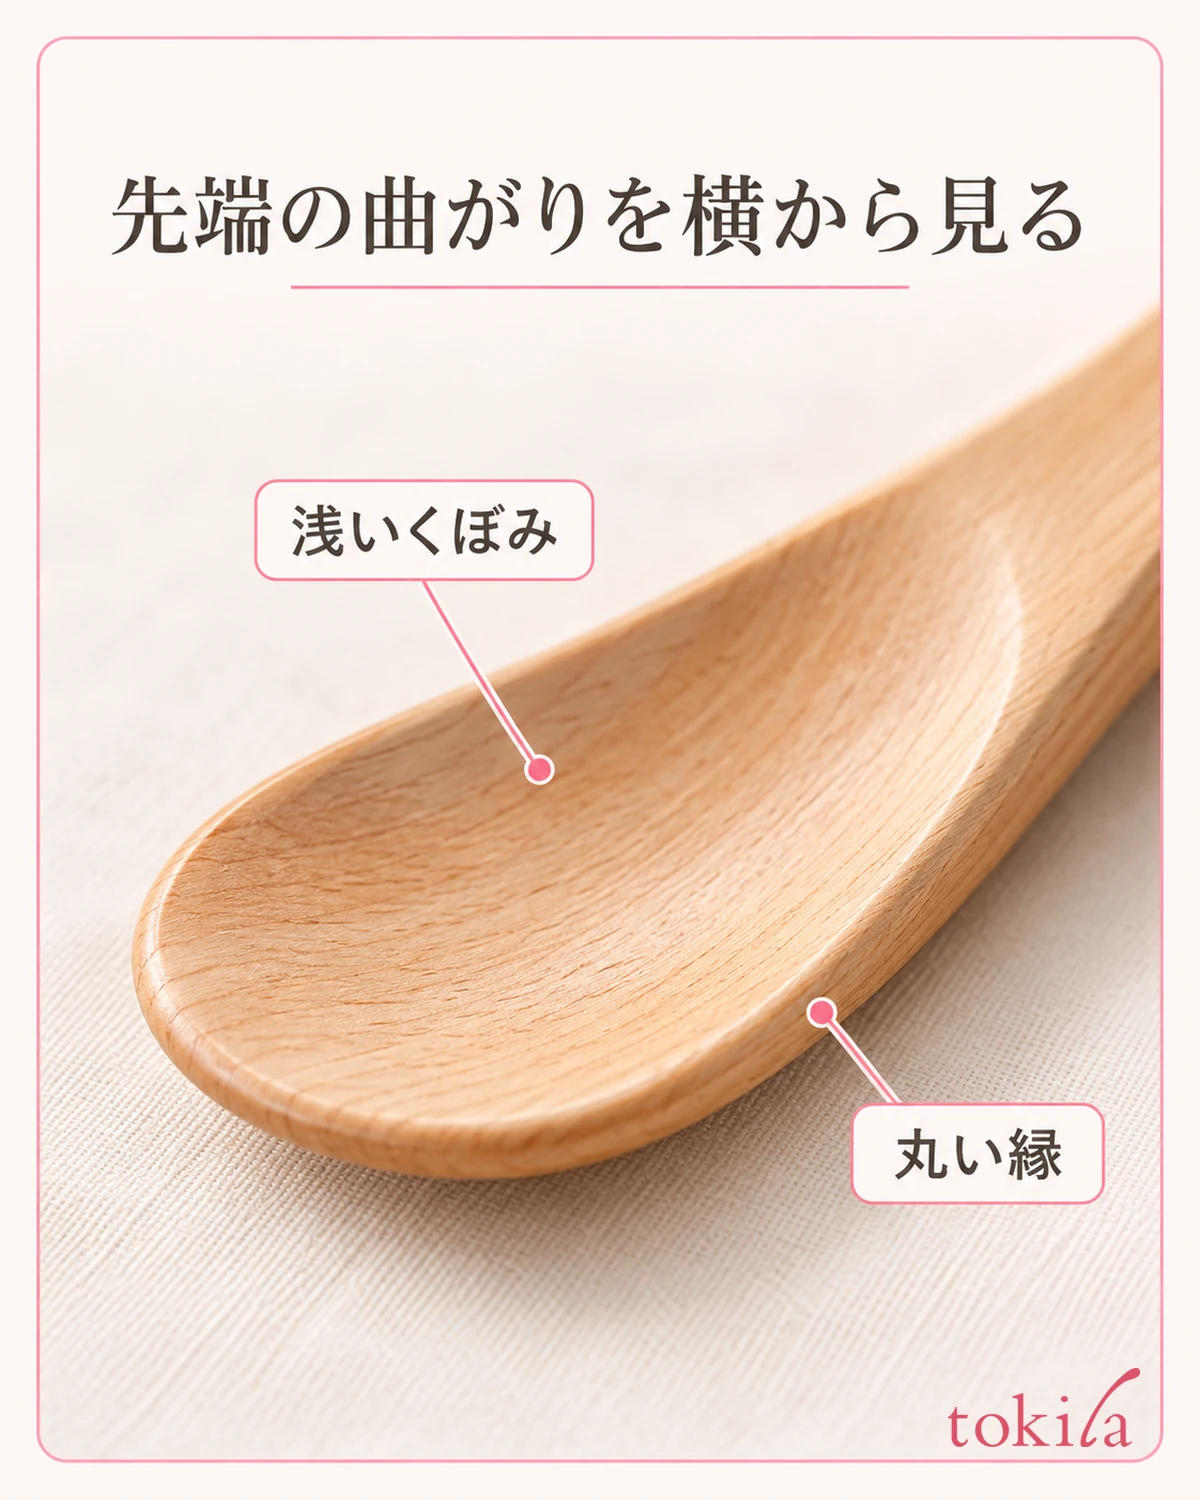
In the photo, look at the broad tip from an angle to see the shallow hollow in the center and the rounded edges on both sides. Even if it looks like a flat board from directly above, turning it slightly sideways reveals its curve. Match the shape of your own tool with its instructions instead of choosing its orientation by appearance alone.
If the width or curve does not suit your foot or shoe and only the edges touch, you do not need to push hard to make it fit. Consider choosing a different width or length. Do not assume from the material alone that metal is always thin and easy to use, or that plastic suits every shoe.
Even with a long shoehorn, do not move the tip while looking only at your hand. A short one lets you hold it close to your heel, but it may be hard to reach depending on your posture. Instead of treating a particular length as correct, choose one you can hold comfortably while checking the tip's position.
3. Let your heel follow the surface and remove the tool as your foot slides in
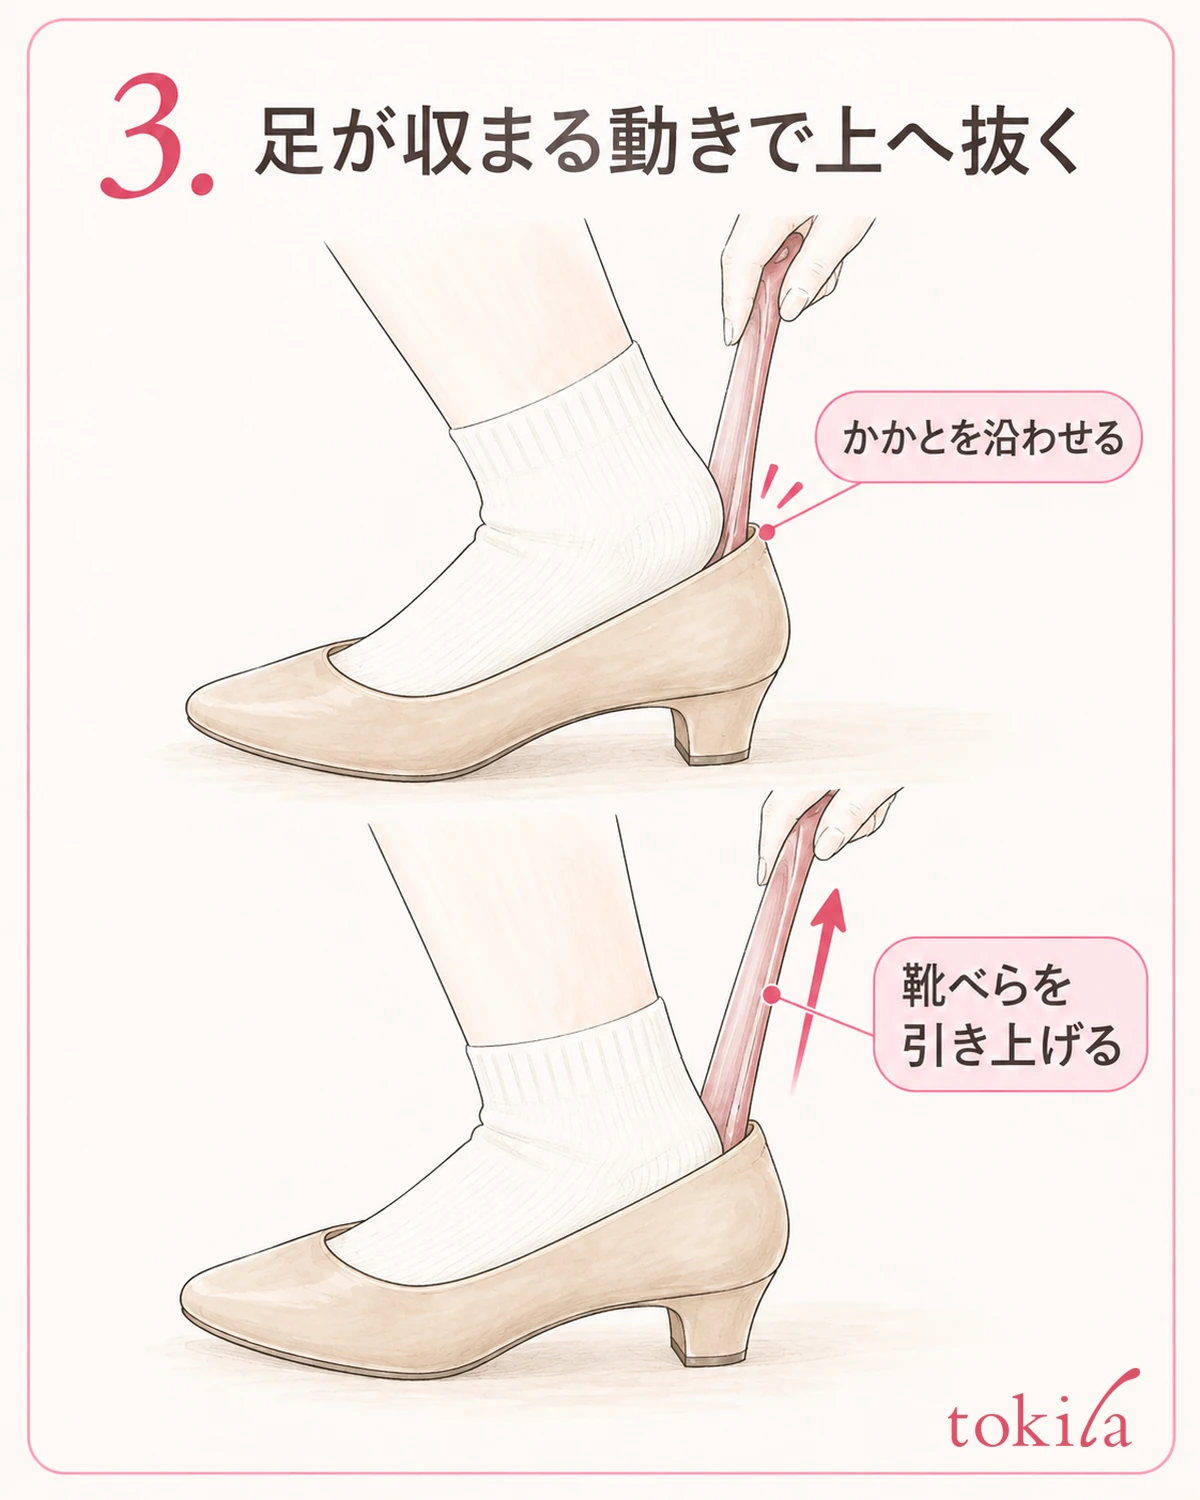
Once the shoehorn's surface rests lightly along your heel, guide your toes farther in and gently lower your heel. Do not jab the tool into the floor or put your body weight on the handle in your hand. Align your foot and the shoehorn, using its surface to help your heel slide.
Pull the shoehorn upward as your foot slides fully in. If you press your heel all the way down before trying to pull the tool out, it can become trapped between your foot and the shoe. Keep hold of the handle until your heel settles inside, leaving room to remove the tool as you go.
When removing it, lift it while keeping the surface along your heel, without pushing the back of the shoe outward. Do not twist it far from side to side or use it as a lever. If it catches, stop moving and ease your foot back slightly before putting weight on it, then check the position again.
After removing the shoehorn, check that your heel is inside the shoe and the back edge is upright. If the sock heel is pulled tight or the inner lining has folded, put the shoe on again rather than immediately starting to walk. Finish one foot at a time instead of moving to the other without checking the result.
If you feel pain or strong pressure partway through, withdraw your foot instead of pushing it in. Check the loosened opening, overlapping sock fabric, and the shoe's size and shape separately. Getting your foot in with a shoehorn does not by itself show that the shoe is the right size for walking.
If it does not go well, check one thing at a time rather than changing both the tool's orientation and when you remove it. Instead of practicing pulling only the tool out quickly, slowly link the movements of inserting your toes, letting your heel follow the surface, and removing the tool as your foot settles in.
4. If it catches, recheck the edges, width, and shoe condition
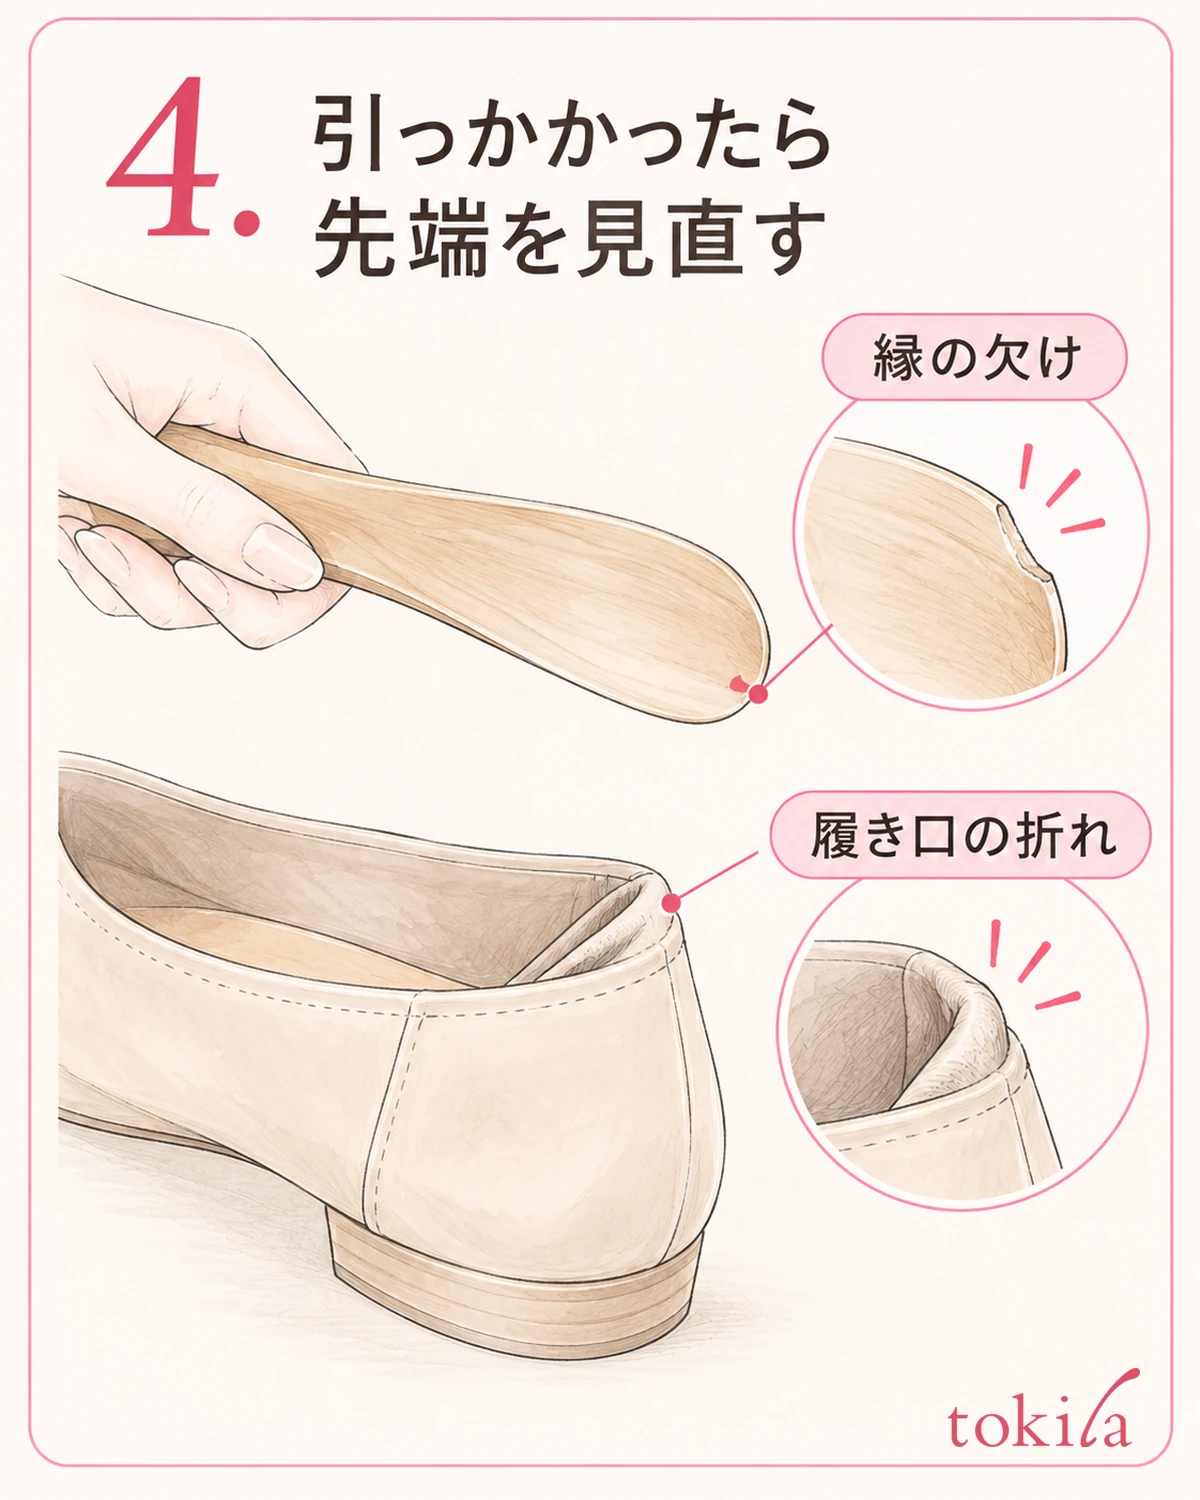
If it repeatedly stops in the same place, remove the shoehorn and inspect the tip. In a bright place, look for chips, splinters, bending, or roughness. Do not run your finger firmly along cracked plastic or a sharp edge to test it; stop using the tool if you can see damage.
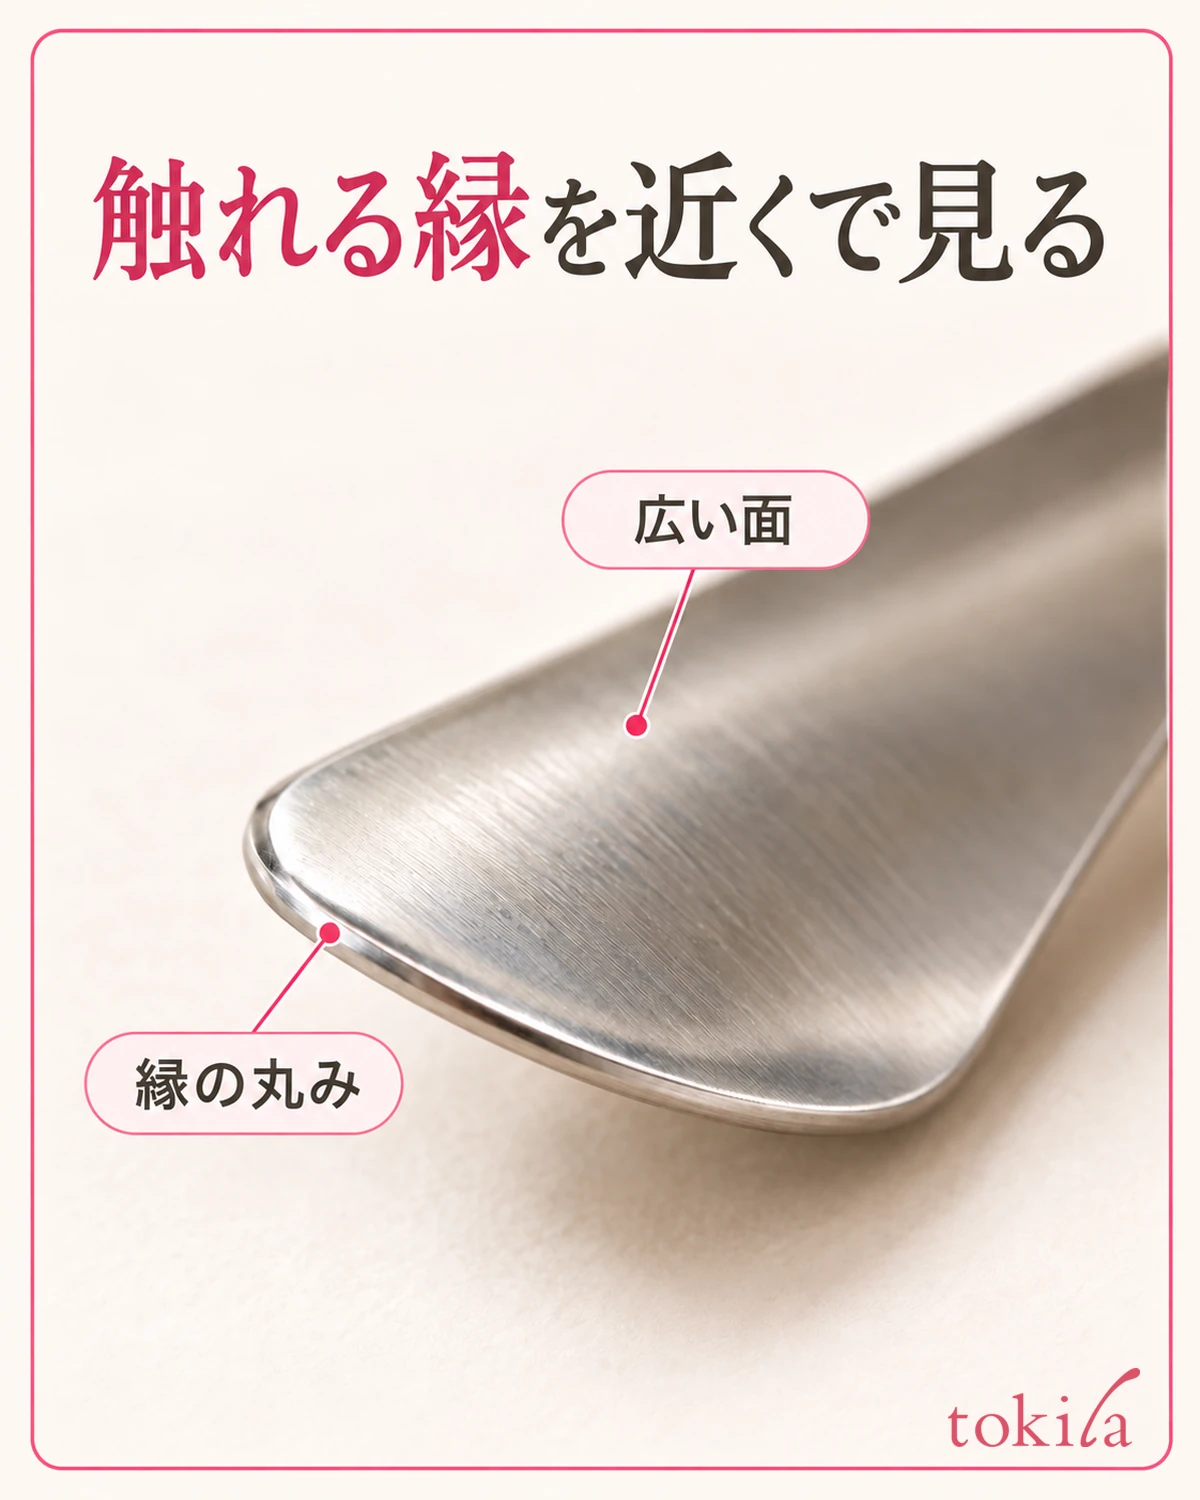
In the photo, look closely at the shoehorn's rounded edge and where it meets the surface catching the light. Even when the broad surface looks smooth, the tip and both edges need separate checks. Do not take a strong shine as a guarantee that it will slide easily; focus on the edges that touch your foot and shoe.
If you cannot find a problem with the tool, go back and check whether you opened the laces or straps enough. Distinguishing a narrow part of the opening from tightness that starts at the toes helps you notice situations that cannot be solved by repositioning the shoehorn alone.
The back of a soft shoe may fold inward with the tool. Check its shape while supporting the outside with one hand only as far as you can comfortably reach; do not pull it upward forcefully or push your fingers deep into the gap. Do not apply a movement that worked on a shoe with a firm heel to another shoe without adjustment.
Avoid applying oil or cream to the shoehorn or shoe opening on your own to make it slide more easily. Caring for the tool and caring for the shoe are separate tasks, and handling differs by material and finish. Do not add a product before finding out why the friction is strong.
If it still catches, it is time to reconsider the combination with another tool or the fit of the shoe itself. Instead of bending the tool forcefully or shaving the shoe's edge, you can choose another pair that is easier to put on that day. The more hurried you are, the more useful it is to keep options other than pushing harder.
5. Check the shape after putting the shoes on, and return the shoehorn within easy reach
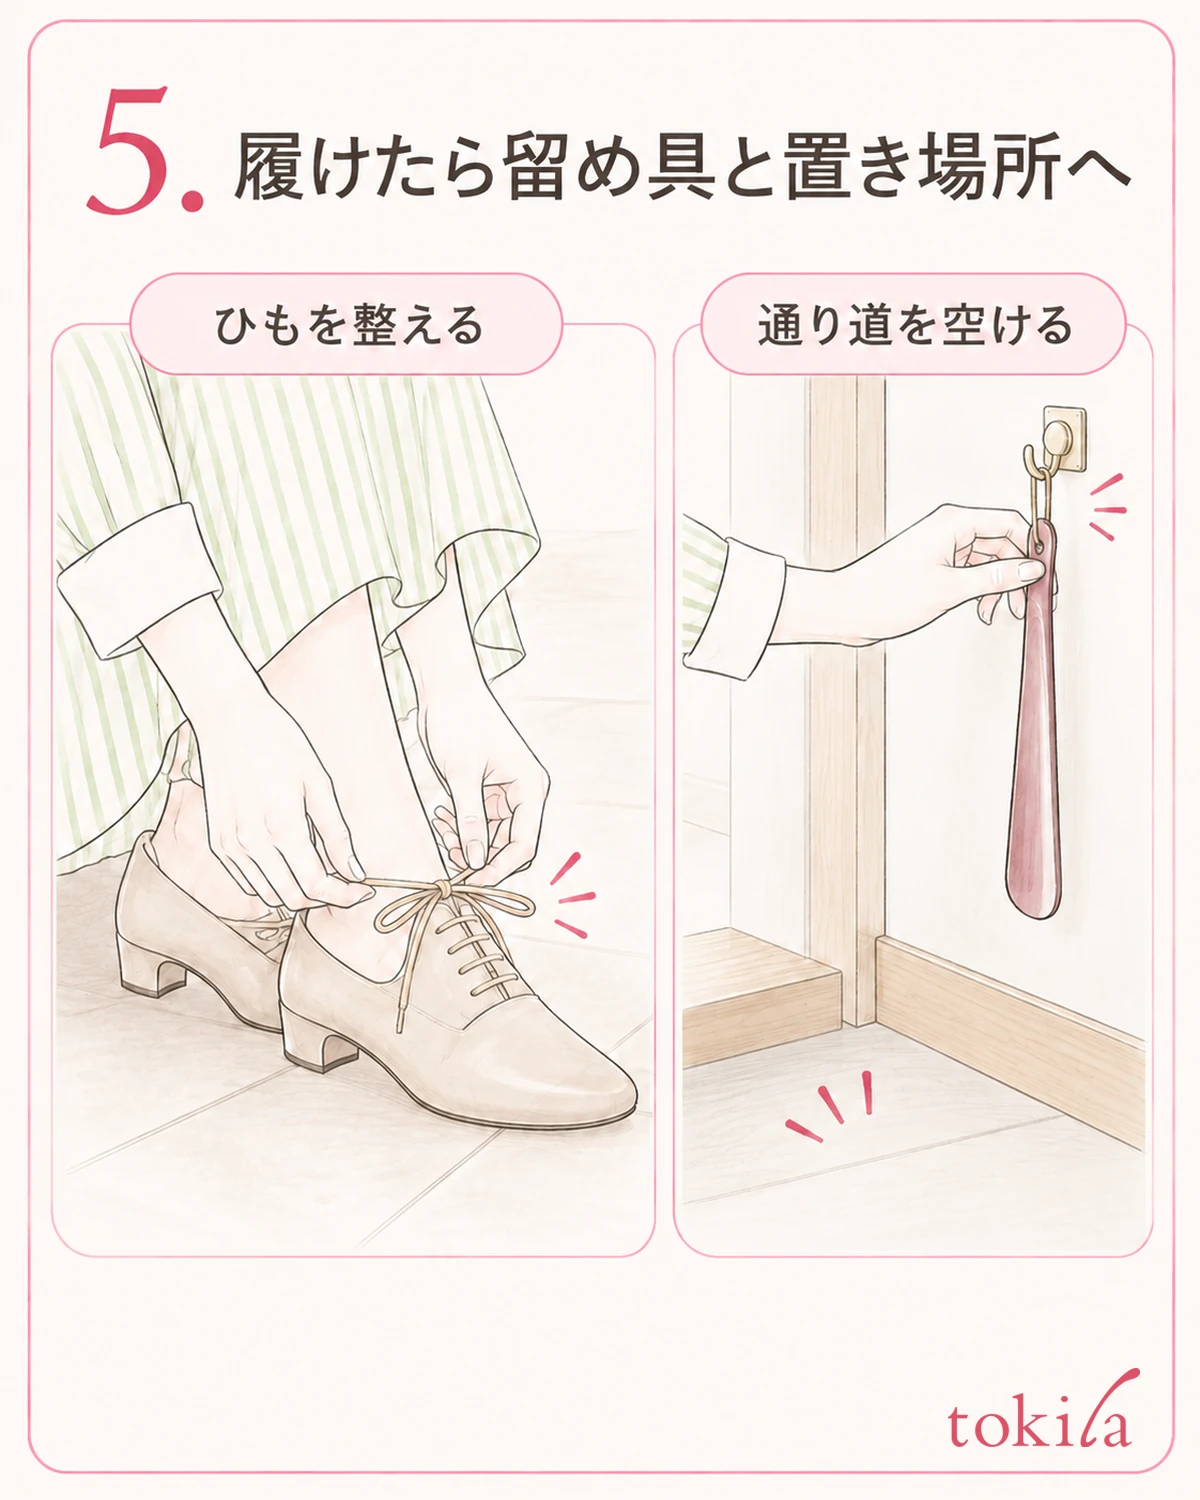
Once both shoes are on, adjust the laces or straps as usual. Loosening them enough to insert your feet is different from securing them for walking. Before moving, check that the back edges are not folded, the socks are not pulled tight, and nothing feels uncomfortable around your feet.
After using the shoehorn, check for dirt or moisture on its tip. Follow the care instructions for its material and the product you own; do not assume every shoehorn can be washed all over. For products combining leather-wrapped handles, wood, metal, or plastic, also consider how each part should be treated.
Choose a storage spot you can reach comfortably from the position in which you next put your shoes on, without blocking the walkway. Avoid laying a long shoehorn on the floor or standing it unstably with its tip pointing up. If it comes with a stand or hanging loop, follow its instructions.
Carry a portable shoehorn in its case or other specified storage so that the tip does not knock hard against other items. Before using it immediately after taking it out, check again for chips and dirt. Adjust your posture for a long one at home and a short one when out, rather than trying to use them at the same hand height.
If you check your whole outfit in the entryway, you can also take a moment with your shoes on to see how the hem and footwear look.Fashion how-to guidescan also help when planning how to get ready. Check the shoehorn steps and your clothing combinations as separate stages.
The next time you wear the same shoes, do not remember only to insert the shoehorn first; start by opening the fasteners. Choose one aspect that caused trouble last time—orientation, contact point, or removal timing—and review it. Try making this a small habit that keeps you from roughly forcing your favorite shoes on.



