
If a hat is a little big, adding tape to the inside seems like it should work. However, hat size adjustment tape cannot be used on every hat. First confirm that the hat and the tape are compatible, the material of the inner band and the surface to stick to, and check whether the conditions for adding thickness are in place.
Here, we go through, in order from before choosing to after wearing, the dedicated size adjustment tape used on everyday hats. We do not cover modifying a hat to make it larger, repairing a damaged band, or adjusting protective gear such as helmets. The instructions of both the hat and the tape you own take priority.
1.Separate whether the hat is too big or the problem is how you wear it
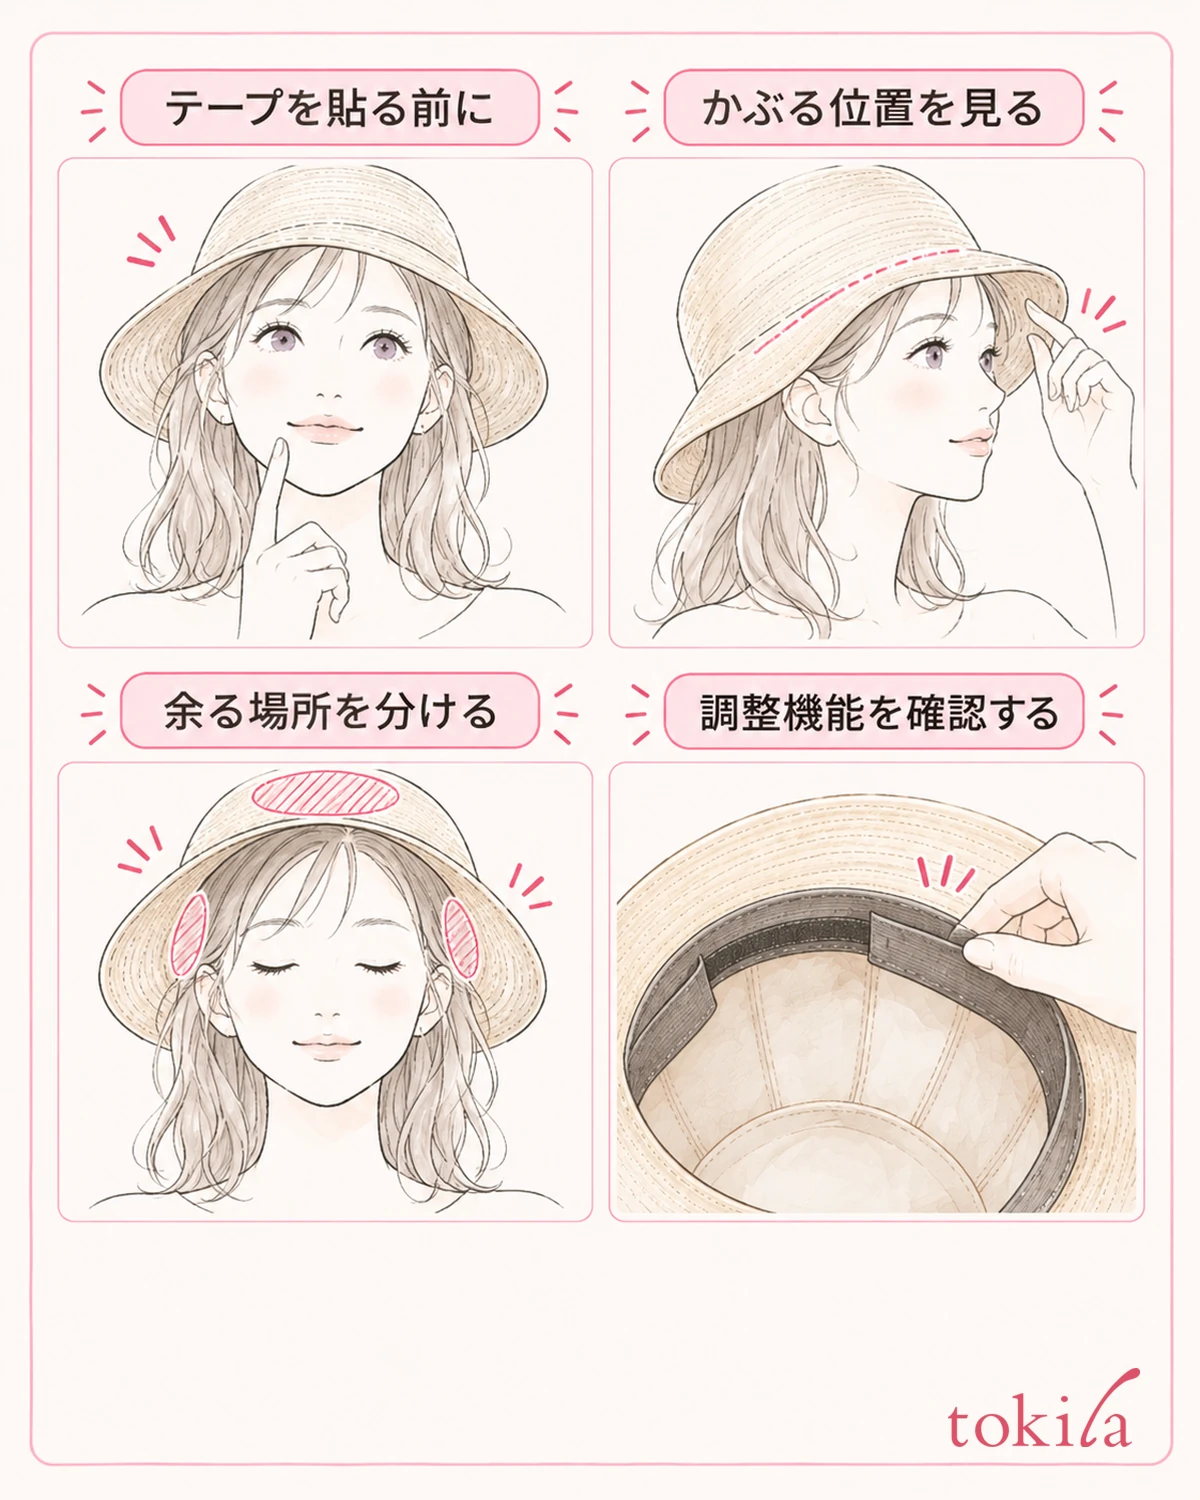
To start, put the hat on with your usual hairstyle without applying any tape. Check the front-to-back orientation, look at the front and side in a mirror, and see how far it drops and which part has extra room. Judge by how it stays with both hands off, not with one hand pushing up the brim.
A hat with room all around the head is different from one that does not fit the shape and lifts in only one place. If you add thickness to a hat that is tight at the forehead but loose only at the sides, the parts that already touch can become even more cramped. Do not decide "it falls off, so make everything narrower"; also check whether there are places that feel pressed.
If the inside has an adjuster or adjustment cord, first check that function and its adjustment range. A type where you retie the cord, a type fastened with hook-and-loop tape, and adjustment tape that you stick on afterward are different mechanisms. Even if a similar band is visible, the same operation does not necessarily apply.
If you are simply wearing it too deep, put it back in the right position and then reassess how it sits. If it is hard to see in front, also refer to checking the hat brim and your field of view, and think of the visibility problem separately. Do not try to fix the shape or the direction of the brim with tape.
Rather than filling a large size difference with a lot of tape, it may be better to choose a different hat size or shape. Remembering not only how much smaller you want it, but also how it feels and its outline now, makes it easier to compare what changed after the work.
The way it sits inside also feels different on a day you tie your hair up and a day you wear it down. Decide when you will use the hat and check with that day's hair. If you change both your hairstyle and how deep you wear it while checking the looseness, it becomes hard to tell whether tape is needed.
Put the state before adjustment into short words in front of the mirror, such as "extra room at the back" or "already touching the forehead." If you separate your preference for appearance from actual looseness, it is easier to avoid making the inside too narrow when you only wanted to change the shape.
2.Check the inner band and the materials the tape supports
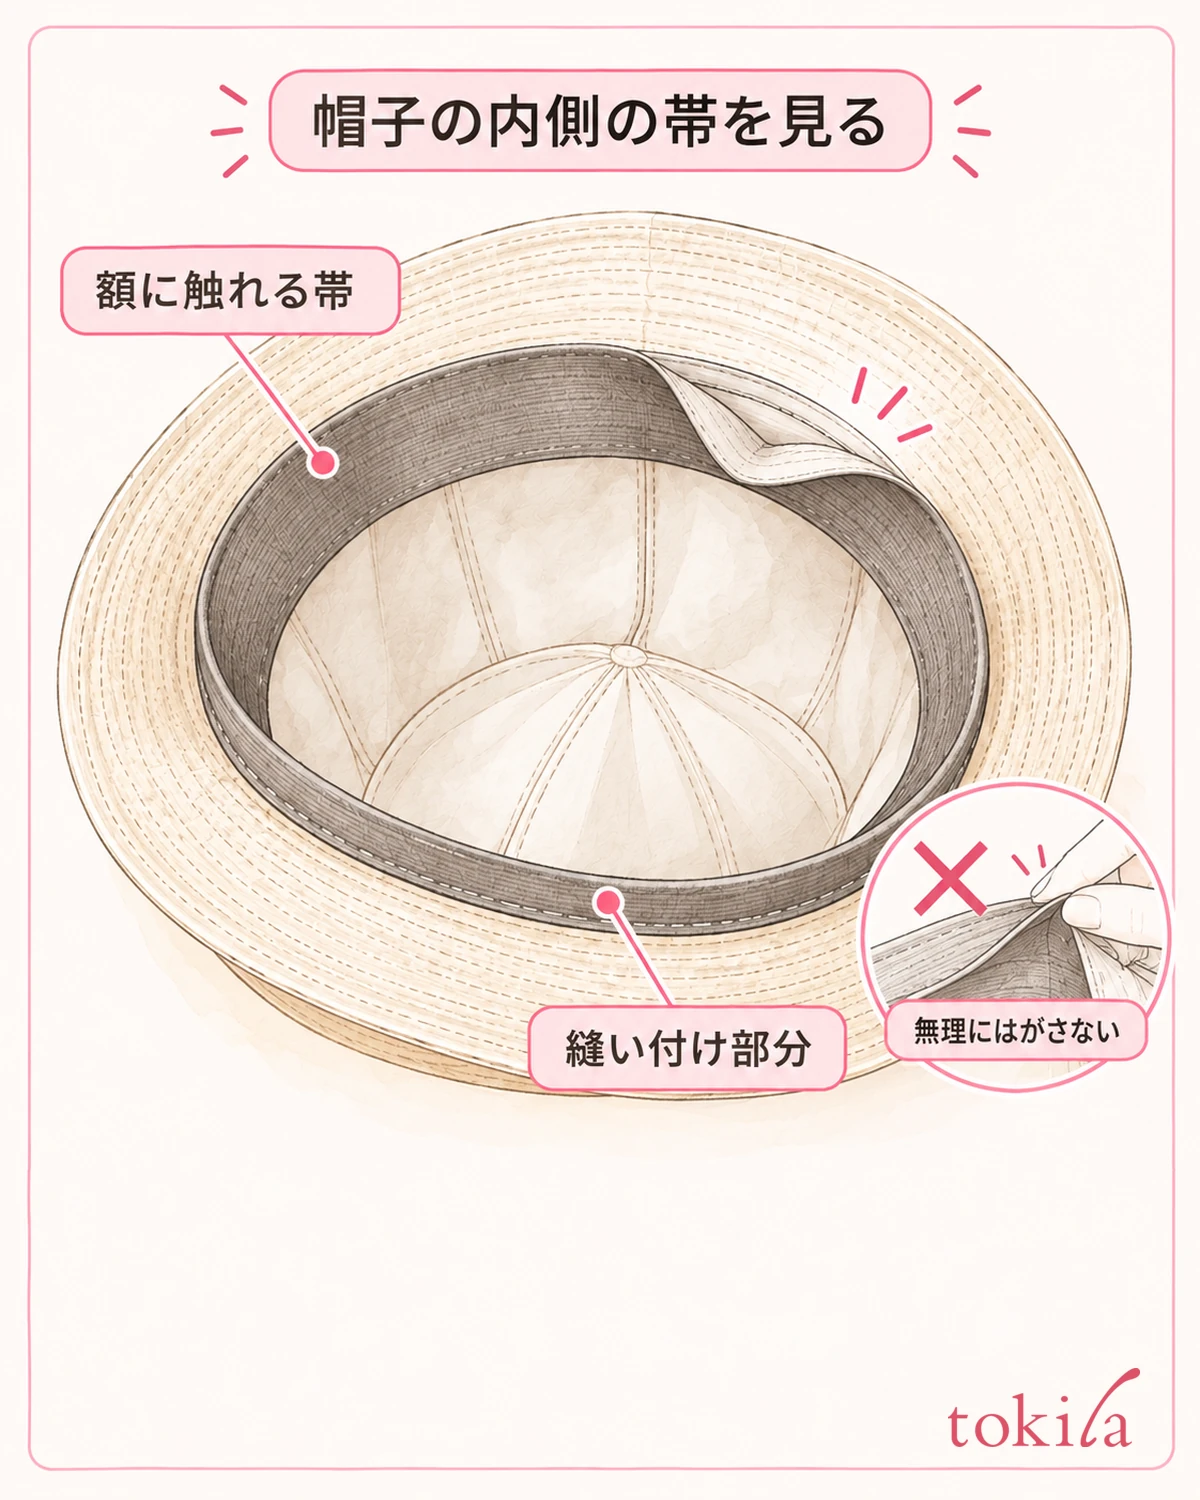
Inside the hat, find the band-shaped part that touches your forehead and so on. This band is called the "sweatband" ("suberi" or "asedome" in Japanese). It is a different part from the whole lining or the decorative ribbon that goes around the outside. Rather than judging by the name alone, check the position on the actual hat.
The instructions for dedicated tape include types that stick to the back of the band and specifications for materials it cannot be used on. Some products cannot be used on hats without a band or on leather bands. Do not stick tape that worked on another hat directly onto knit fabric or leather; stop if the combination cannot be confirmed as compatible.
Before buying, look at a photo of the inside of the hat, the material label, and the description of the tape you want to use together. Rather than the single word "it's fabric," checking whether there is a band, which side is front and back, and which parts can move makes it easier to ask about compatibility with the items you own.
If the edge of the band can be checked without forcing it, tell apart the stitched part from the part that lifts gently. In the photo, we look closely at the edge of the band and the seam. You do not need to pull the thread or peel off glued parts in order to show the back.
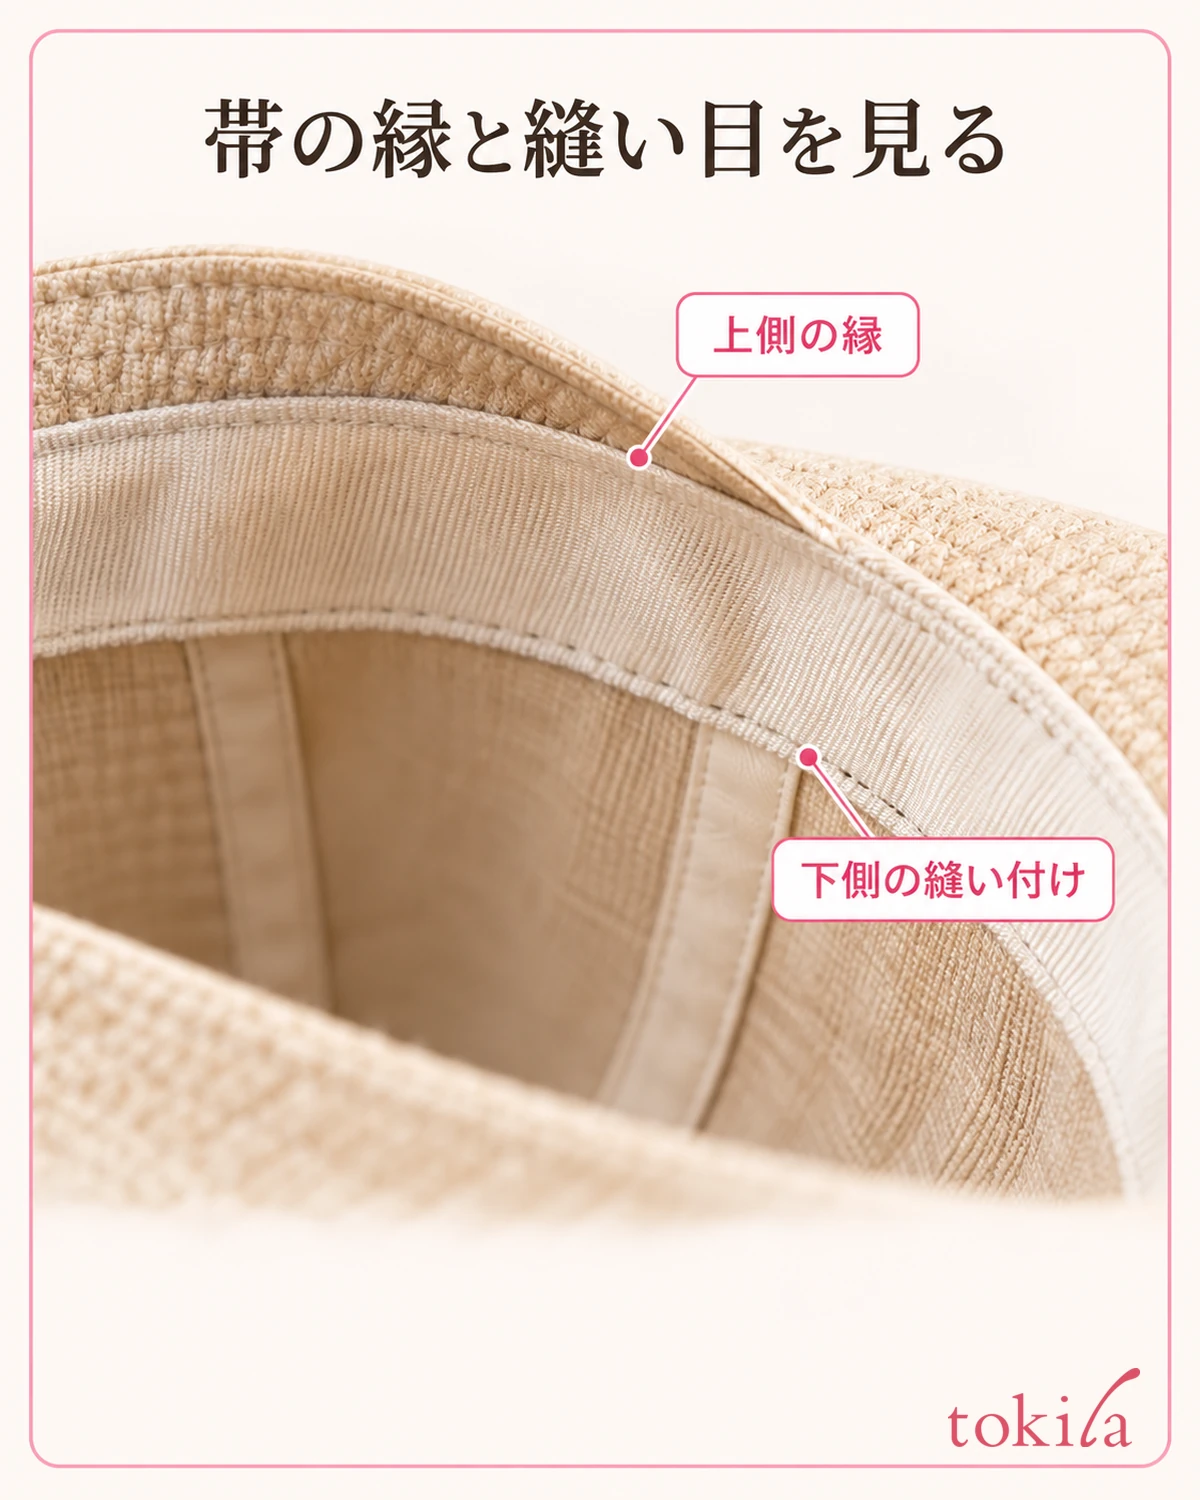
It is also important not to decide adhesive compatibility from how the material looks. Even if it looks like fabric, the surface finish or structure may differ. If the hat has an instruction to avoid treatment, follow it, and if the tape's description does not list compatibility, tell the store the material of your hat or send a photo and ask.
When the band has tears, peeling or heavy stains, separate adjustment from repair. Do not stick tape over the damaged area to hide it; first check the hat care or repair guidance. Do not wipe it with a solvent that is not specified, or apply heat, in order to stabilize the adhesive surface.
Read in advance whether it can be removed and how to handle it when washing. Once stuck on, it cannot always be peeled off cleanly any number of times. Once you know the compatible hat, the surface to stick to and the care conditions, move on to considering length and position.
3.Match the position, length and thickness to the product's instructions
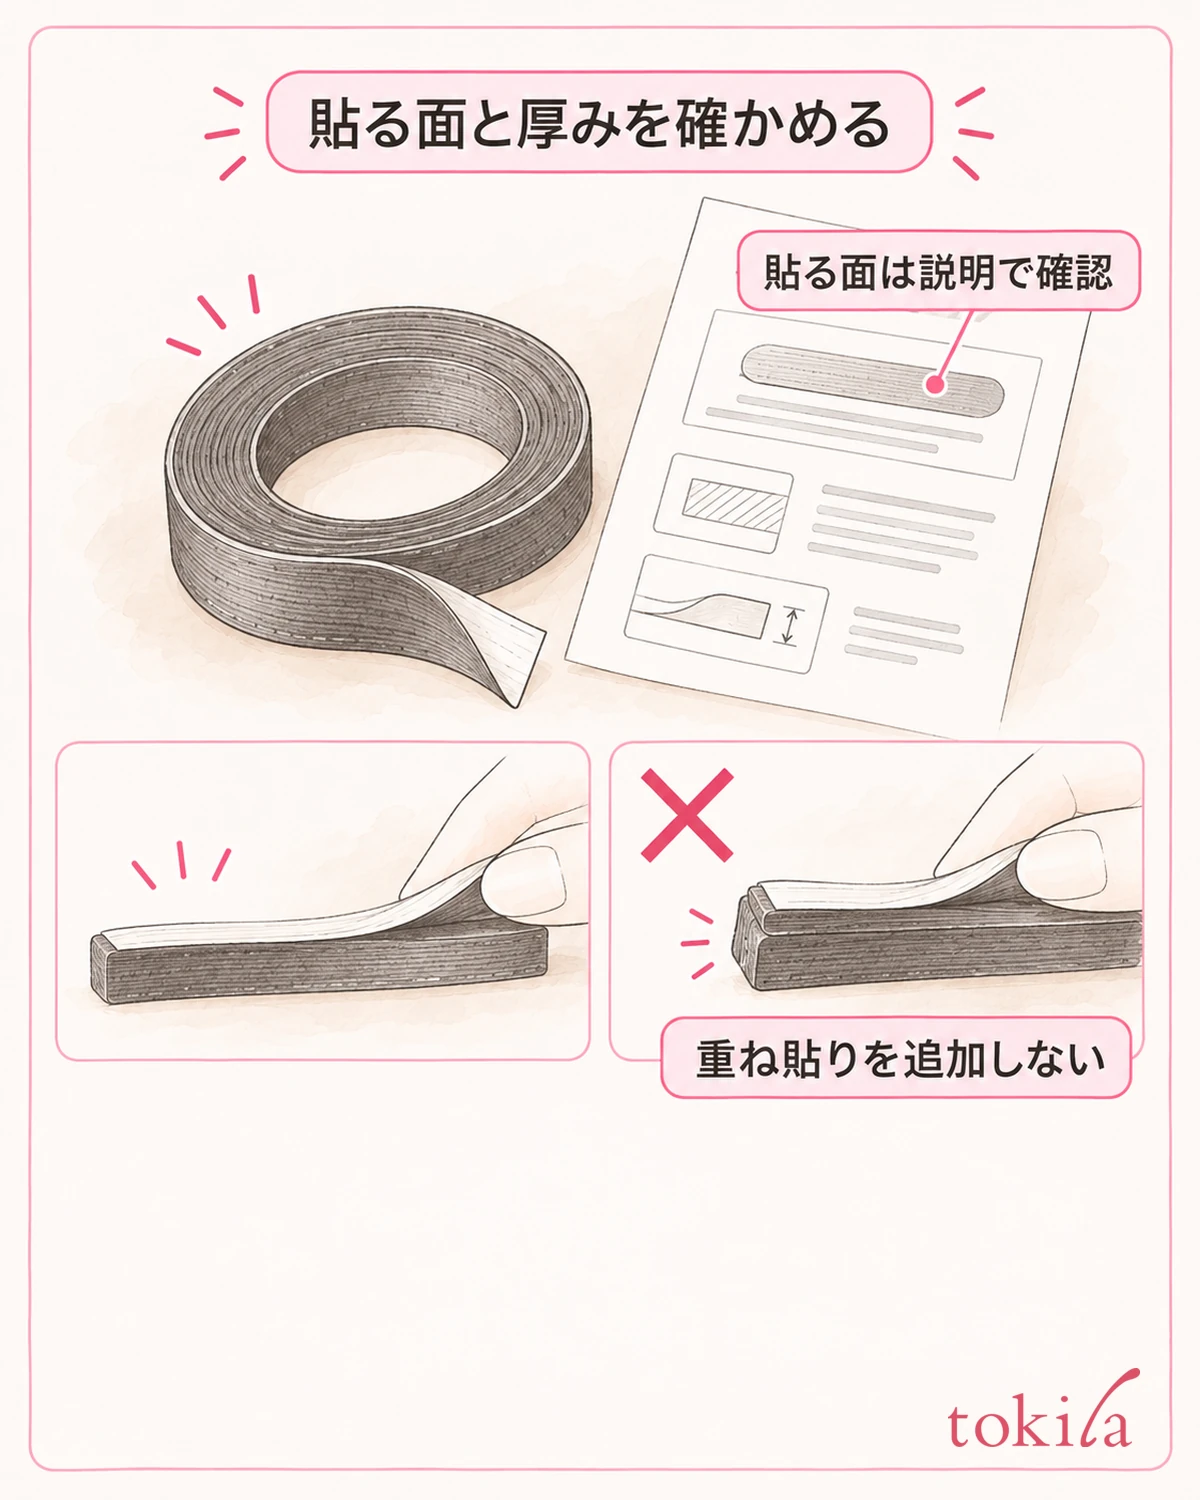
With the tape you have, check the surface and the area to stick it to. If the instructions say to stick it to the back of the band, do not change it to the surface that touches your head directly or the outside of the hat. Rather than judging by the word "inside" alone, compare with the actual item which surface the adhesive side touches in the diagram.
Even for a product whose length can be adjusted, making the whole circumference the same thickness from the start is not necessarily the answer. If the position or length to stick is specified, follow it. The amount of adjustment for a full circle is a guide for the product, so do not calculate and apply it by assuming that a short piece will shrink it by so many millimeters.
Tell apart the tape itself from the release paper covering the adhesive surface. In the photo, we look at the edge from the side and check the overlap of the thick body and the thin paper. The thickness changes once the paper is peeled off, so do not decide how it will feel when worn from how it looks with the backing still attached.
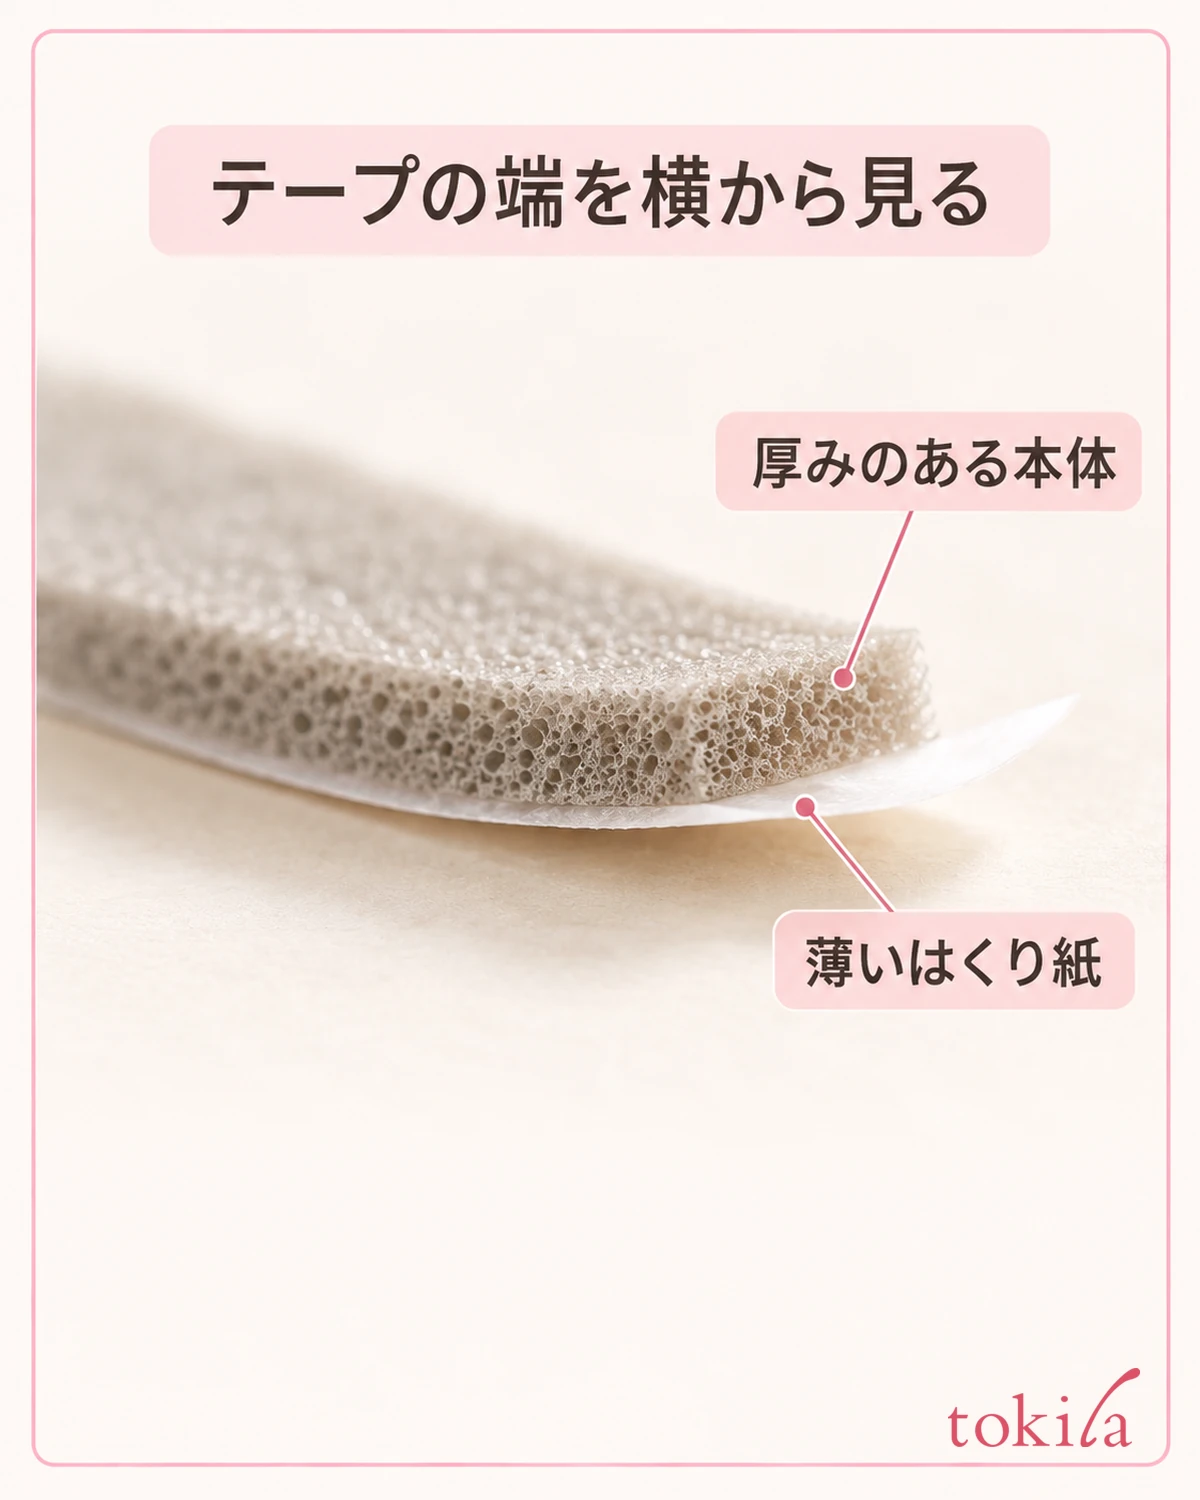
If the instructions say to cut it for use, confirm the length you need and where to cut, then set the hat down away from you before working. Do not point the blade toward the hat or cut while wearing it. Rather than forcing in something whose width does not match, you can also choose a product with the compatible width.
Another point is not to add your own layering just because you want more thickness. If only the place where the ends overlap rises up, it will touch only there, or the band may not return to its shape. If adjustment within the specified range is not enough, reconsider the size of the hat itself.
Before peeling off the release paper, place the instructions where you can read them at hand. If you need marks for left and right or front and back, leaving them in a note at hand rather than on the tape lets you look back at the position without putting extra marks on the hat. When moving it to a different hat, check again that the conditions are the same.
4.Put the band back and recheck any lifting, steps and how it fits
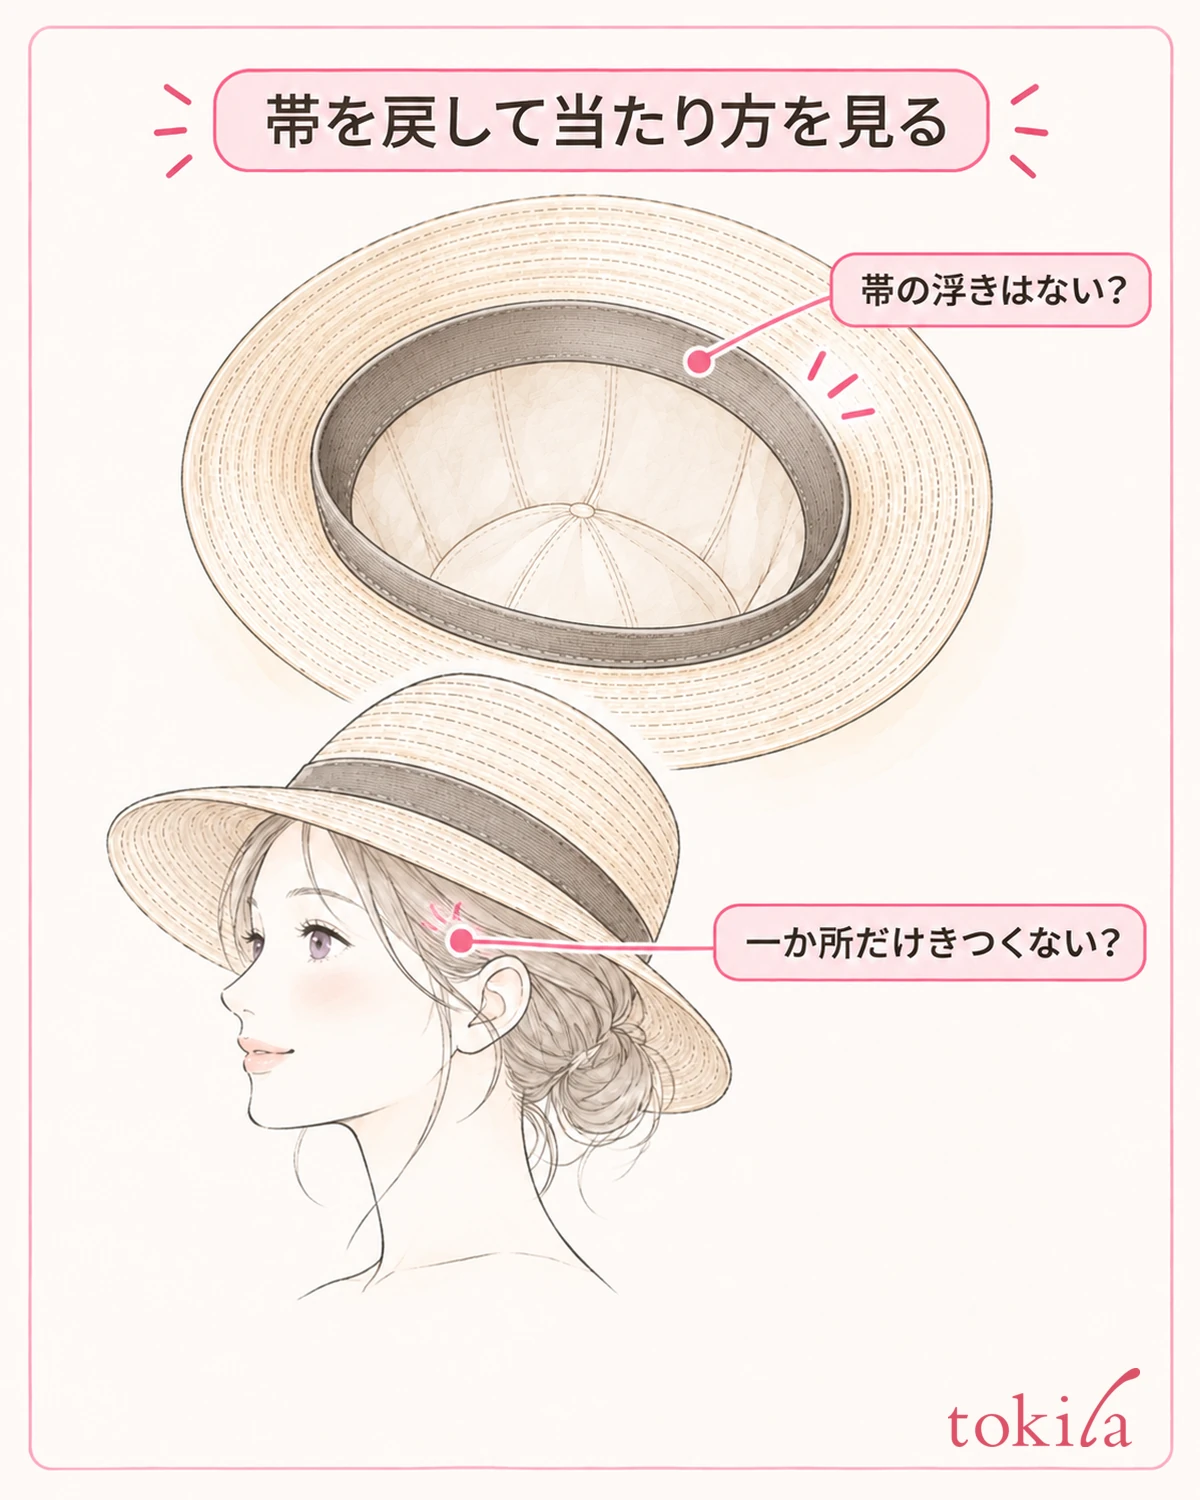
Proceed with applying according to the steps for the tape and the hat. When sticking it to the back, put the band back in its original position after the work and check that there is no twisting or folded-in part. Do not crush the seam to flatten it by force, or fold over and hide any part that sticks out.
If the band does not return naturally, the tape shows at the edge, or the glued part is lifting, do not wear it and press it down as it is. Check the width, the surface to stick to and how it is attached against the instructions. Do not assume pressing hard will fix it; also judge by the product's conditions whether it can be peeled off and redone.
Once it is in a state you can wear, put it on with the same hairstyle and the same depth as before adjustment. While looking at the shape in the mirror, check that only one spot on the forehead or temples is not being pressed. It is important not to accept tightness or pain as proof that it no longer slips.
After looking at how it stays with your hands off, slowly turn your face left and right indoors. Check not only whether the hat drops, but also whether the edge is pulling and whether the brim narrows your field of view. Do not make it a routine to try the fit for the first time after going out into the wind.
Keep thinking of adjusting the shape and adjusting the size as separate until the end. There are also elements of appearance, such as the roundness at the top for a beret, or the direction of the brim for a hat with a brim. If making the inside narrower alone does not give you the outline you like, choose the shape again before adding more tape.
5.Check again before the next wear and before care
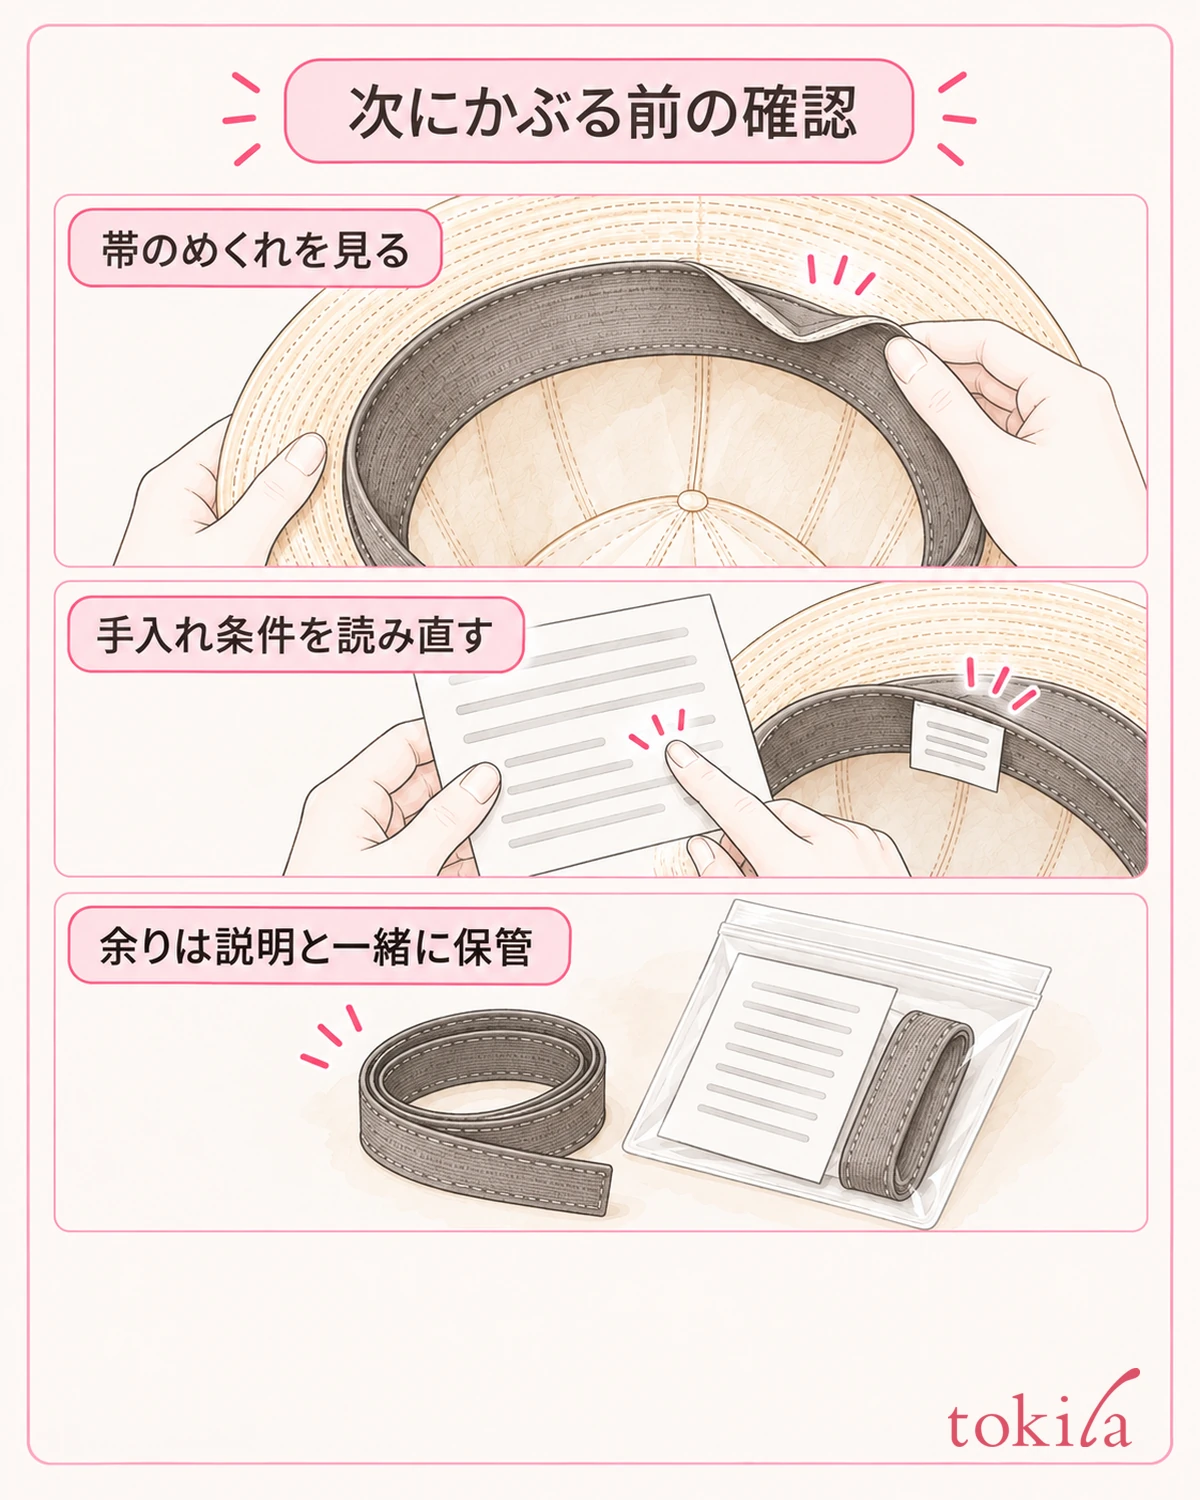
To finish, put away the unused tape and release paper, and store the hat. Keep leftover tape in a state where its instructions and product name are clear. If you group together short pieces of tape that look the same, you will not be able to tell which material you can use them on next time.
If needed, also remember where you attached it with a photo of the inside. Rather than recording only how many pieces you added, knowing which side of the band you attached it to and according to which instructions will help with the next care. Treat the photo as a record for checking the current state, not as something to look at when sticking on new layers.
Before the next wear, look for a curled band, tape that has shifted or is lifting, and any step you feel when touching it. Do not skip the check because it fit last time; check whether the condition has changed because of sweat or how it was pressed in storage. Do not let any exposed adhesive surface touch your hair or skin.
When washing, wiping or caring for the hat before storage, check against the instructions of both the hat and the tape. Even if only the hat is labeled as washable, the same care cannot necessarily be applied to it including the attached tape. Even when there is an instruction to remove it, check the method before peeling it off your own way.
Even if stickiness or marks remain after removal, do not scrape with a nail, use a solvent or melt with heat on your own judgment. If you do not know whether it can be treated without damaging the material, switch to asking about hat care or repair. Do not hide old tape by layering new tape over it.
Size adjustment tape is an aid that can be used only once you know it is compatible with the hat you own. Referring also to hat types and basics, enjoy the shape and the comfort of wearing it together. Please go one step at a time, in this order: checking compatibility, the surface to stick to, the thickness, and how the band returns.



