
You try to take off your watch, but the clasp on the band will not open. You can see a small button, but you are not sure whether to push it or pull it. Before sliding a fingernail in, take a look at the shape of the clasp that holds the band (called a "nakadome" in Japanese).
Here we go through how to match the instructions for your own watch with the place you operate, for clasps of the type that fold a metal plate. Putting the watch on and taking it off every day is treated separately from changing the length of the band. This is not about applying one way of opening to every watch, but about preparing to handle your everyday watch calmly.
1. Check the clasp's shape and the release part used for putting it on and taking it off
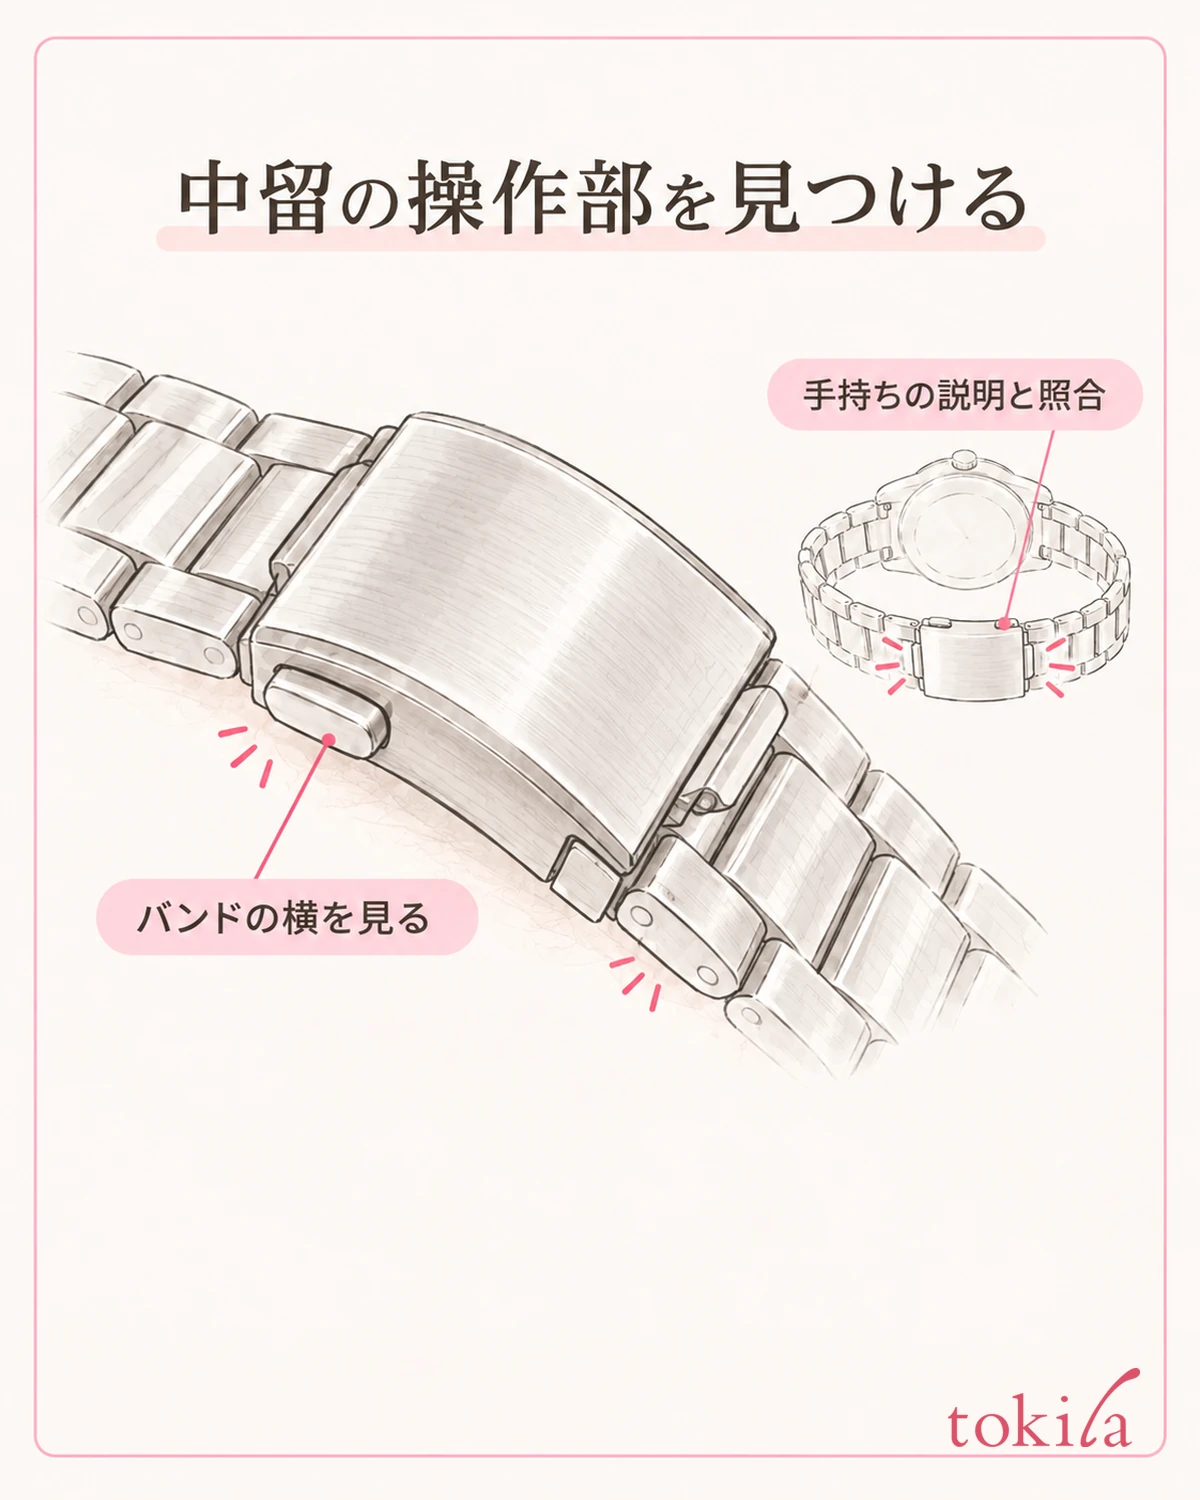
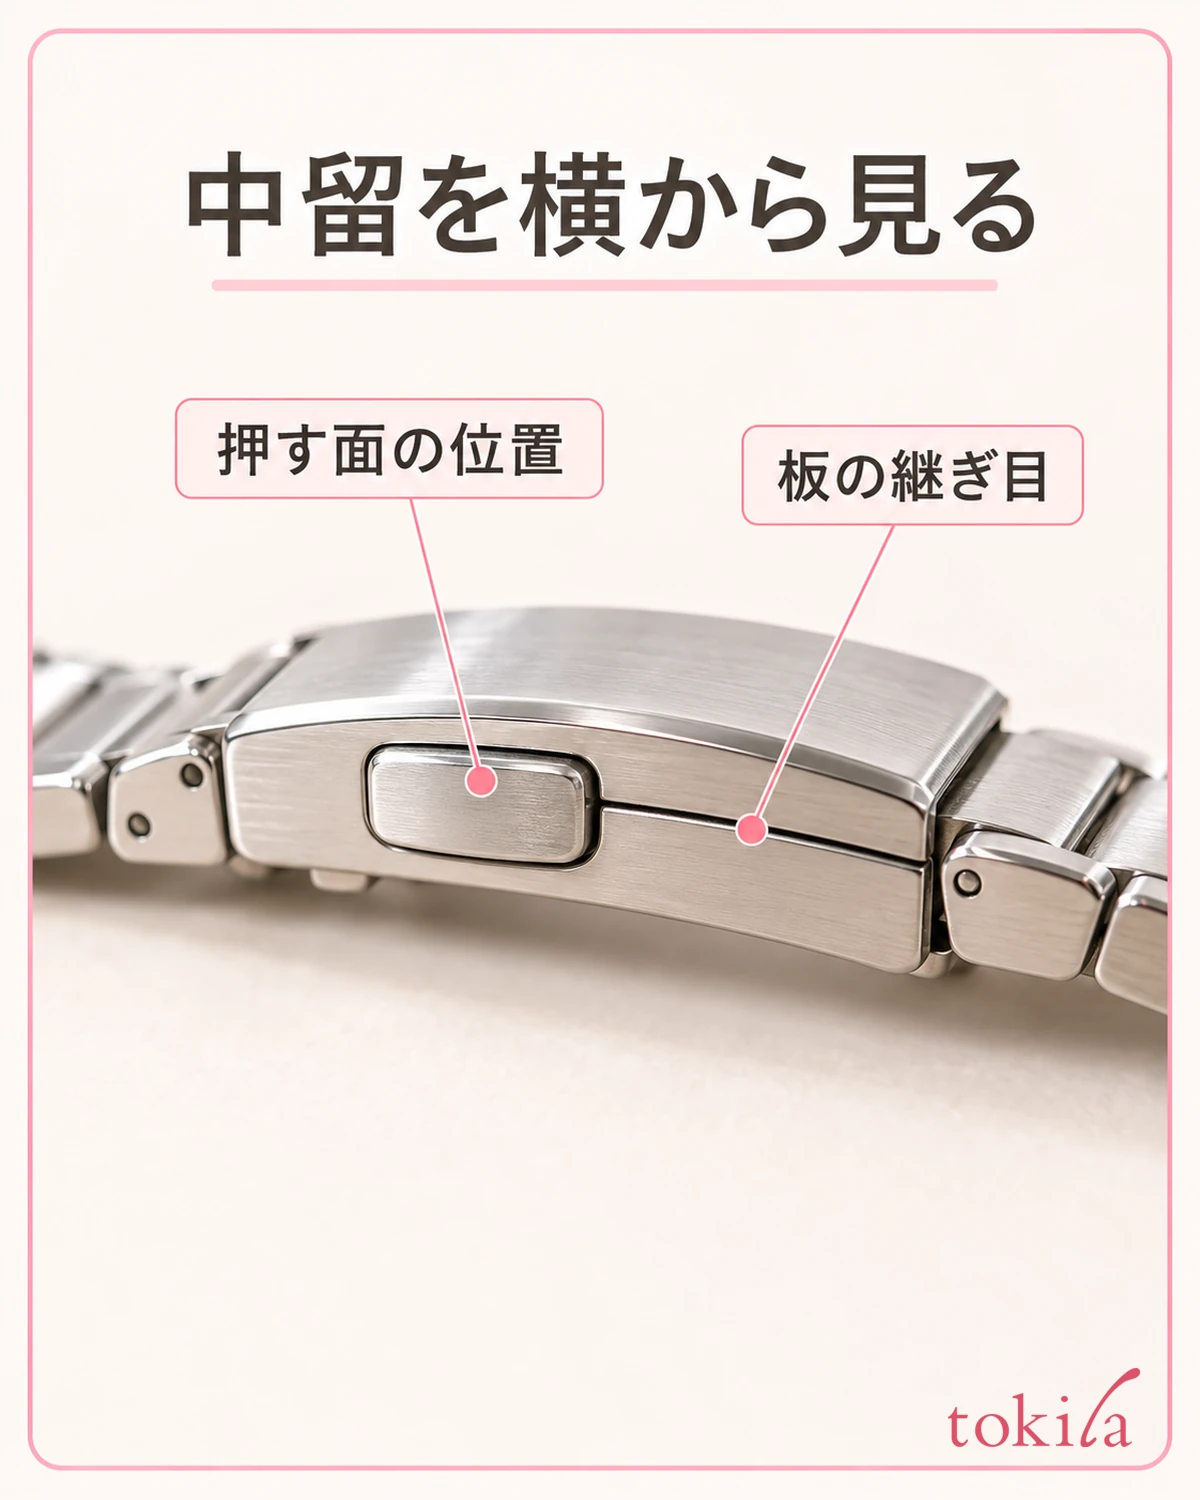
The clasp is the fitting that fastens the watch band around your wrist. Unlike a buckle, which passes a pin through a hole, some clasps open and close by folding metal plates. You cannot decide how to operate it just from whether the band is metal or leather, so first check the outside of the fitting and the parts visible from the side.
A three-fold clasp has a structure that unfolds overlapping plates, and some use push buttons. However, even under the same name of three-fold, there are types where the end comes out and types where it tucks inside, and the part you handle partway through putting it on and off differs. Do not carry over the steps for a different watch just because the name is the same.
In the instruction manual, look for items such as "putting on and taking off" or "how to use the clasp," and compare the diagrams with your own fitting. Check whether there are buttons on both sides and whether there is an additional fastening part on the outside. Not every small round dot is a button. The first check is not to confuse them with an adjustment hole or the place where you press a fixing part.
The crown and buttons on the side of the watch case, used for setting the time and so on, are separate from the clasp's release part. What you want to open is the band's fitting on the underside of your wrist, so do not try to take it off by pressing the side of the dial. When looking at a diagram, check the front and back of the watch together with the position you operate.
For a watch bought secondhand or one whose band has been replaced, the instructions that came with the original watch may not match the clasp now attached. Do not decide by the watch's model number alone; check whether you can find the instructions for the clasp currently fitted. If you cannot tell which applies, check the handling instructions before applying force based on images of similar-looking fittings.
Keep the instructions you found within reach, with the page for putting on and taking off ready to open. If a diagram for adjusting the length is next to it, keeping the item you want separate makes it harder to get confused. For a watch you are handling for the first time, you could make time to look at the structure after clearing your desk, rather than right before rushing out.
2. Support your wrist and the watch, and prepare a place where it will not be dropped
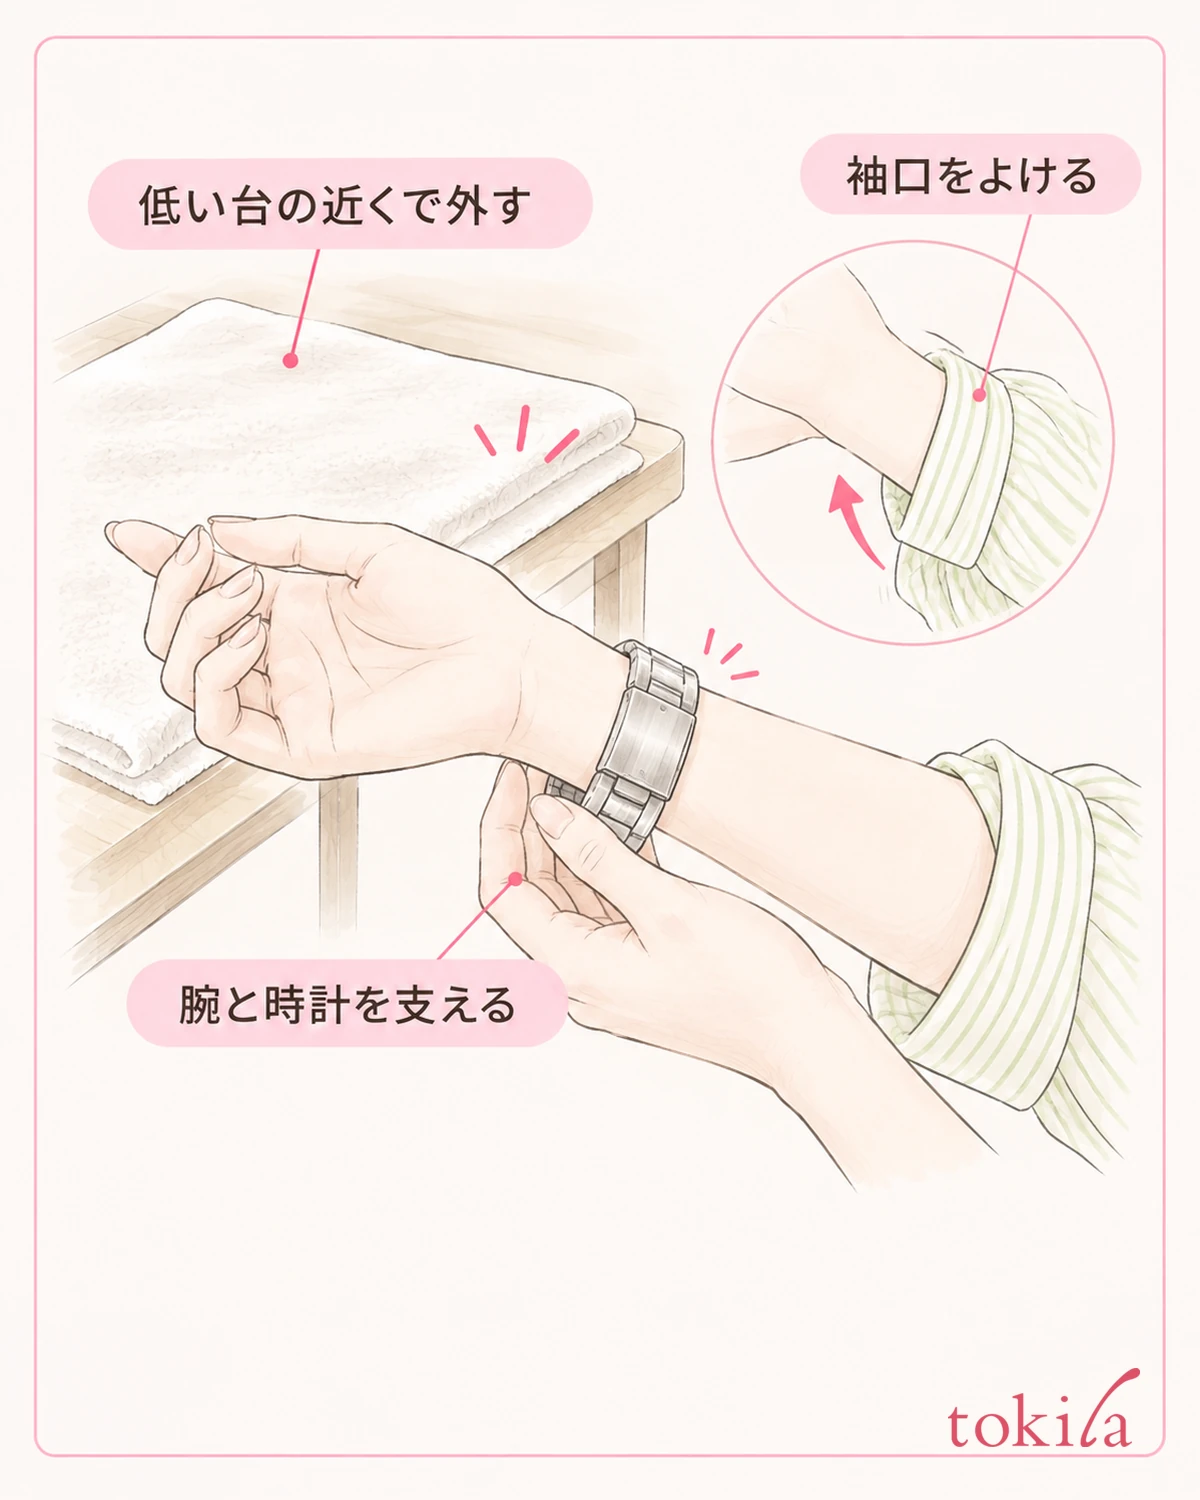
Before opening it, move to a bright, stable desk or table. So that the watch does not fall to the floor the moment it comes loose, support the arm wearing the watch at a low position and take a posture in which your other hand can see the fitting. Avoid taking it off while walking, while carrying a bag, or over the water at a sink.
If needed, spread a soft, clean cloth on the table. This is not a tool that will always protect a dropped watch, but preparation to decide where you will handle it. Do not choose a damp towel or a thick cloth in which the fitting gets buried and hidden; keep the part you operate uncovered.
If you are wearing long sleeves, check whether the cuff is covering the clasp. Do not open or close it with fabric pushed in; move the sleeve aside only as much as needed so the fitting is visible. If a bracelet or the like is nearby, check that it has not gotten into the clasp before you move.
You do not need to twist your arm sharply to feel for a button on the side you cannot see. Turn your wrist to a range where you can see comfortably, and if the instructions say to press from both sides, first decide on a grip where your fingers can reach those two spots. Rather than a grip that pokes a fingertip into gaps between parts, choose a posture in which you can place the pad of your finger on the designated surface.
Also clear the place where you will put it down after removing it. If you go looking for a storage box while holding the opened watch, you will have to re-grip the fitting with one hand. Set out the cloth or case you will use on the table in advance so that you can take it off your arm and put it straight down.
3. Operate the designated release part and open it while watching how the plates move
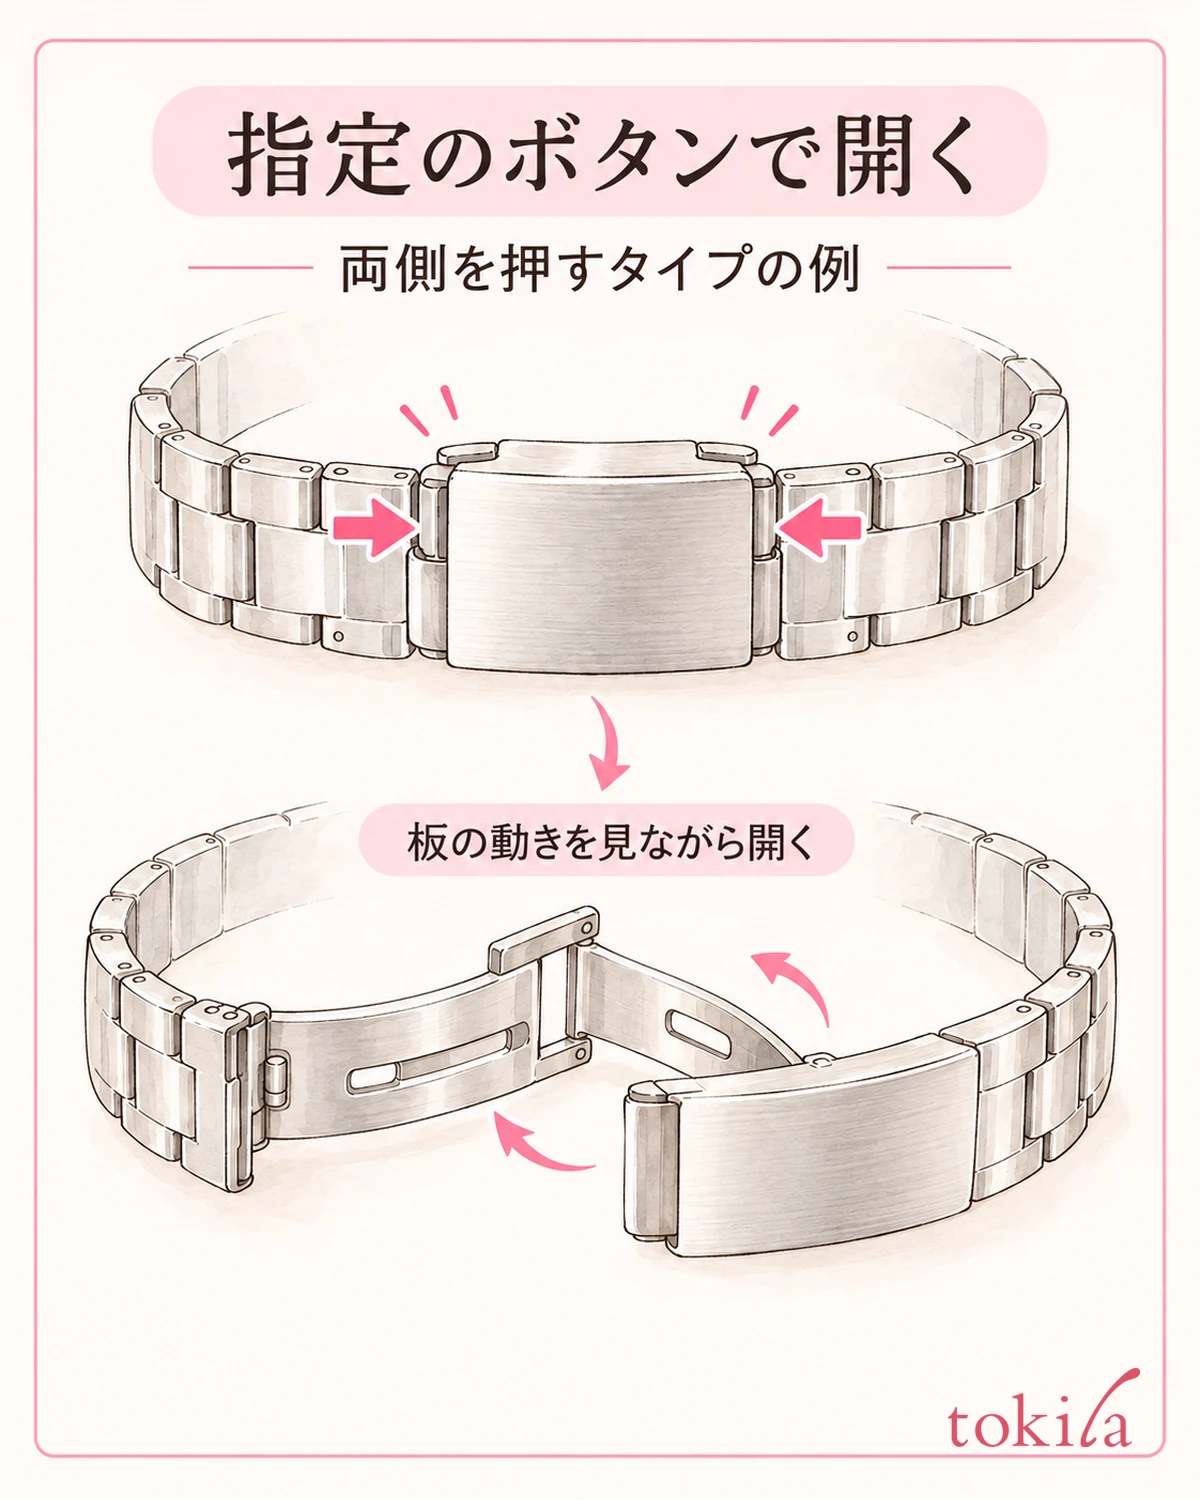
Once the shape matches your instructions, operate the release part for putting on and taking off as the guide says. If it specifies pressing push buttons on both sides, check the flow of pressing the left and right at the same time while opening the clasp. Do not keep pressing hard on just one side, or lift the top cover without pressing the buttons.
Even with push-type clasps, some have a step of pulling the end of the band out of a loop. The loop through which the end of a leather band passes may be fixed or movable, and its relationship to the order of opening the clasp differs by product. Go back to the diagram for your own watch and check where, before or after opening the plates, you handle the end.
Once it starts to open, do not pull on the whole band; watch the movement of the folded plates near the fitting. Support it while following the position of the hinge and which plate moves. Do not put fingers or sleeve fabric between the plates while it opens, and handle it while keeping it in view.
Even after the clasp is open, some bands remain connected in a loop. It does not necessarily mean you are opening it wrong if it does not separate into two pieces. Check that it has reached a state where it can slip off your wrist, and remove it slowly while supporting the watch case. Do not add the step of pulling the plates open further to separate the loop.
If it does not move, catches on only one side, or moves only in a direction different from the instructions, stop for now. Recheck where you press the button, whether there is an outer fastener, and whether fabric is caught, and if it is still unclear, do not continue opening it. It is important not to let putting on and taking off turn into do-it-yourself repair, such as applying oil or water or prying with a thin tool.
If you were able to take it off in a state where you could see the opened fitting, remember only the movements that were needed for putting it on and taking it off. You can sort them into short phrases that match your actual instructions, such as "buttons on both sides" or "has a step of pulling out the end." Rather than memorizing all the complicated names, give priority to knowing which part of your own fitting you moved.
4. Keep the parts that change the length separate from everyday putting on and taking off
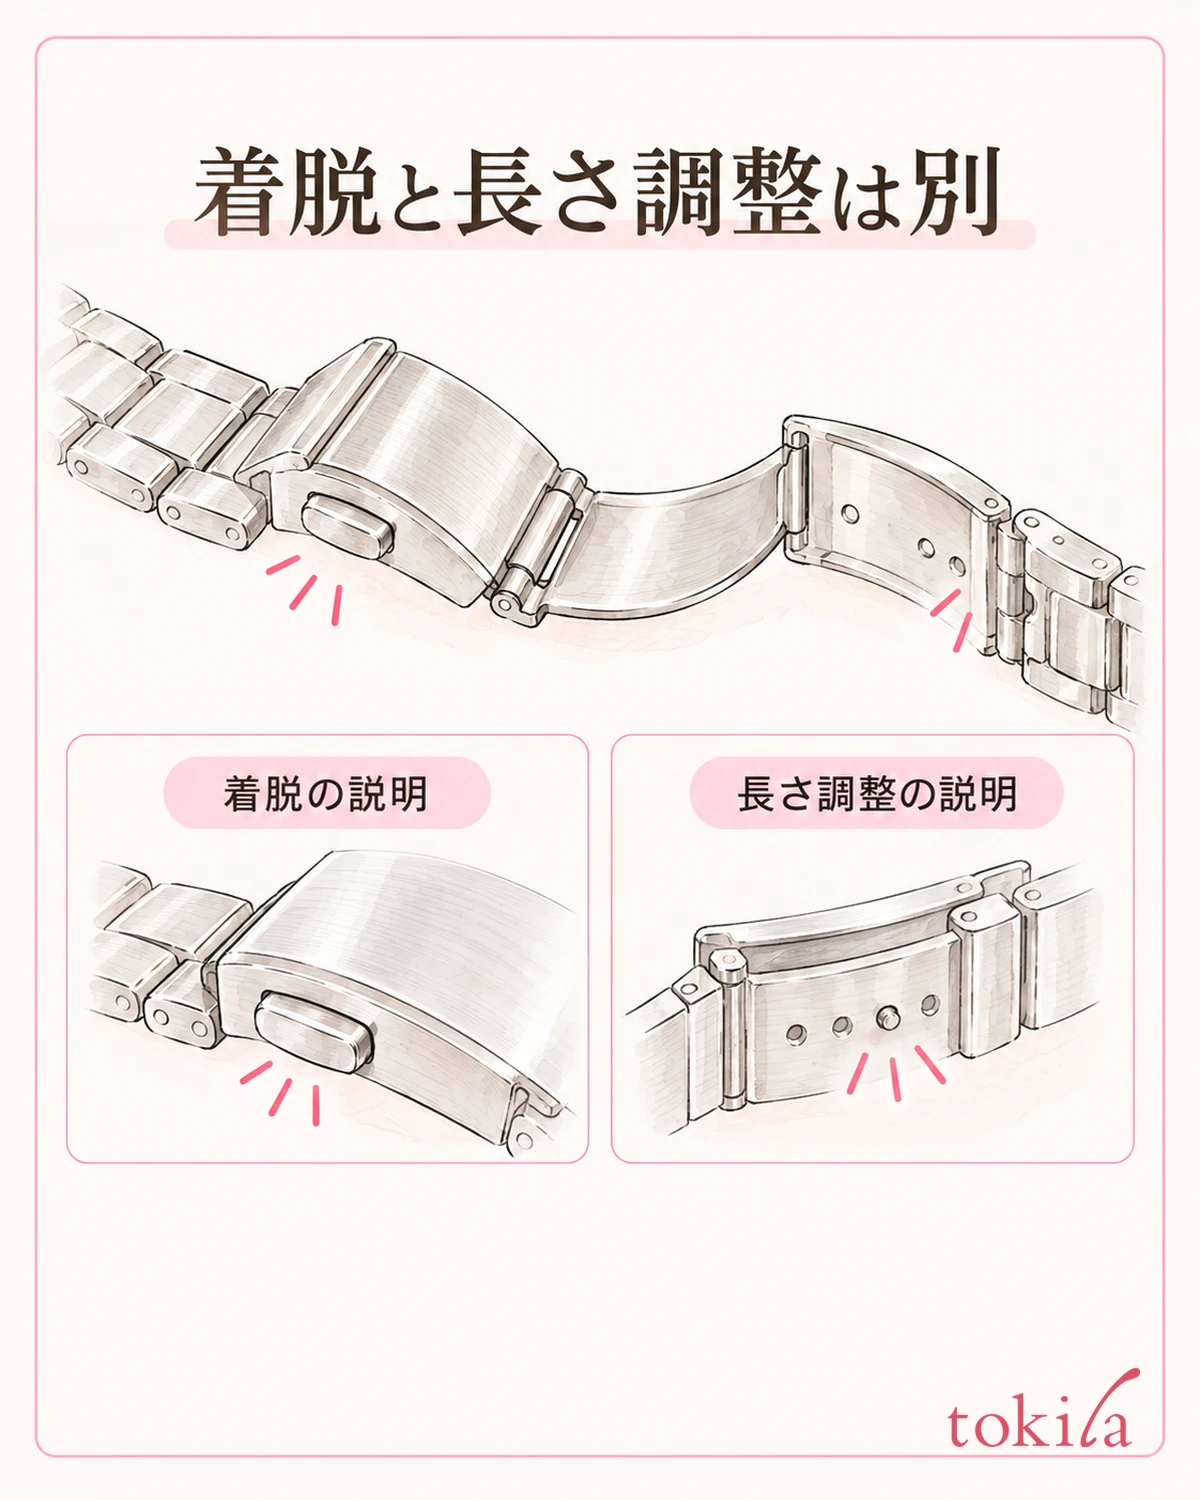
Inside the clasp, some have pins and holes that set the band length, and parts that fix the position. Just because you opened it to put it on or take it off, you do not need to move every visible part. If the instructions say "to adjust the length," read that as a separate task from the steps for taking it off your arm each day.
For example, there are structures where opening with a button is enough for putting on and taking off, but adjusting the length requires opening one more plate and changing the position of a pin. There are also types where you slide the band to change the position, and types that use a special tool. Do not use movements you learned for a different mechanism as a basis for trying things on your current watch.
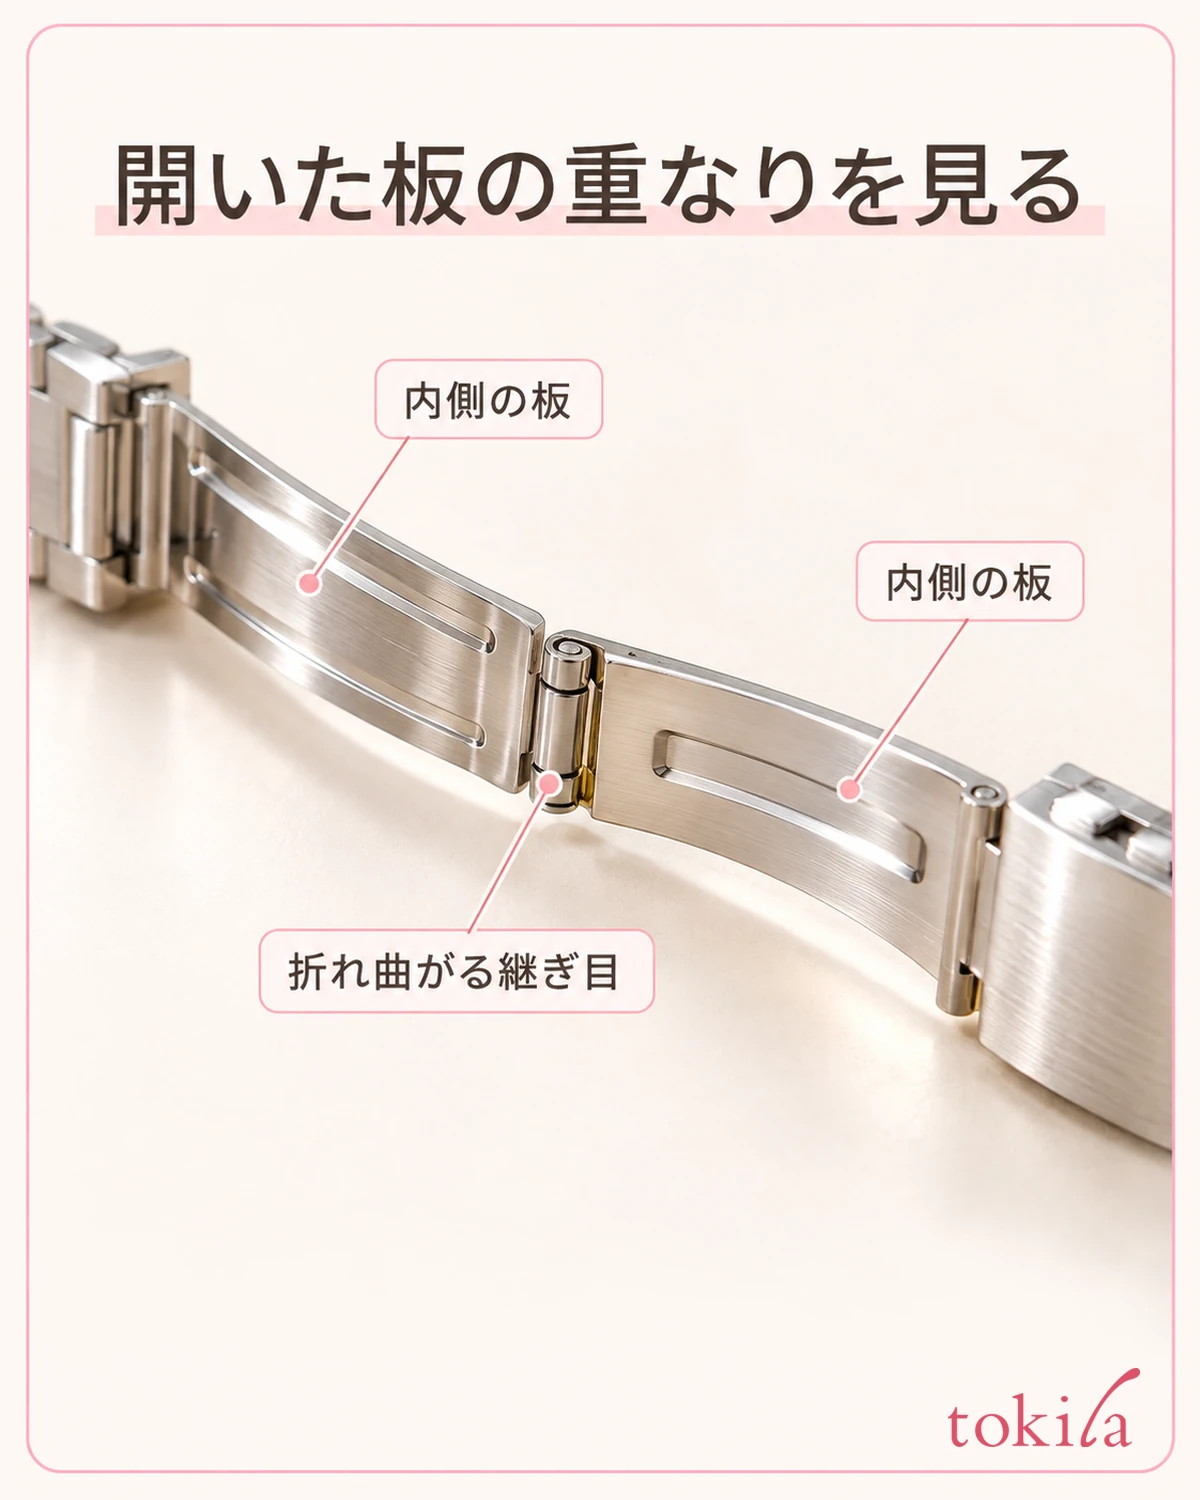
Whether you can adjust it yourself should also be confirmed from the product's guidance rather than the look of the band. Some metal bands are meant to be adjusted by asking a retailer or similar, so do not assume that because there is a button you can shorten everything yourself. Here we do not go on to the steps of removing links or pins, and just keep it in a state where it can be put on and taken off.
On a day when it feels tight or loose, sort out since when and at which position you feel it, and set aside a separate task to check the size. Rather than moving the adjustment position every time to take it off, first understand where putting on and taking off and adjusting diverge on your own clasp. There is also no need to change how snug it is just to match your outfit.
If, after taking it off, you notice anything unusual, such as a small pin sticking out or a visible deformation of a part, do not fasten it and keep using it. Do not push it back in to see how it goes or bend the fitting back; instead, make sure you can communicate the condition and have it checked. This is a record to separate a misremembered operation from an abnormality in the parts.
5. Check the closing order and the fastening, then match it with your clothes
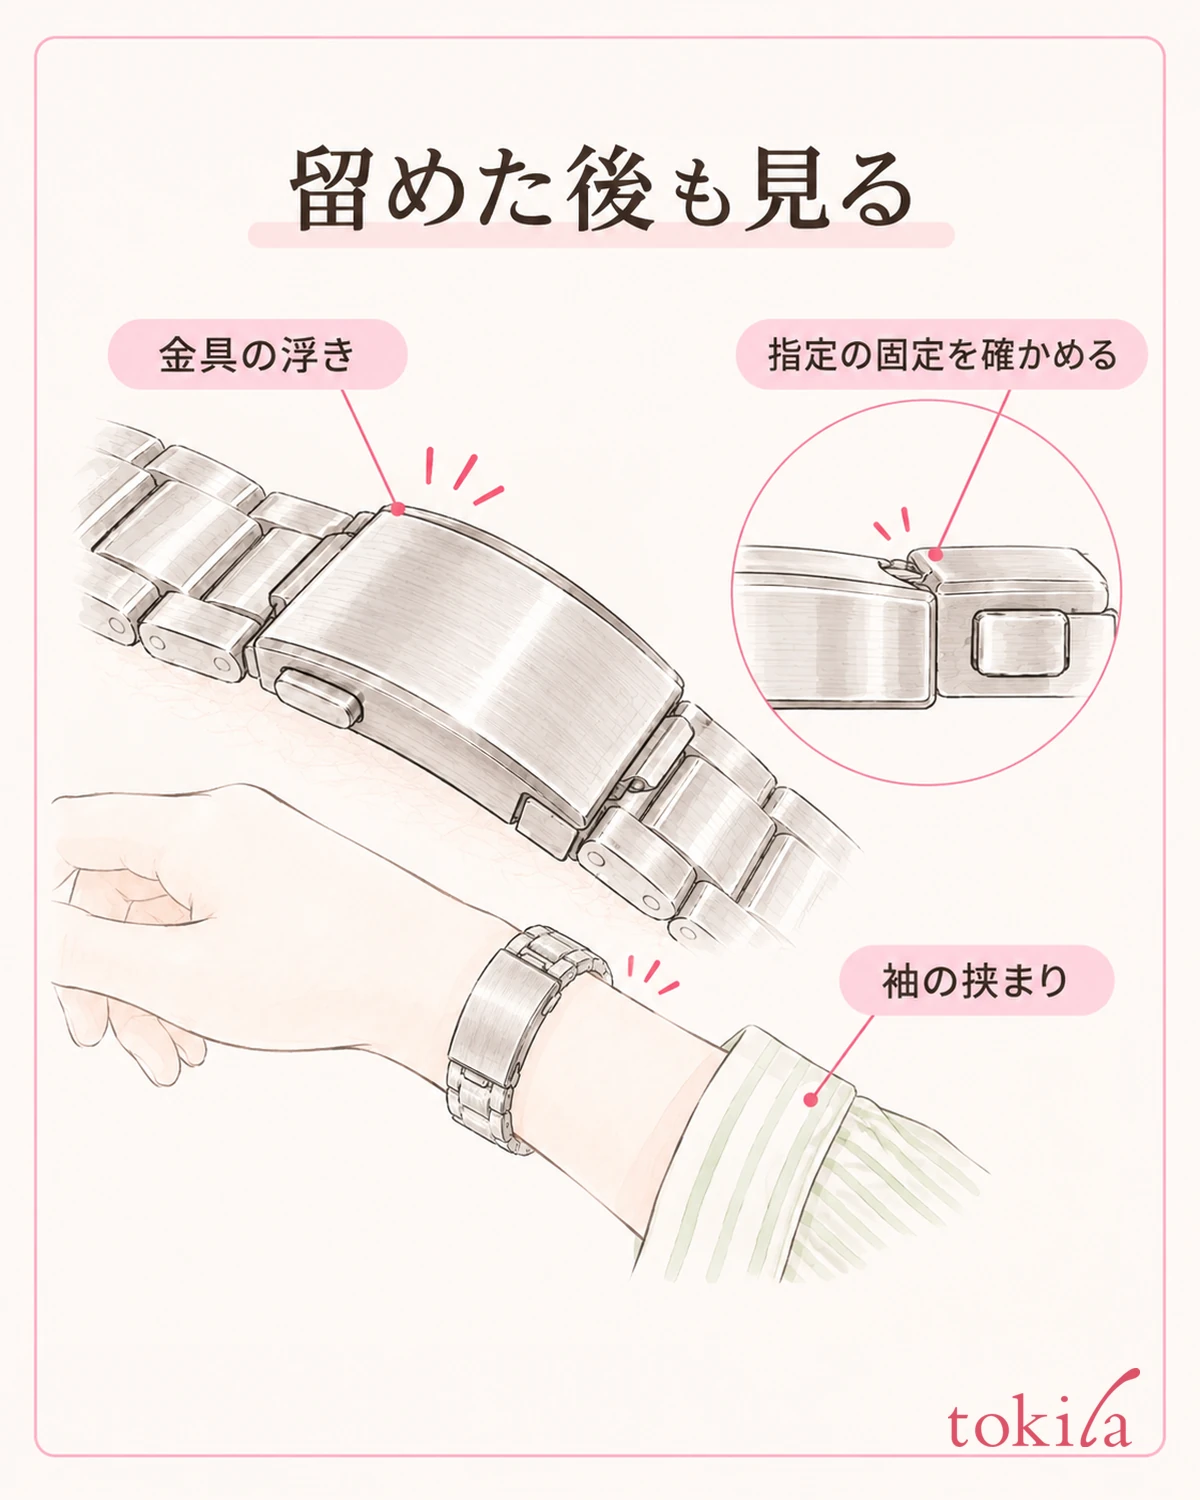
When putting it back on, do not just push it in from your memory of how it opened; check "how to fasten" in the instructions. For some, such as those where you put the end of the band into a loop and then close the upper fitting, the order of handling the end is specified. Do not pinch skin or sleeve between the folding plates; support it and close it in the designated order.
After closing the fitting, check that one side is not lifted and that no plate remains partly open. Do not take the sound as the sole criterion for completion; if there is an additional fastener on the outside, check that state too against the instructions. Rather than testing durability by pulling hard, check whether it is properly secured as the guide describes.
If it opens right away even though you thought you fastened it, or the same spot keeps lifting, do not go out like that and stop using it for now. Do not use workarounds such as holding the cover down while wearing it or securing it with glue or tape. Judge separately whether you could open and close it and whether it holds in use.
Once the normal way of wearing it is in place, put the cuff back and look at how it appears with your arm on a desk and with your arm lowered. Check that no fabric gets into the clasp and that the sleeve moves without strain. If you are unsure about matching colors with your clothes, go on to how to compare the colors of a watch strap and a cuff, and keep the opening and closing operation separate from choosing a color scheme.
To be ready for next time, it is enough to note where your instructions are and the release part used for putting on and taking off. When you add more watches, do not make the first watch's steps the rule; look again at the clasp of that watch. When the structure of the fitting and the daily movement are connected, you can also cut down the time spent in a hurry looking for how to take it off after choosing your clothes.



