
You put on a beret and it looks flat on top of your head. When you pull at it to add fullness, the edge against your forehead rides up too. In that case, adjust the "opening" that touches your head and the "crown" that spreads above it separately. Decide the position of the edge first, then move the fabric or felt on top a little, and it is easier to compare what you changed.
Here, I introduce steps for shaping a typical soft beret in front of a mirror. For firmly molded hats, hats with decorations or hats with a special construction, follow the instructions that came with yours. Do not treat wearing it deep or tilted as the right answer; start from a position where nothing feels tight and you can see your eyes and the surroundings.
1. Look at the Opening and the Crown Above It Separately
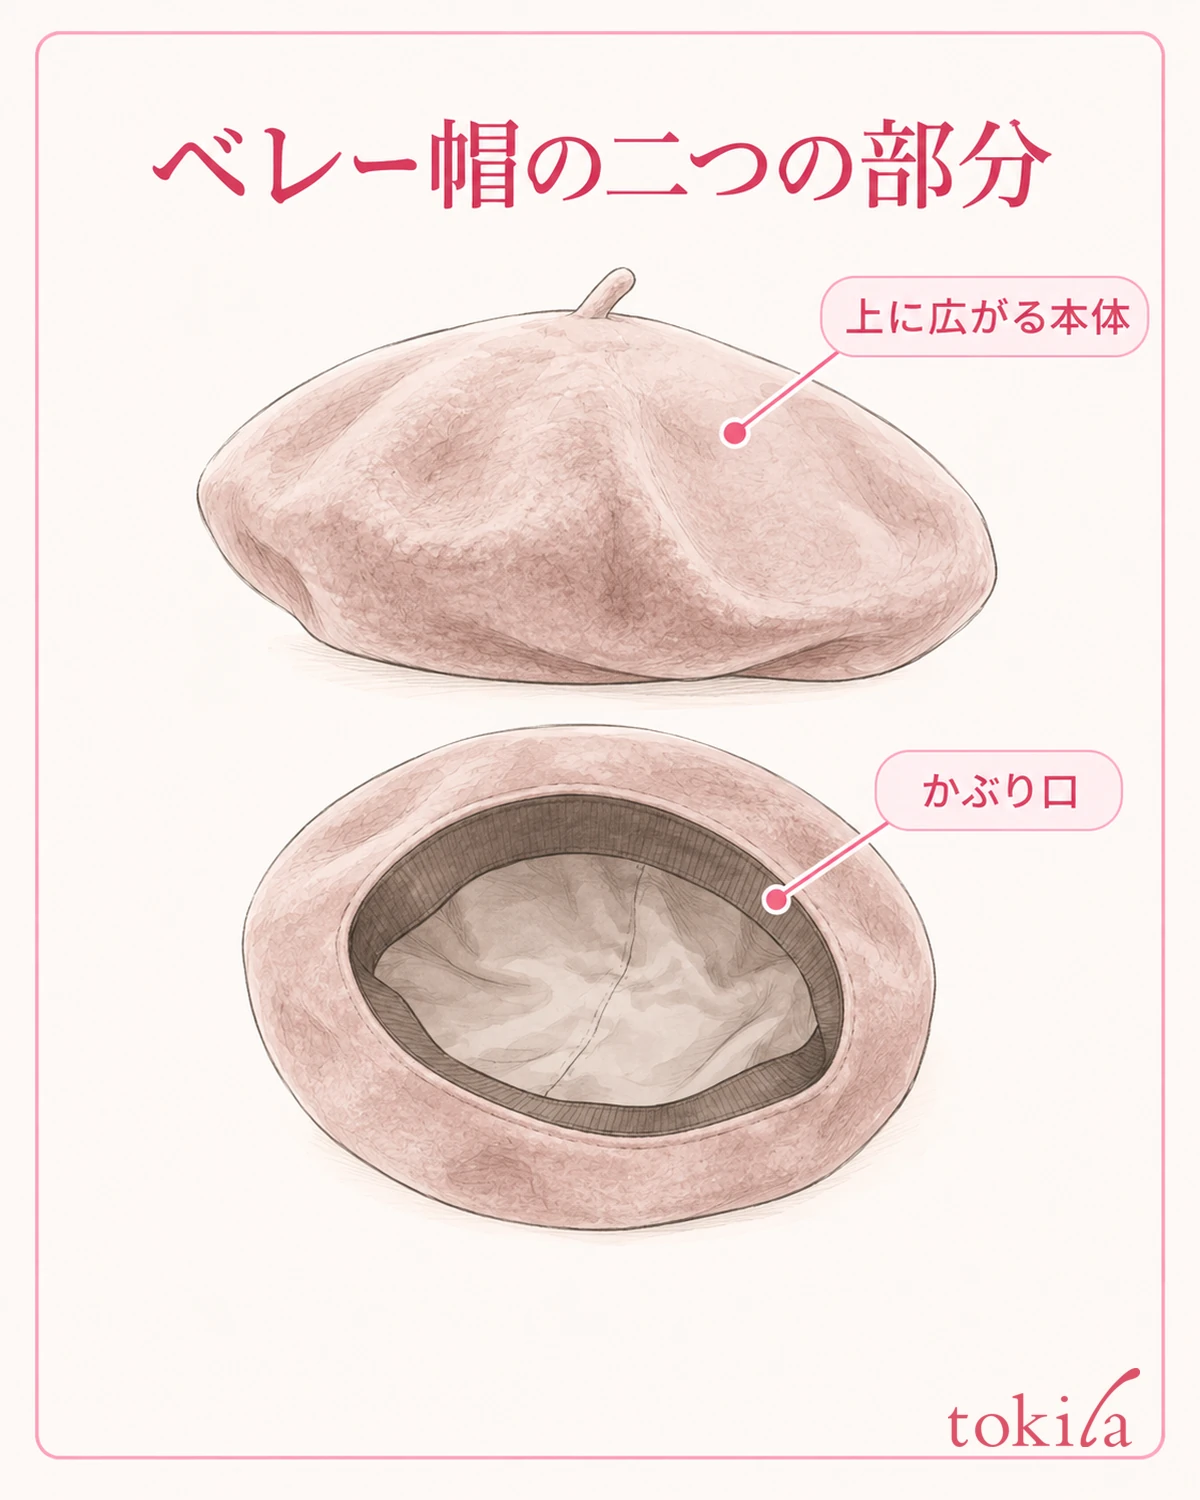
First, take the hat off and look around the hole your head goes into. This is the opening. The round part spreading outside it is the crown. Constructions differ: some have a band on the inside, and some have an edge folded over in the same material. So do not think of the whole round outer edge as "the part that sits on your head."
When the flatness bothers you, separate the shape of the hat itself from its shape when worn. See whether it is a thin design even when placed on a desk, or whether the extra material on top falls wide when it sits on your head. If you try to create the same fullness as a large beret you saw in a photo from a hat that is originally small, you tend to move the edge too.
If there is guidance about direction or decoration on the inside, check it. Seams and tags alone do not decide a front and back that is common to every beret. Look at whether yours can be tilted to either side or has a fixed direction to wear it, according to how your hat is made.
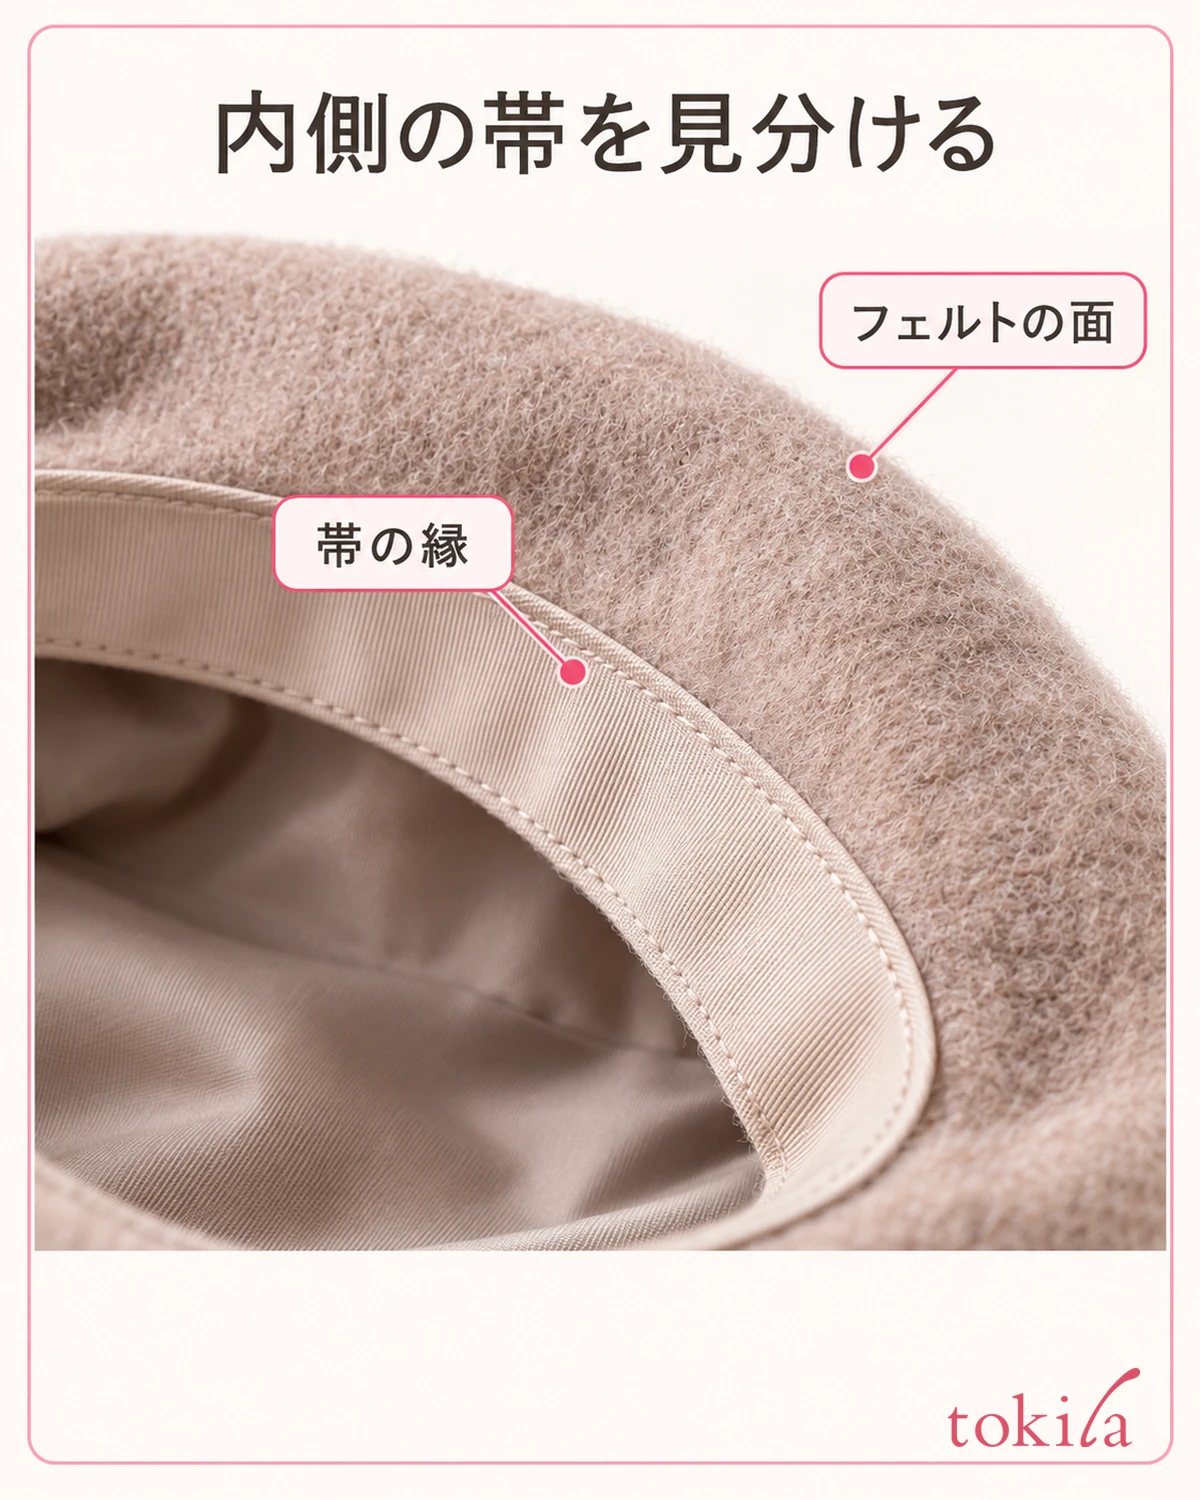
The way roundness shows up also depends on the material and construction. Soft felt connects its surface smoothly, while on a sewn-together hat the seam between pieces is a landmark for the shape. Without stretching a knit hat hard or crushing the molded parts, check the range that moves naturally by hand.
Before buying, look at the circumference around your head and the spread of the top separately. A large diameter when laid flat is not the same as having room on your own head. If you can try it on, it is easier to choose by checking your preference for the shape and whether it feels tight, each on its own.
If there is a fold or twist on the back of the edge, see whether you can return it to a natural state before putting it on your head. For a hat with no instruction to wear the band turned over, you do not need to add a fold of your own. If it is hard to tell which part touches your head, check from the inside while the hat is off.
2. Decide the Position of the Opening and Even Out the Height at the Front
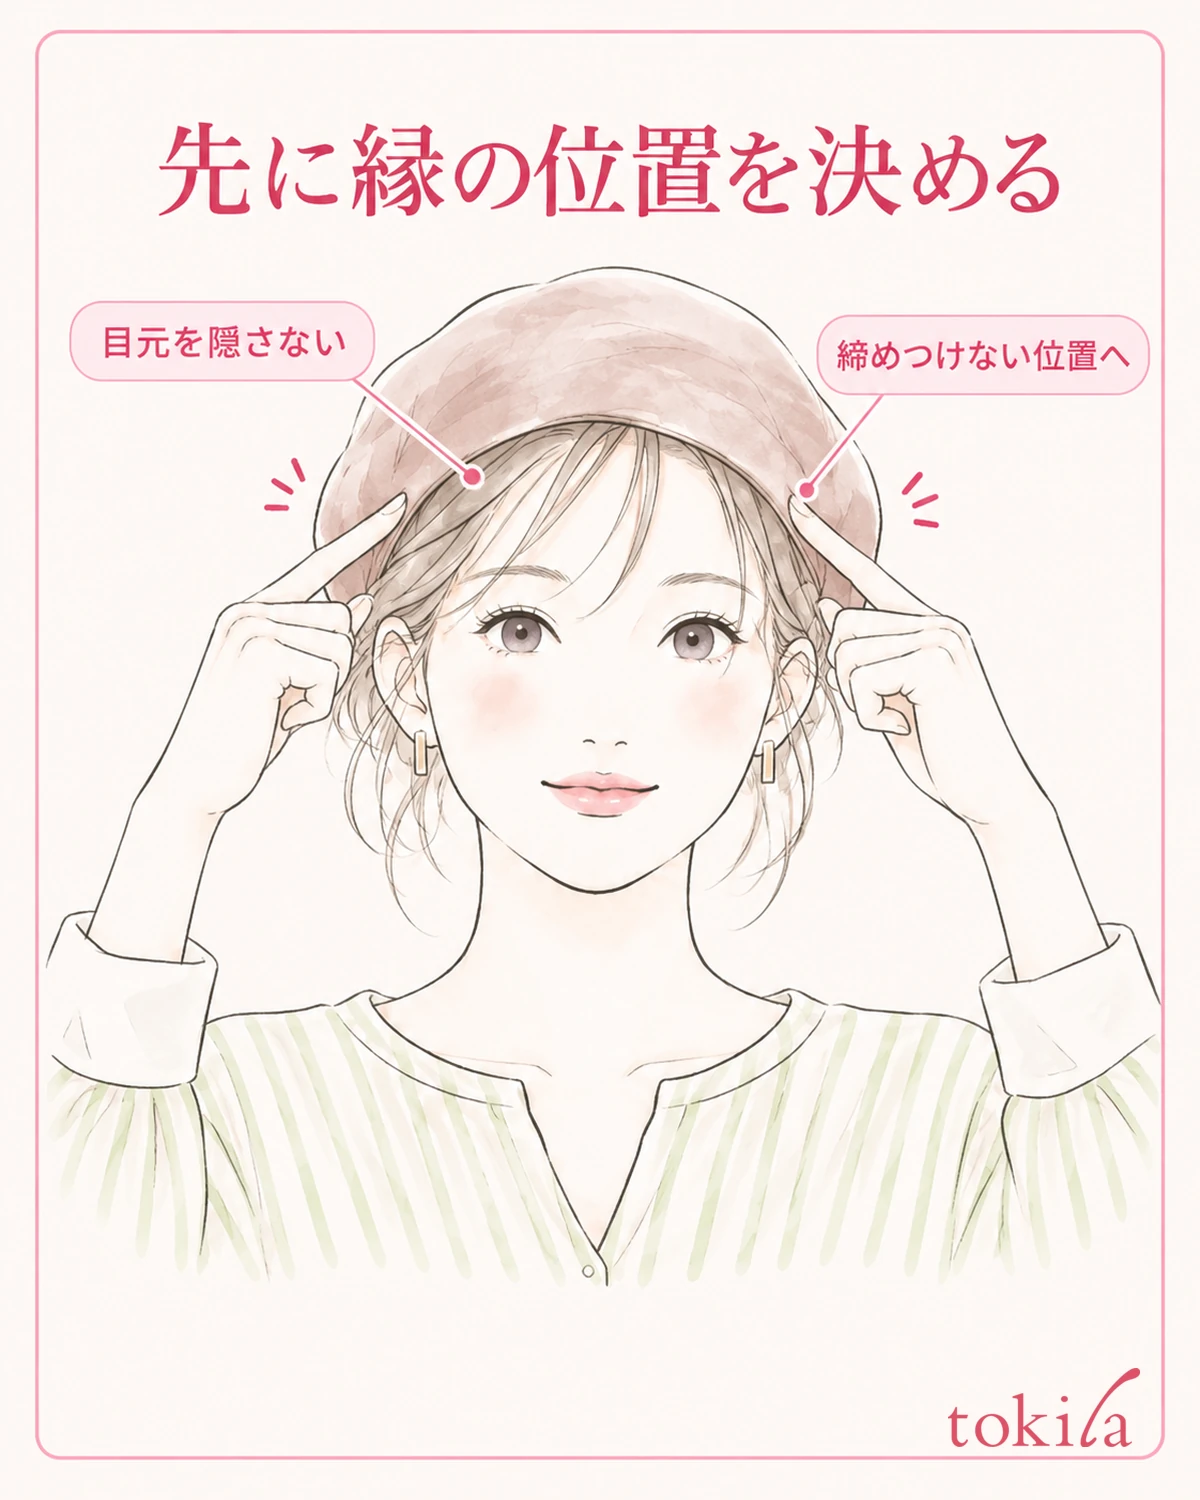
Arrange your hair close to how you usually wear it, and in front of a mirror place both hands on the opening. Instead of pulling on just one spot with your fingertips, support around the hole and put the hat on so that it settles from the forehead side to the back of your head. Rather than pushing it deep right away, look for a position where your head goes in comfortably.
At first, do not tilt it far to the left or right; look at the height of the edge from the front. If the edge is raised on only one side, reposition it before fixing the fullness on top. Also check whether the edge is pulling your bangs or the hair above your ears. You do not need to lower it until it hides your eyes, or put up with a spot that hurts.
A figure like "so many centimeters from the forehead" is not the right answer for everyone. How much you can see changes not only with the shape of your face but with the depth of the hat, your bangs and whether you wear glasses. First check that your eyes are not hidden when you look ahead and that the edge does not press too much, then choose the height you like within that range.
When you want to change the position, do not twist the crown hard while it is on; support it with both hands once, lift it and set it down again. If your hair is being pulled, stop moving and do not try to yank out tangled strands. If your bangs change while you keep putting the hat on again, arrange your hair and then compare again.
At this stage it is fine if the top is a little flat. Use the point where the height of the edge and the comfort are settled as the starting point for adjusting the shape. If the inside has a size adjuster, check its mechanism and how to use it, and take care not to mix it up with pulling on the fabric on top.
Whether the opening sits on your head the same all the way around, check gently by hand above your ears and at the back of your head as well, not only the front that you can see in the mirror. If only the back of the edge is folded, taking the hat off and fixing the fold lets you readjust from the original shape, rather than lowering the height at the front.
3. While Supporting the Edge, Move the Fullness of the Crown a Little
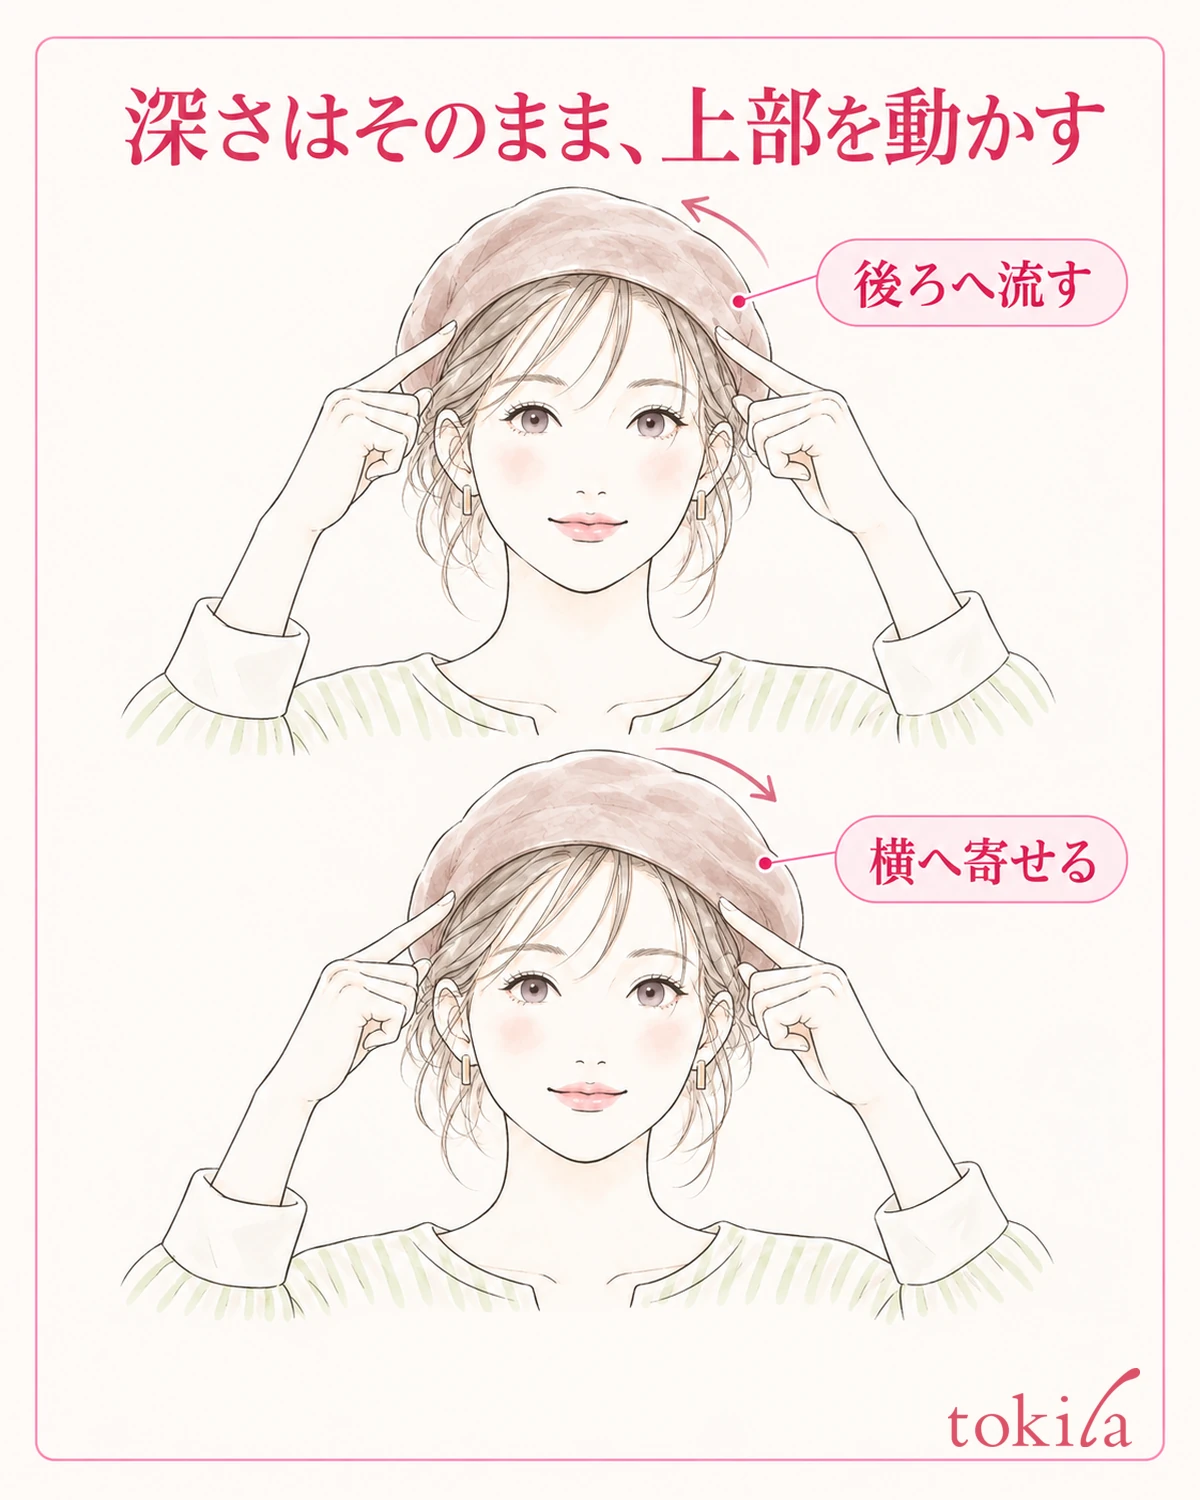
With one hand supporting the position of the edge, lightly lift the extra crown on top with the other. Do not pinch with your nails; use the pads of your fingers, and handle it so you do not damage the felt or fabric. Do not use the method of stuffing something between your head and the hat to create fullness.
First, sweep the crown back a little and check how it looks from the front. After you let go, see whether the edge at your forehead has moved back with it. If you next want to try a shape shifted to the side, return to the baseline state once, and compare by moving only the top to one side at the same depth.
Rather than pulling hard on the side that looks flat, look at where the top is gathering. Move it in small amounts: if the roundness juts out too far forward, move it back a little; if too much extra has gathered on one side, bring it back toward the center. You do not need to aim for perfect symmetry.
If even your face looks different in the mirror, check whether any conditions other than the hat have changed. If you change the angle of your chin, where you stand and your bangs all at once, it becomes hard to tell what came closer to your taste. Try comparing the "swept back" shape and the "shifted to the side" shape in the same posture.
If it returns to its original shape naturally after you move it, the edge rides up, or an unnatural crease forms on the surface, do not try to fix it in that shape. The shapes a hat can take are limited by its size and construction. Before changing the shape with heat or water, check the care label or the place of purchase, and keep daily adjustments within the range that moves comfortably by hand.
If you keep photos for comparison, take them in the same place and from the same distance. Do not look closer at only one of them or change to a camera angle looking up; frame it so that both the outline of the hat and the edge at your forehead are in the picture. Use the photos as notes for looking back at your own shape.
4. Arrange Your Bangs and Around Your Ears, and Check the Sides and Back Too
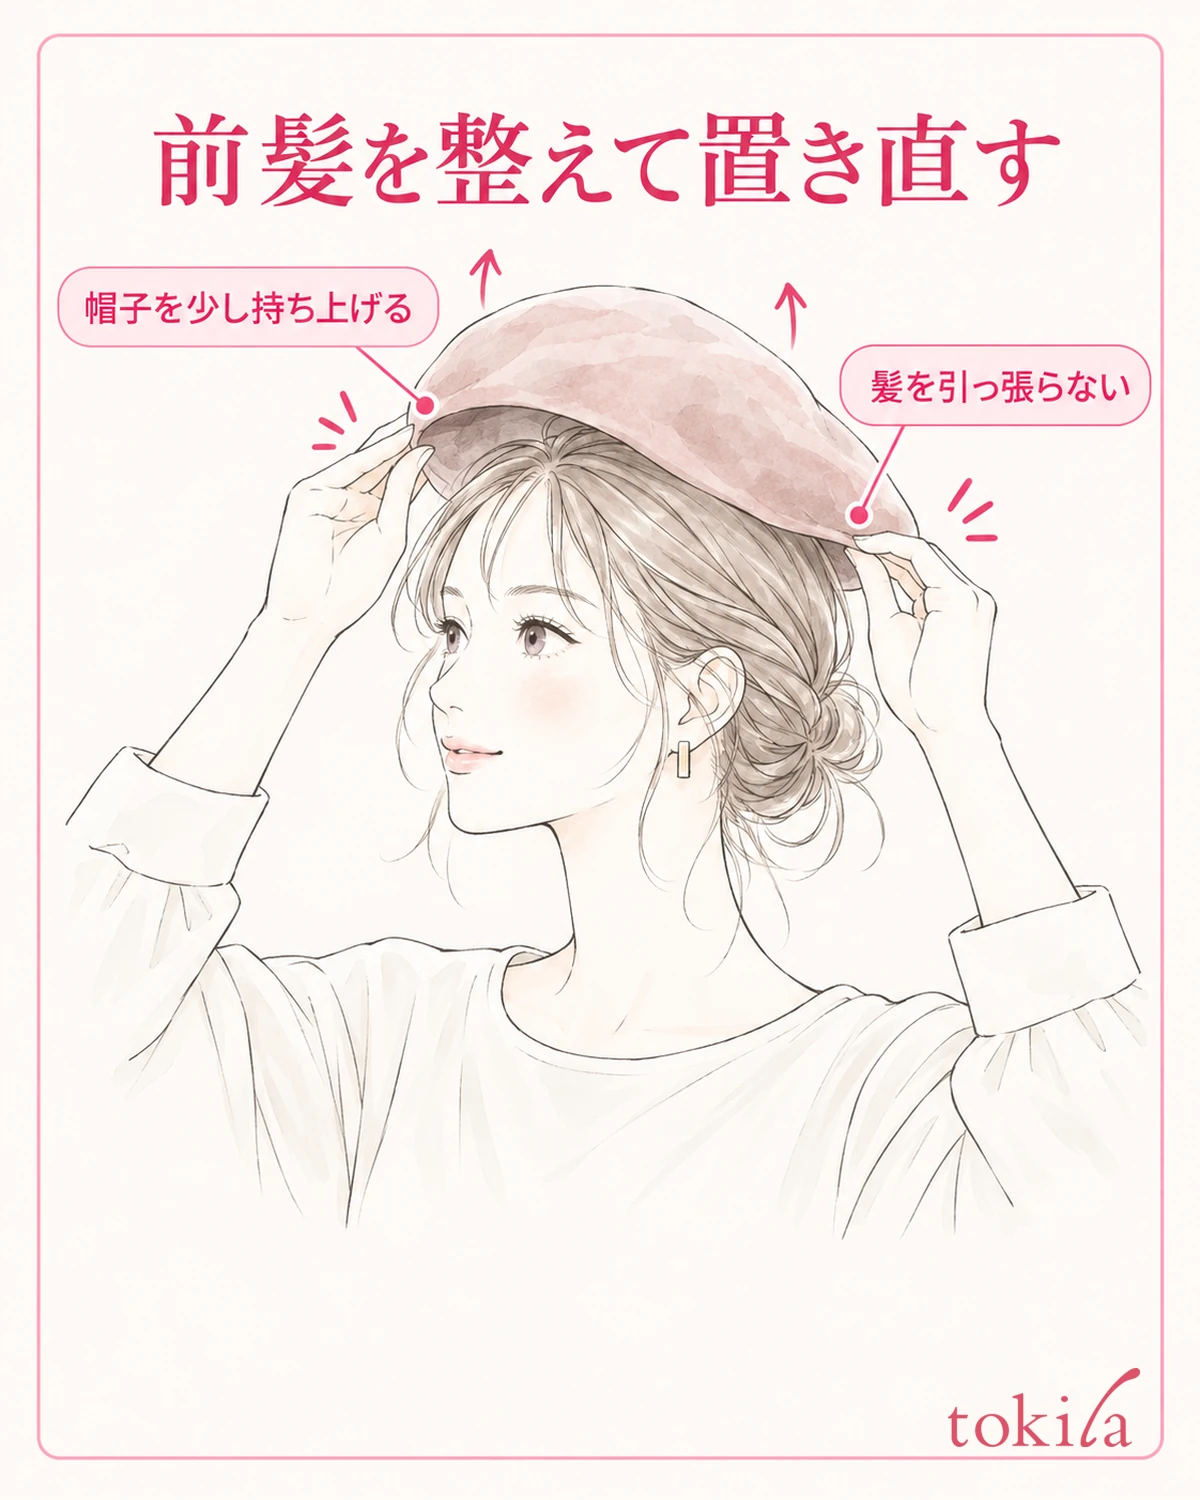
Once the shape of the hat is decided, arrange the hair that comes out from under the edge. You can choose how to show it to your taste: bring out your bangs, show your forehead, or tuck hair behind just one ear. Instead of changing everything from the start, arrange the hat with your usual hairstyle first, then move your hair in just one place, and it is easier to compare.
When the edge rests on top of your bangs and presses at the roots, do not try to fix it by pulling out only the ends. Support the hat, lift it a little, arrange your bangs and set it down again. Pulling the ends down hard changes the position of the edge and the shape of your hair together.
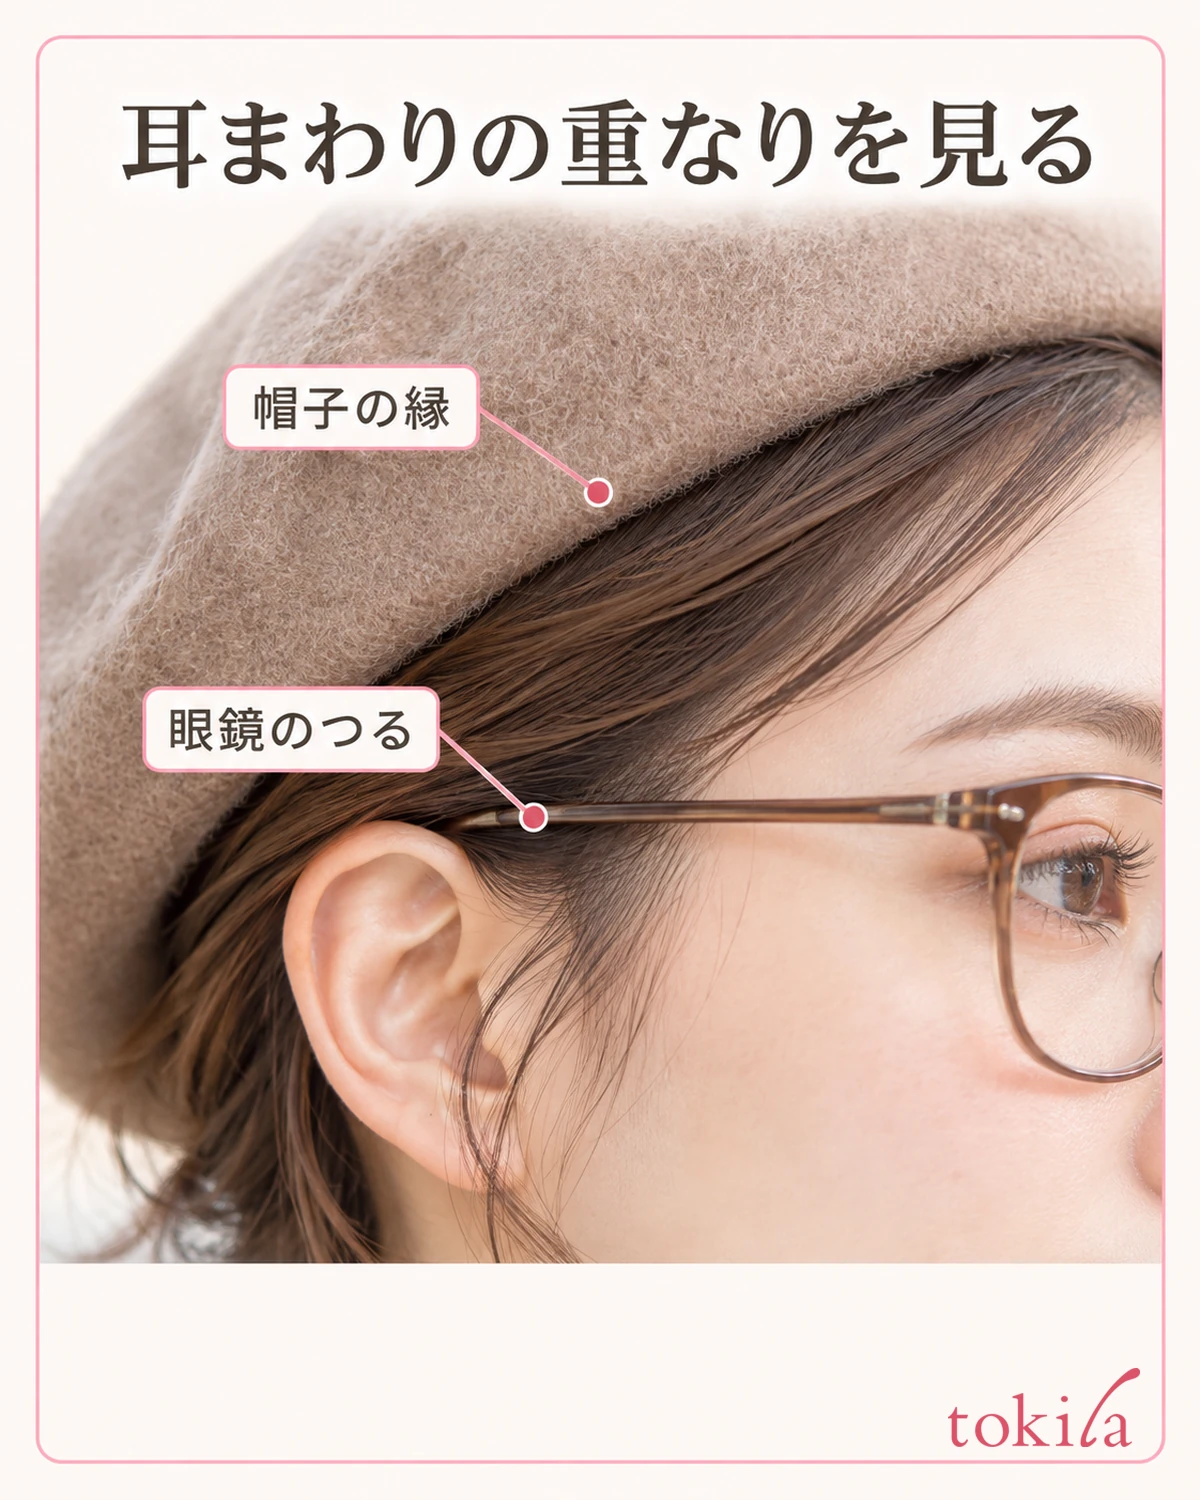
If you tuck hair behind your ear, check that the edge of the hat, your hair, the temple of your glasses and so on do not overlap in the same spot. If it is cramped behind your ear, review the overlap and the position before tilting the top far over to hide it. You do not need to put up with something that hurts to the touch for the sake of looks.
Check your appearance with your face turned to the side in the mirror, not only from the front. You may look at the shape of the back with a hand mirror or a photo, but do not judge only from how you look with one hand holding the hat. The key is to look at the edge and the place where the crown settles when both hands are released.
On days you wear your hair up, also check whether the knot is pushing the crown up. Rather than retying your hair tightly for the hat, compare the position of the knot and how it overlaps with the hat. For how to tuck the ends, also refer to steps for tidying the ends of a bun, and think of it separately from your own hairstyle.
On days you have large accessories or earrings, also check whether they catch when you put the hat on and take it off. You can choose to change the order of getting ready, such as not pressing hard on your ears with your hands and taking off anything that catches first. Arrange your hair and accessories, then return to the shape of the hat.
5. Look at the Whole Look With Your Clothes, and Protect the Shape Until You Take It Off
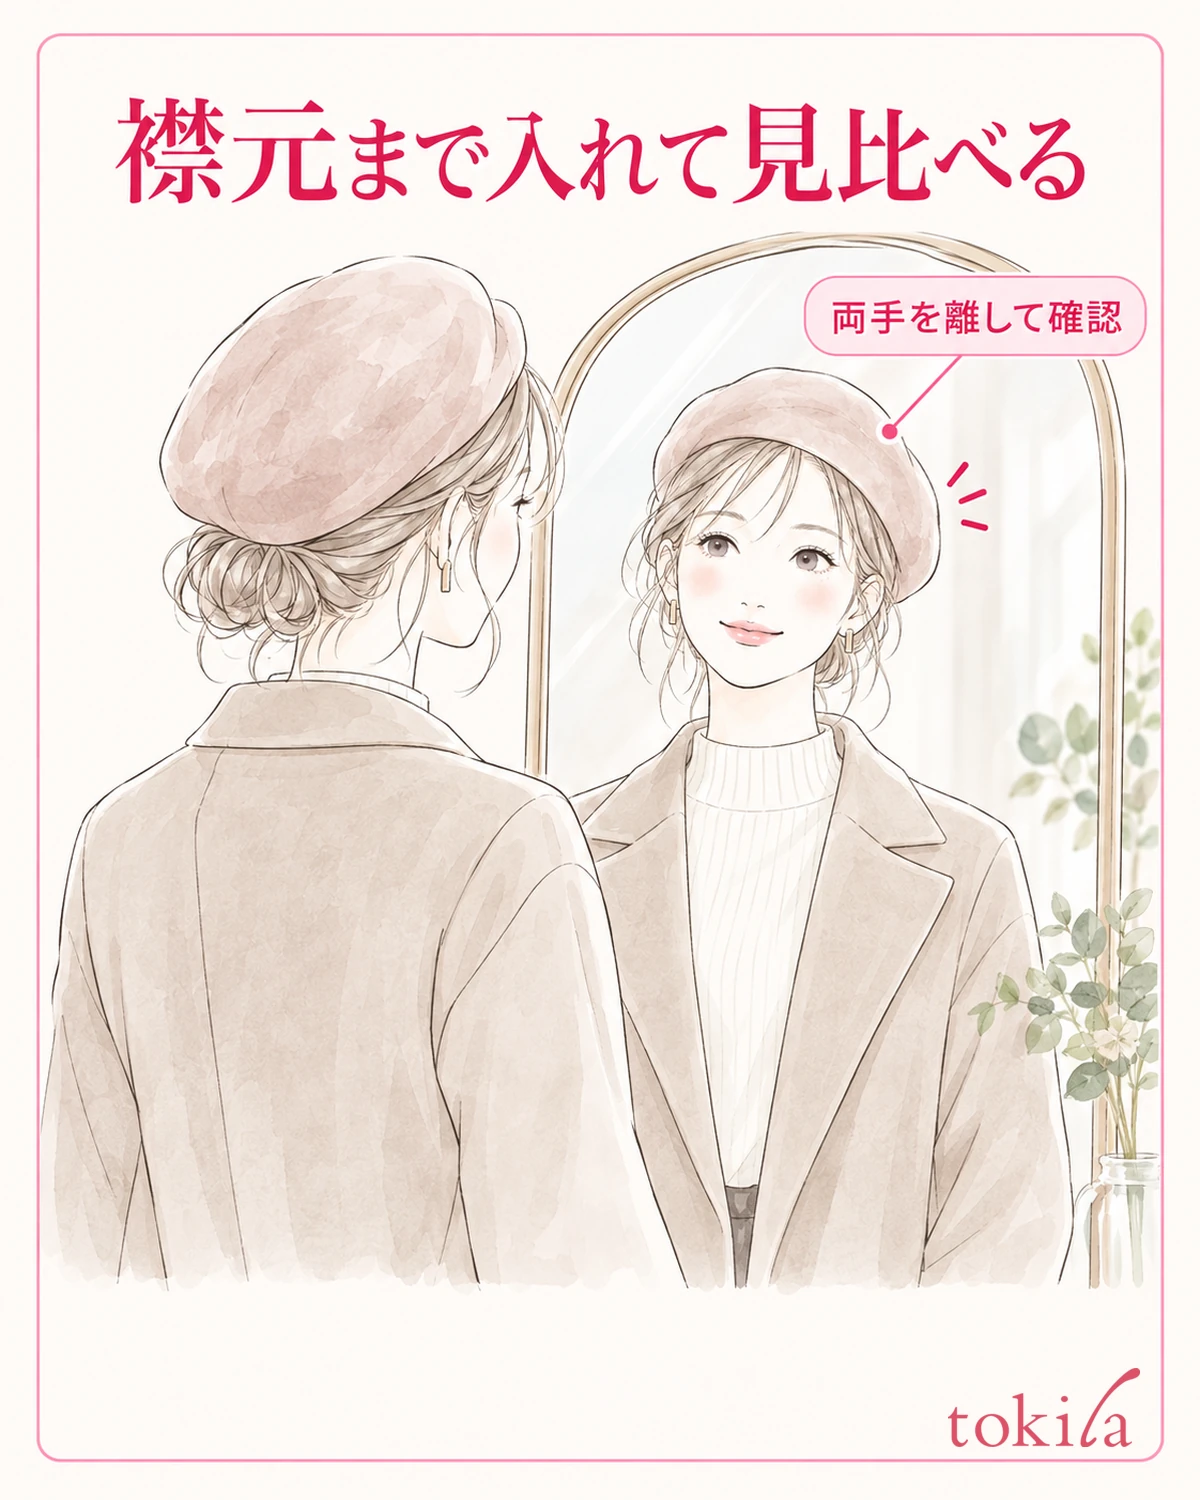
To finish, put on the top or jacket you will wear out and step back a little from the mirror. The fullness may feel large when you look only near your face, but the impression can change once your shoulders and collar are included. Rather than bringing just the hat closer to an ideal photo, look for the shape you like together with the clothes of the day.
If you want to change it a bit more, decide which to adjust among the depth of the edge, the direction you tilt the crown and how you show your hair. For example, compare by keeping the depth as it is and moving only the crown back. Instead of changing everything at once, check how the look changes with a single move.
After walking a short way or turning your face from side to side, stop indoors and look at the position of the edge. Do not try to shape a hat that seems about to fall off by making it even shallower. If the size or construction may not suit you, reconsider using it, and avoid continuing to adjust the shape outdoors on a windy day.
When you take it off, do not pull only on the knob or decoration on top; support around the crown and the opening with both hands. Check that you have not caught your hair, then lift it off comfortably. As for where you put it, also avoid placing it under heavy bags or in a narrow gap that crushes the fullness, and choose a storage method suited to the product.
Care follows the material and the label. Even if sweat or dirt bothers you, do not assume that felt can be washed or that a knit can be stretched back into shape. The next time you wear it, start from the position of the edge, and trying a tilt you like is enough.types of hats and the basicstoo, and enjoy a shape that feels comfortable with the one you already own.
When you find a shape you like, remember it briefly, such as "edge at this height, crown a little back." Your hairstyle and clothes will be different the next day, so it is fine not to reproduce exactly the same look. Check the comfort first, and make it your basic approach to look for a shape that feels settled in the mirror that day.



