Want clustered lashes, but adding more of your usual mascara only makes the tips thicker? Before adding more formula, look at your applicator. Some mascaras designed for clustered lashes use separate sides to apply the formula and group the hairs, while others finish with a single comb.
Here we outline the preparation and movements for your first use of a cluster-lash mascara. The aim is to watch the lashes group together and stop where you like, rather than create large accidental clumps. Follow your product’s instructions without applying the same number of strokes or grip to products with different directions.
1. Read how the product creates clusters and what each applicator part does
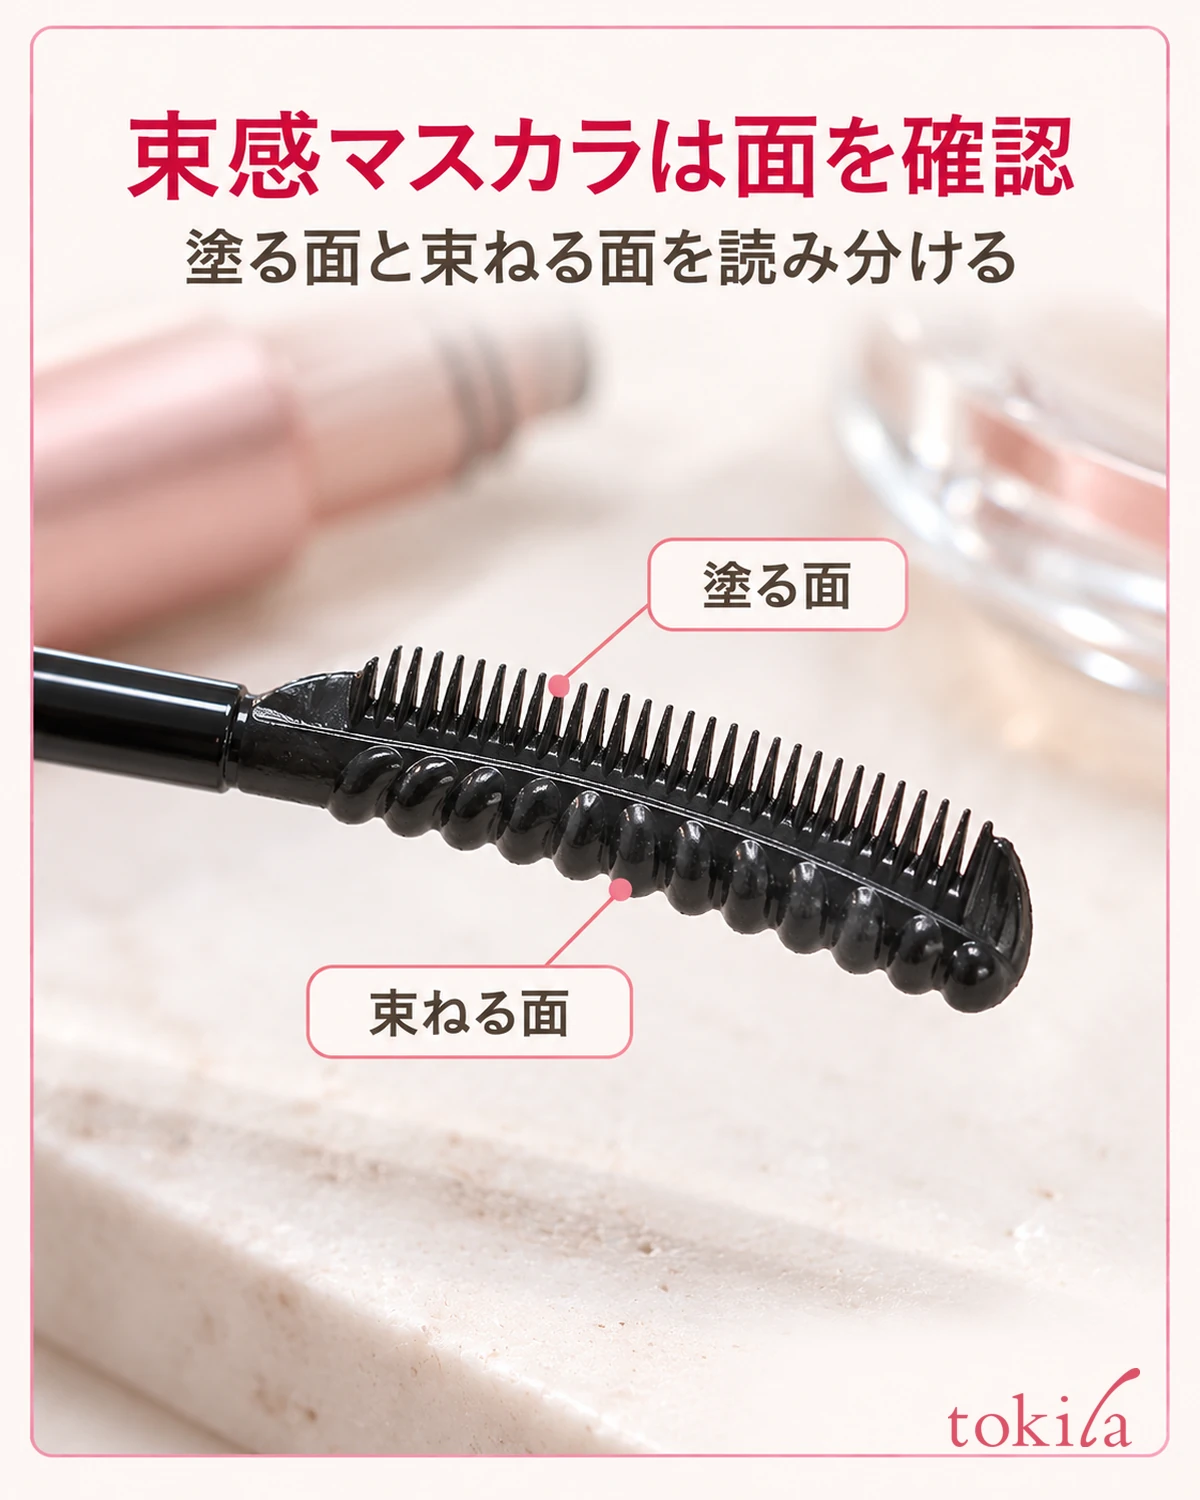
First, read the directions on the container or outer box to identify which part applies the formula and which creates clusters. With designs that use both a row of comb teeth and a coiled part, their roles differ even if they look similar. Check which side faces you when holding the cap before bringing it near your eyes.
Another design uses a slim metal comb from roots to tips, building your preferred grouping through additional coats. Do not transfer instructions for moving a coil sideways directly to a metal comb. Rather than making side-to-side movement a universal step, read each product’s directions as one complete procedure.
When comparing applicators in photos, do not judge their roles solely by the material’s color. Look for a row of teeth or a spiral section, and check whether the shape and position match the instructions. Also distinguish a separate finishing comb from an applicator that goes back into the formula’s container.
For metal applicators, check for any warnings about metal allergies. You cannot simply conclude that a slim shape will suit you or a thick one will create larger clusters. Read the finish description, precautions, and removal instructions together before preparing.
If layering with a primer, read the order and drying instructions for both products. A cluster-lash mascara does not necessarily require primer. If applying another product first, also check when to apply mascara primer and prepare without extending or shortening the waiting time on your own.
2. Set up a mirror that shows the applicator, and prepare lashes and formula
Place your mirror somewhere stable, at a distance where you can see your lashes and the applicator tip. Setting the angle beforehand makes movements easier to check than switching hands with a handheld mirror while moving toward your face. Choose a spot where you can comfortably support your elbow or hand and nothing will bump into you.
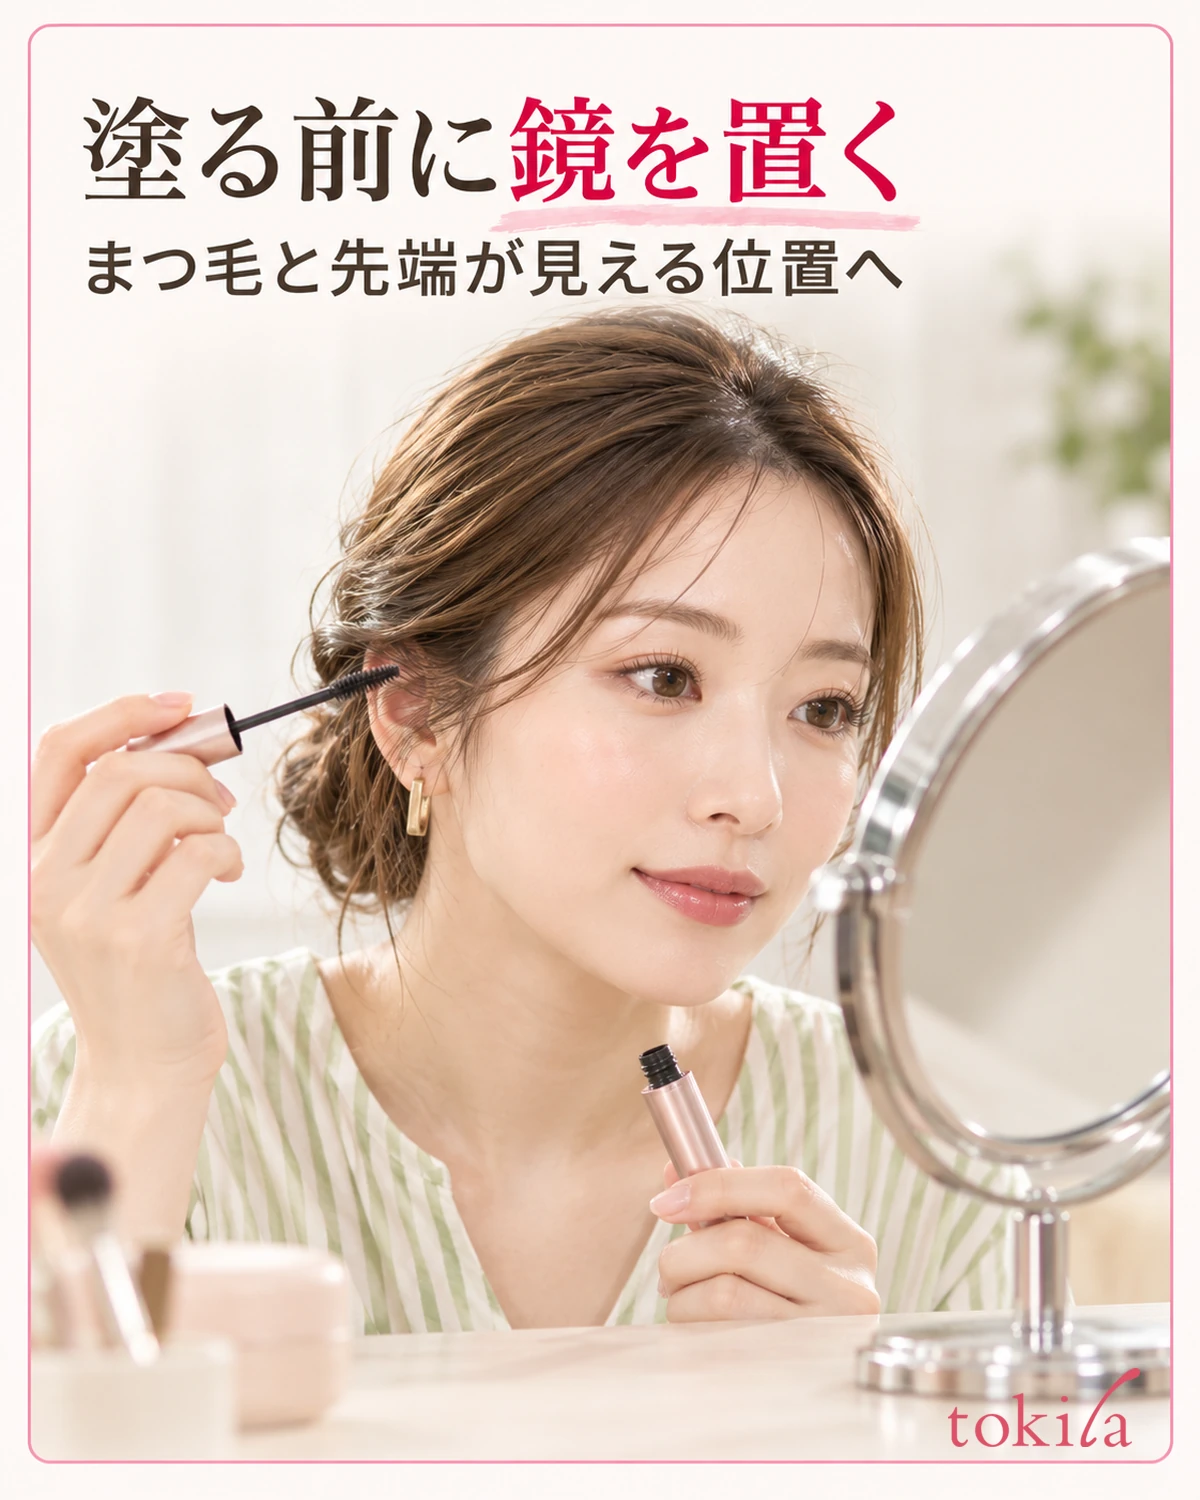
If your product instructs you to curl your lashes first, do that preparation beforehand. Do not move pre-mascara eyelash-curling steps to after application on your own. If the eye area has any abnormality, follow the precautions rather than prioritize practicing the shape.
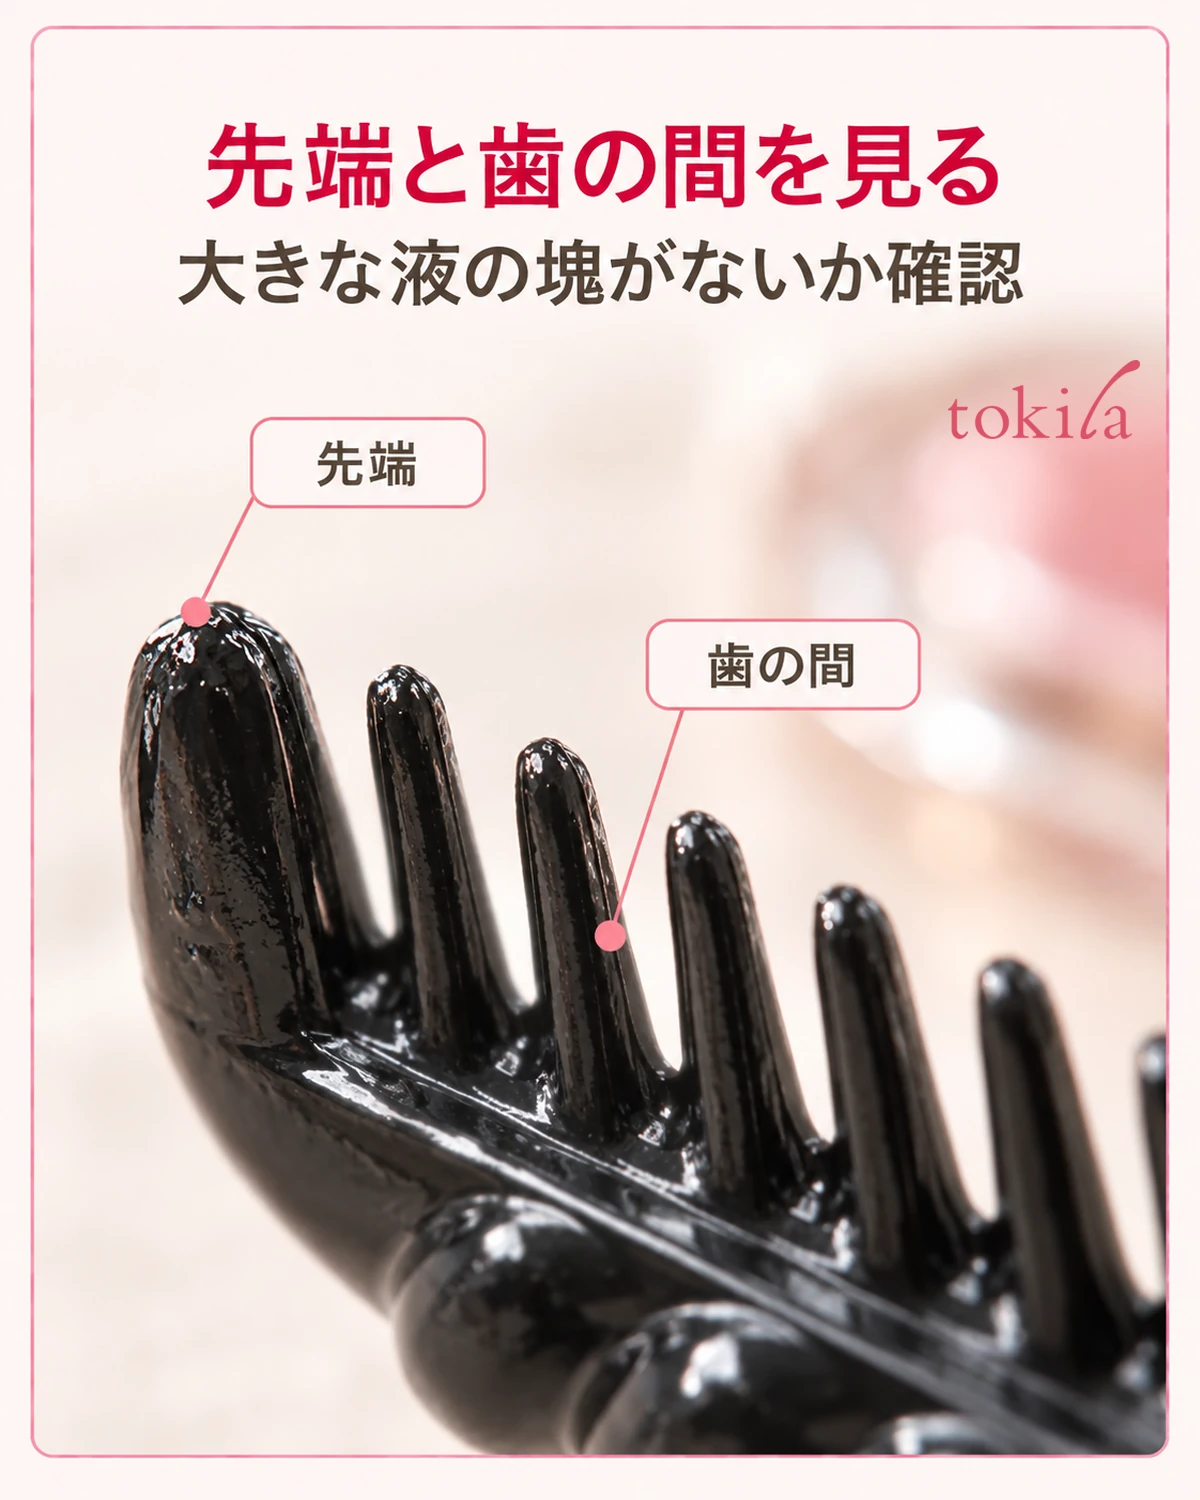
After taking the applicator out, hold it away from your eyes and look for large pools at the tip or lumps filling the spaces between teeth. In the photo, check whether you can see between the teeth and whether a round lump remains at the tip, rather than focusing on the formula’s color. Do not treat the photographed quantity as suitable for every product.
Adjust the formula amount according to the product’s instructions. Do not add steps such as repeatedly scraping hard or thinning it with water or toner. If the formula or applicator has changed before use, return to the storage and expiration guidance rather than bring it straight to your lashes.
On your first day, allow time to assess the finish and, if necessary, remove it and start again. Before rushing to add clusters, arrange things so you can see your grip and eye area at the same time. Do not share the applicator, and keep a removal product within reach.
Even when aiming for a similar finish on both sides, return to a front-facing view occasionally instead of tilting your face and watching only one eye. Changing the mirror lighting significantly midway can alter how cluster shadows and intensity appear. Alternate between a close view of your hand and a slightly more distant view of both eyes, judging under the same lighting.
3. Apply formula with the application side and check before grouping
For a product that applies formula with a comb before grouping lashes with a dedicated coil, use the comb first. Move from the root area toward the tips in the instructed direction, separating formula application from cluster formation. Watch the part touching your lashes in the mirror, without pressing it onto eyelids or mucous membranes.
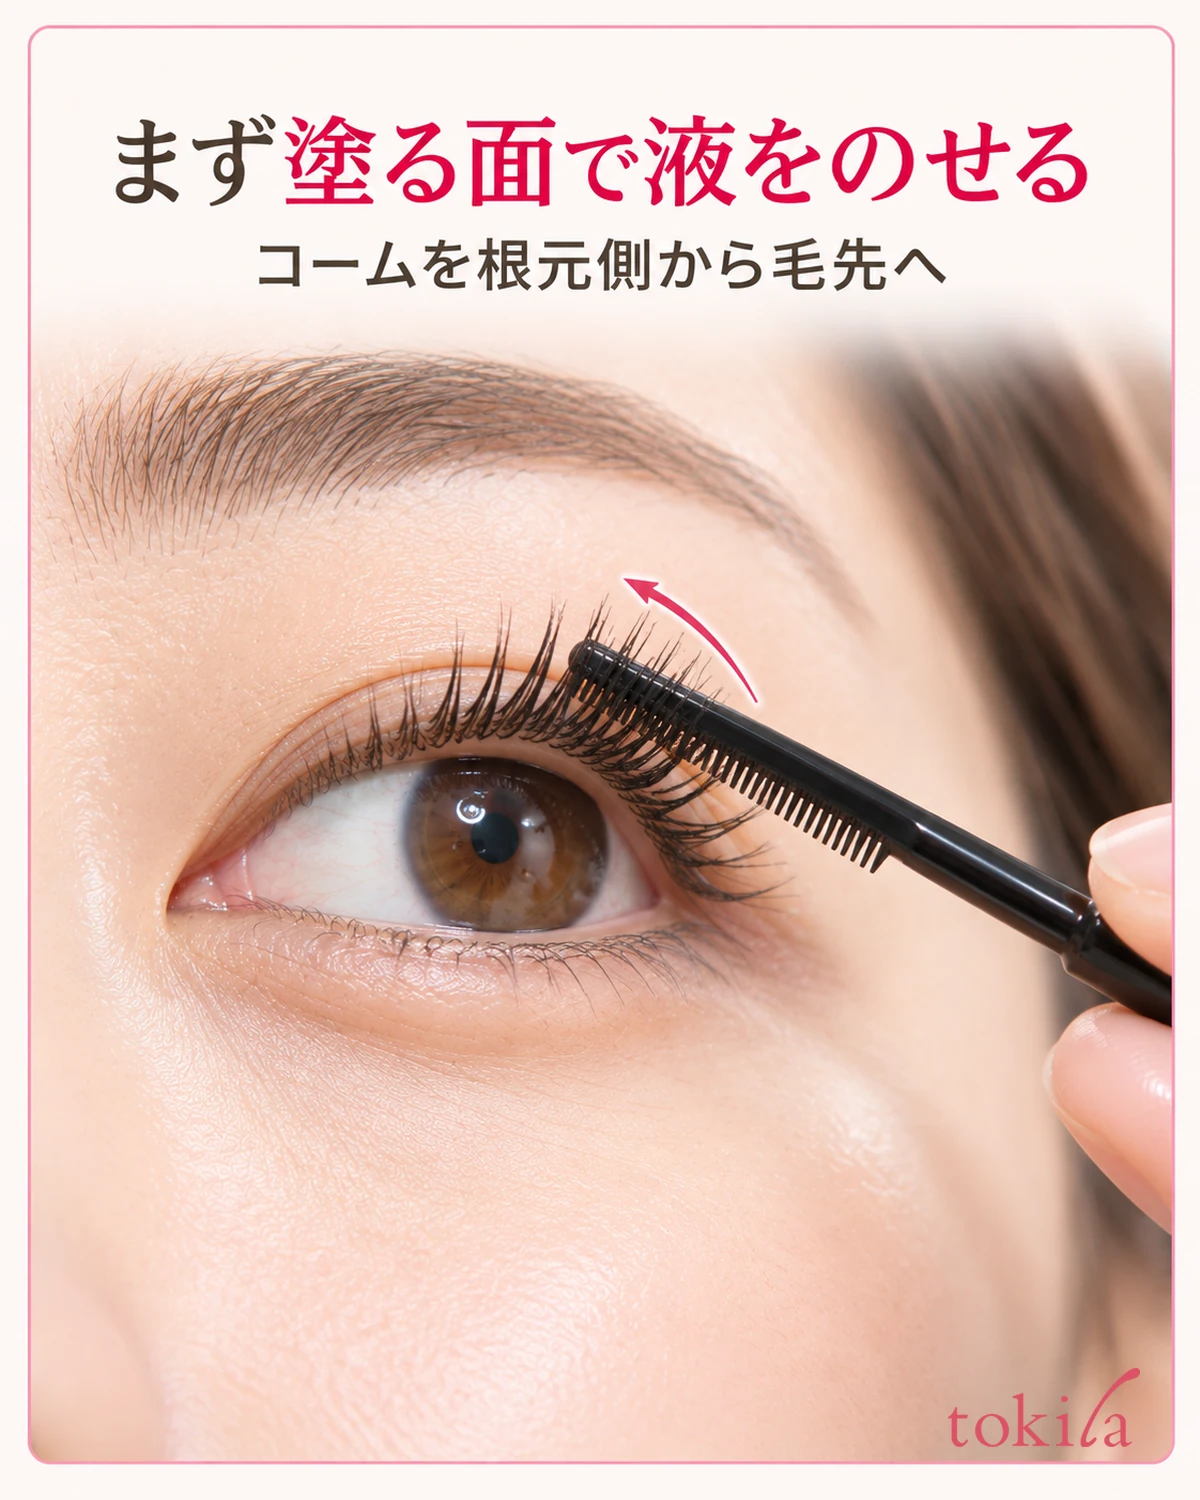
Instead of collecting formula only on the tips from the start, check whether it covers the area specified by the product. If moving from inner to outer corner in one motion makes your hand hard to see, move the applicator away, adjust the angle, then continue to the next area. Avoid repeatedly tracing an unseen area by feel.
The supplementary photo shows the relationship between the toothed side and spiral section when viewing the same applicator from different directions. Knowing which side you are using helps you notice if application has unintentionally turned into grouping. If your product has a different structure, prioritize its own diagram.
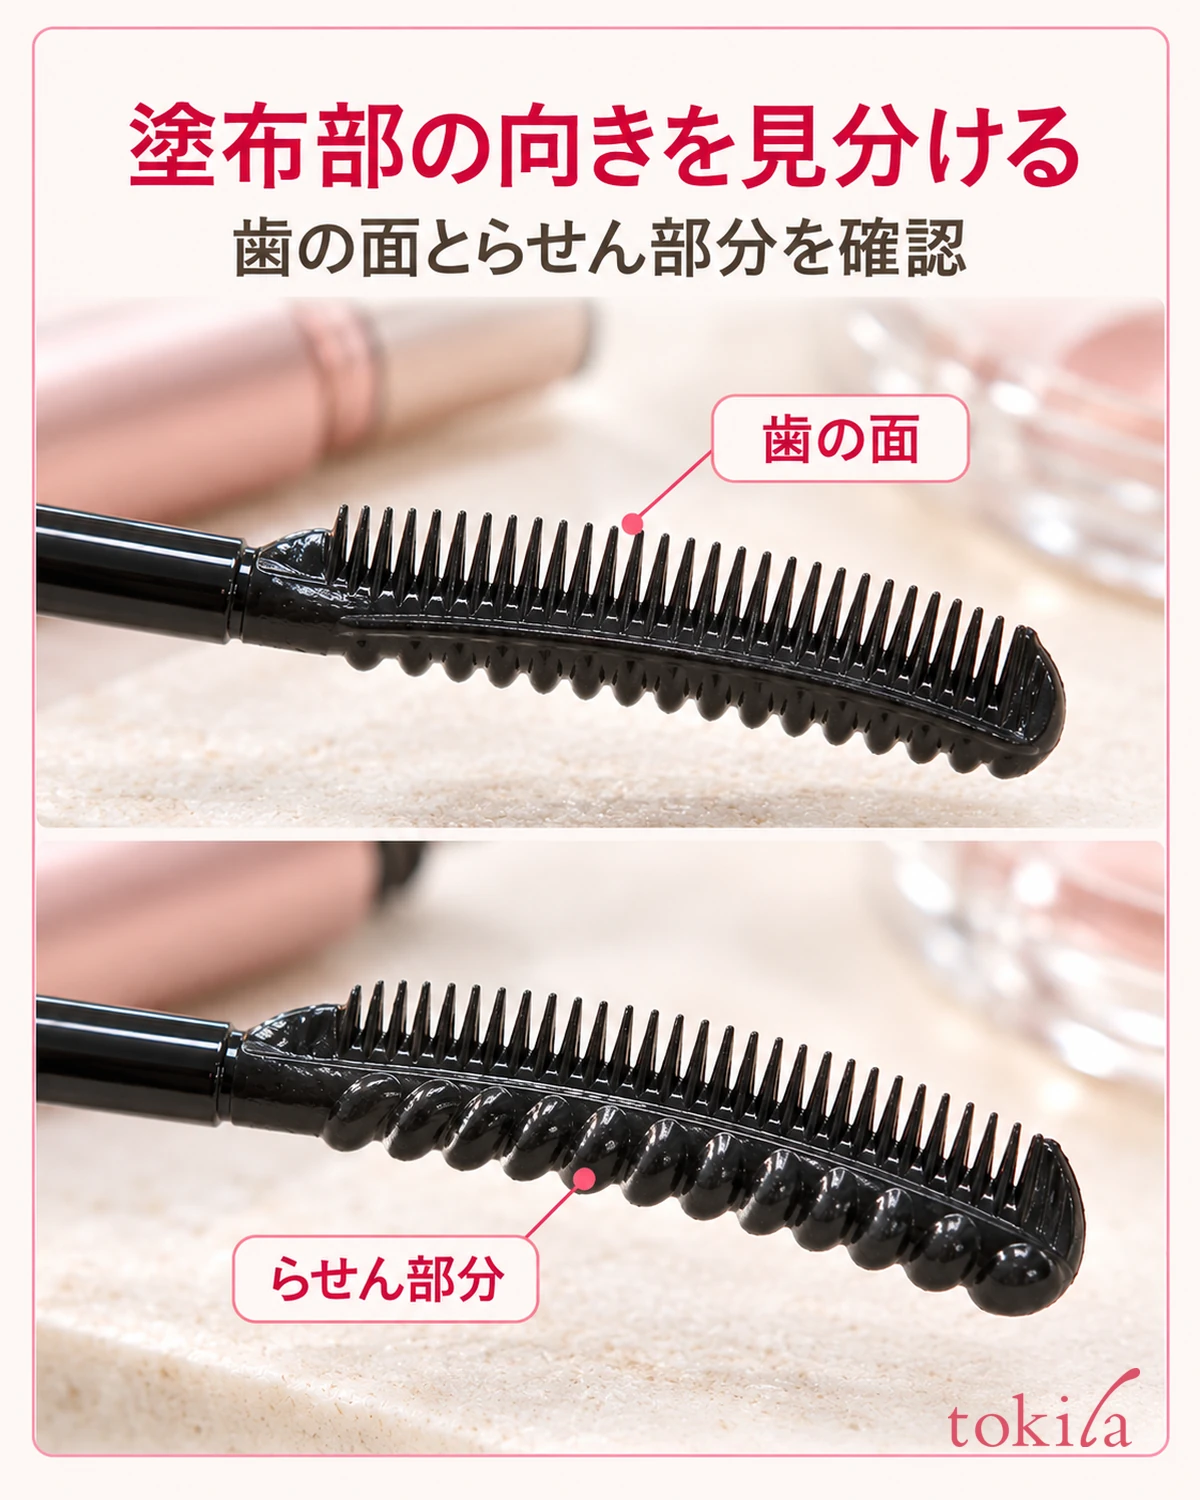
After applying formula to one side, check the instructions for when to move to the next action. Do not set a universal drying time in seconds or require complete drying before grouping. Follow the product you are using rather than applying the same waiting time to formulas that dry differently.
If formula gets onto your skin during application, do not keep clustering to try to hide it. Follow the warnings for formula entering the eye as well. Formula on lashes and dots on skin require different corrections, so identify where it landed before responding.
4. Switch to the grouping side and finish while watching the clusters
With a product that forms clusters using a dedicated coil, turn to the instructed side after applying formula. If directed to move sideways near the roots before drawing through to the tips, check that product’s specified movement. Do not reuse the number of strokes or movement width with other products.
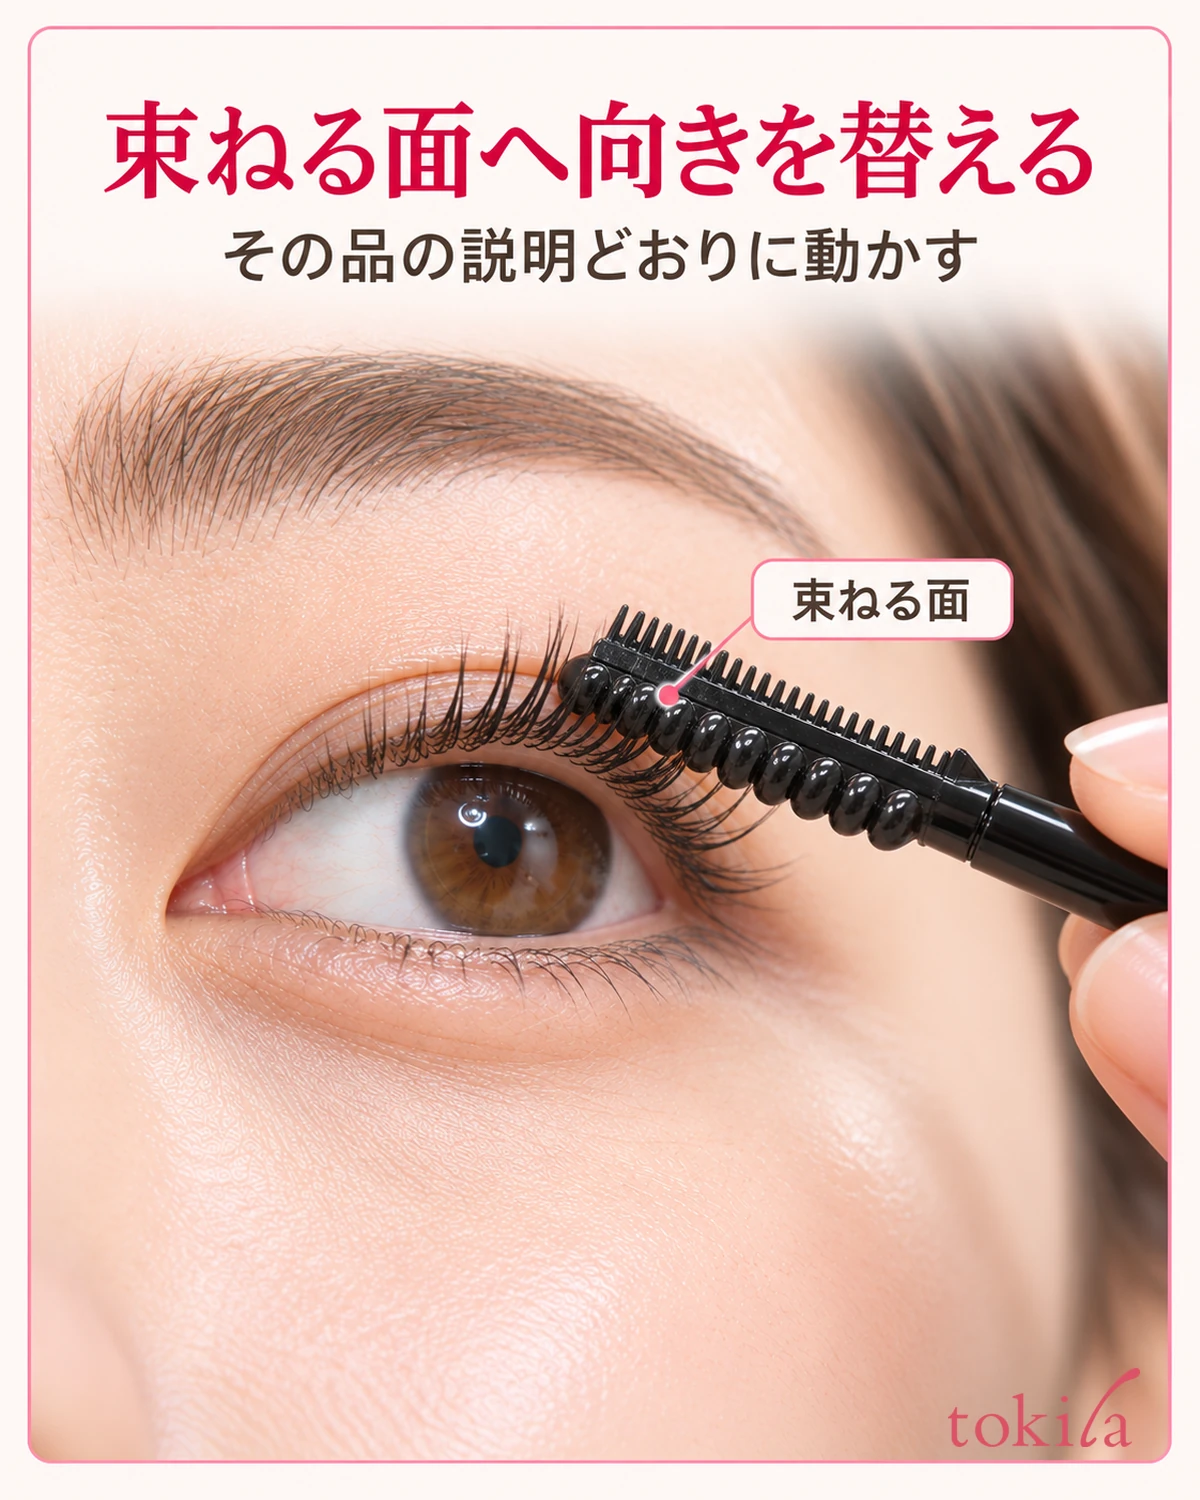
Watch where the hairs are grouping instead of aiming for large, fast hand movements. If the product instructs you to draw through to the tips after clusters form, follow that sequence. Do not point the tip toward the eyeball or press the roots firmly against skin to increase clustering.
For a design that finishes with a single metal comb, follow its application and layering method. Do not substitute pinching with another sharp tool because it has no dedicated coil. This article does not cover adding tweezers or needles near the eyes to form clusters.
After one movement, take the applicator away from your eyes and check the finish. The inner corner, center, and outer corner do not need equal thickness or cluster counts. Lashes grow differently on each side, so use the front-facing intensity and your preferred grouping as a guide rather than mechanically matching strokes or hairs.
Even if it feels insufficient, consider which area you want to add to instead of immediately coating both eyes again. Checking your whole face with eyeliner and eyeshadow finished can help you avoid endlessly intensifying the lashes alone. Stopping where you like is part of finishing.
If just one cluster looks too thick, first stop adding fresh formula and locate it. You do not need to darken everything to make the surrounding clusters equally thick. If you cannot adjust within the product’s directions, you can leave it without adding more that day and review the initial amount or movement next time. Distinguish this from responding to abnormalities or snagging.
5. Distinguish intentional clusters from grainy clumps, and check removal
When assessing the finish, distinguish grouped hairs from irregular grainy clumps attached to the tips. Even on days when you enjoy clustered lashes, you need not endure snagging lumps or pain. Treat creating a shape separately from responding to an abnormal condition.

Rather than pulling dried, hardened formula with your fingers or repeatedly pinching it with a tool, remove it using a method suited to the product. For help identifying the problem, see how to apply mascara to prevent clumps and correct them. Focus on what you want to correct instead of undoing all intentional clusters.
Check removal for the mascara together with any primer or other layered products. Do not choose one removal method from the word “waterproof” alone; follow instructions for warm water, cleanser, or dedicated remover. Avoid forceful rubbing that pulls out entire clusters, and use steps that do not tug on hairs.
After use, follow the care instructions, such as tidying the container opening and closing the cap. Do not remove and rinse an applicator that returns to the formula container on your own or substitute one from another mascara. Stop use if redness, itching, irritation, or other abnormalities occur, and consult a dermatologist if they persist.
For next time, briefly record which side you used, where you added more, and where you stopped. Clustered lashes are not a contest to produce a fixed number in one attempt. Identify the application and grouping sides, follow your product’s movements, and choose the finish you like in the mirror. Start with that sequence and enjoy adapting it to your eyes.